Yamaha DD-75 DD-75 Owners Manual - Page 15
Using a Snare Drum Stand, Setting Up, To install the snare drum stand
 |
View all Yamaha DD-75 manuals
Add to My Manuals
Save this manual to your list of manuals |
Page 15 highlights
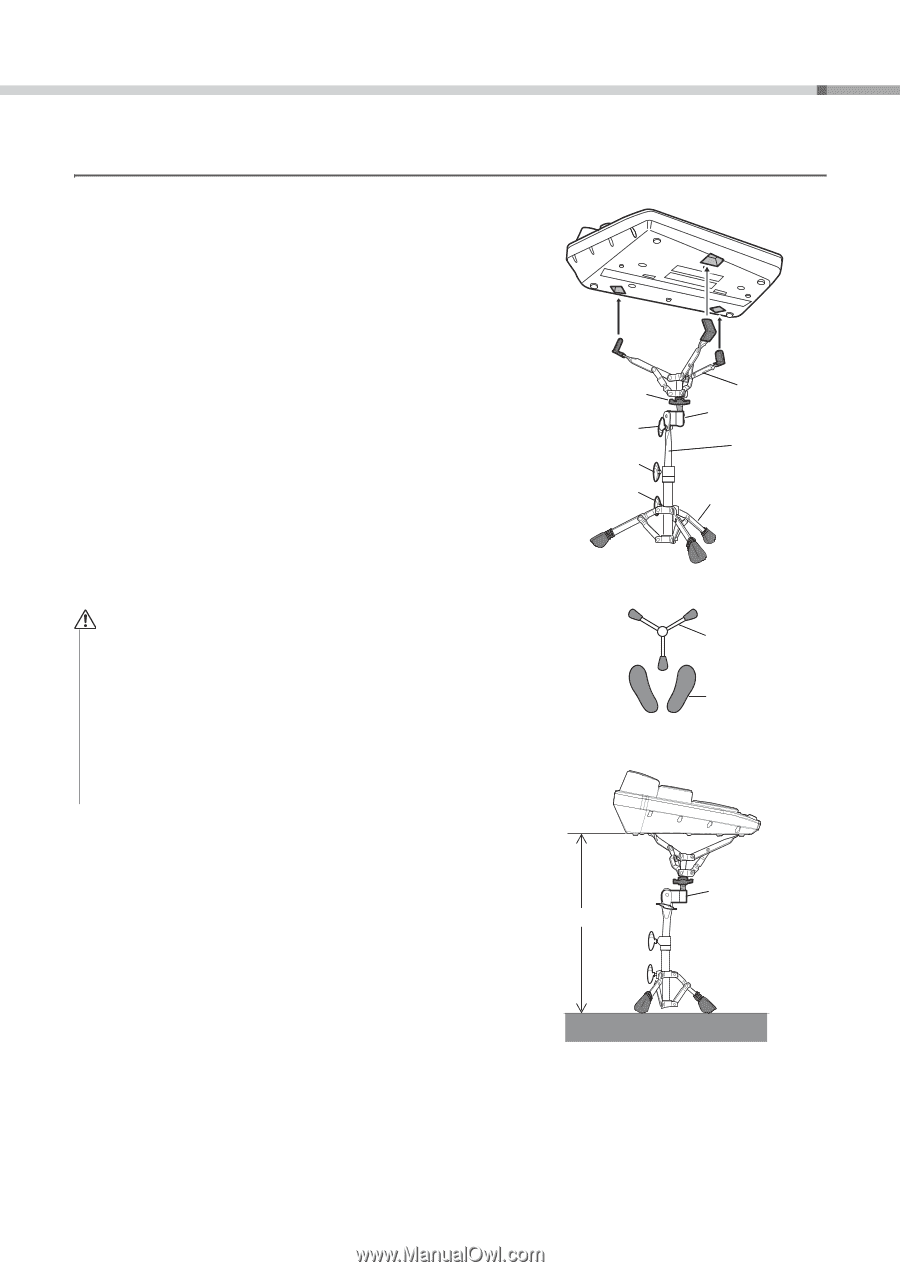
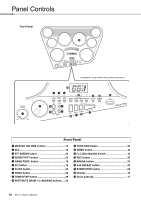
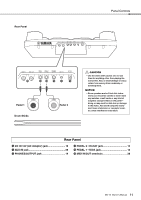
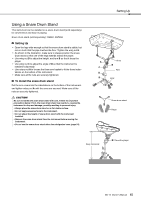
Using a Snare Drum Stand This instrument can be installed on a snare drum stand (sold separately) for convenience and ease in playing. Snare drum stand (sold separately): SS662, SS740A Setting Up • Open the legs wide enough so that the snare drum stand is stable, but not so much that the pipe touches the floor. Tighten the wing nut E. • As shown in the illustration, make sure to always position the snare drum stand so that one of the legs extends toward the player. • Use wing nut D to adjust the height, and turn B so that it faces the player. • Use wing nut C to adjust the angle of B so that the instrument is installed horizontally. • Use rotary nut A to loosen the three arm basket to fit the three indentations on the bottom of the instrument. • Make sure all the nuts are securely tightened. To install the snare drum stand Put the arm covers into the indentations on the bottom of the instrument, and tighten rotary nut A until the arms are secured. Make sure all the nuts are securely tightened. CAUTION Be sure to handle the snare drum stand with care. Follow the important precautions below. If not, the snare drum stand may overturn, causing the instrument to drop and damage, possibly resulting in personal injury. • Always place the snare drum stand on a flat, stable surface. • Do not apply excessive force to the instrument. • Do not adjust the height of snare drum stand with the instrument installed. • Remove the snare drum stand from the instrument before moving the instrument. • Do not use the snare drum stand other than designated ones (page 54). Setting Up A Arms B C Pipe D E Legs Snare drum stand Player Keep horizontal B: Faces the player DD-75 Owner's Manual 15
-
 1
1 -
2
-
3
-
4
-
5
-
6
-
7
-
8
-
9
-
 10
10 -
 11
11 -
 12
12 -
 13
13 -
 14
14 -
 15
15 -
 16
16 -
 17
17 -
 18
18 -
 19
19 -
 20
20 -
21
-
22
-
23
-
24
-
25
-
26
-
27
-
28
-
29
-
30
-
31
-
32
-
33
-
34
-
35
-
36
-
37
-
38
-
39
-
40
-
41
-
42
-
43
-
44
-
45
-
46
-
47
-
48
-
49
-
50
-
51
-
52
-
53
-
54
-
55
-
56
-
57
-
58
-
59
-
60
 |
 |