Yamaha DTX500 Owner's Manual - Page 34
Trigger Setup Edit, Trigger Setup procedure - problems
 |
UPC - 086792942155
View all Yamaha DTX500 manuals
Add to My Manuals
Save this manual to your list of manuals |
Page 34 highlights
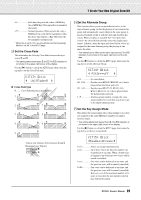
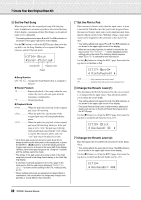
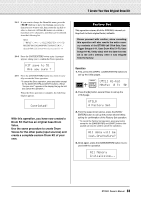
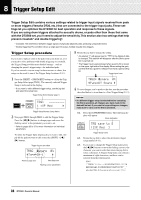
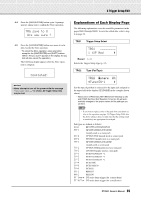
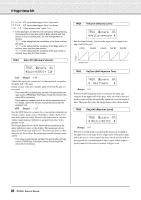
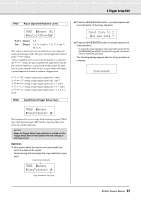
8 Trigger Setup Edit Trigger Setup Edit contains various settings related to trigger input signals received from pads or drum triggers (Yamaha DT20, etc.) that are connected to the trigger input jacks. These settings let you optimize the DTX500 for best operation and response to these signals. If you are using drum triggers attached to acoustic drums, or pads other than those that came with the DTX500 set, you'll need to adjust the sensitivity. This section also has settings that help prevent crosstalk* and double triggering*. * Crosstalk: The interference between trigger signals of physically adjacent pads, producing unexpected notes. * Double triggering: The condition where a single pad hit causes multiple (usually two) triggers. Trigger Setup procedure If you want to replace some of the pads from your drum set, or if you need to solve problems with double triggering or crosstalk, the Trigger Setup provides more detailed settings-such as changing the preset's trigger setup-for individual pads. If you've created a custom setup for these reasons or others, that setup can be saved to one of the Trigger Setup locations (8-11). 3 Rotate the jog dial to change the setting. * An asterisk "*" will appear next to "TRG" in the display if data is changed. This asterisk will disappear after the Store operation is carried out. * The Trigger Input Level produced when a pad is hit is shown on the upper right side of the display. When setting the gain, use this level as a guide to measure how hard a pad is being hit. Trigger Input Level 1 Press the [SHIFT] + [DRUM KIT] buttons to call up the Trig- ger Setup Select page (TRG1). The currently selected Trigger Setup is indicated in the display. * If you want to edit a different trigger setup, use the jog dial and select the setup here. Trigger Setup Select display (page 1) TRG1 1~:XP~Med~~~~~~, Trigger Setup Number: Setup Name 2 Use pages TRG2 through TRG8 to edit the Trigger Setup. Press the [] buttons to change pages and move the flashing cursor to the parameter you want to set. * Refer to pages 35 to 37 for more information on individual parameters. To select the Trigger Input (input jack) you want to edit, simply hit the pad you want to edit or use the [SHIFT buttons. Trigger Input to be edited TRG2~ ƒsnare~~0% "Type=SN-1~~~~~, Previous page icon Next page icon Flashing cursor (parameter) TRG2* ƒsnare~~0% "Type=DT~Snare~, 4 To save changes you've made to the data, use the procedure described below to store them to a User Trigger Setup (8-11). NOTICE • If a different trigger setup is selected before executing the Store operation, all changes you have made to the data will be lost. If you want to keep settings or changes, make sure to carry out the Store operation. 4-1. Press the [SAVE/ENTER] button. The following display will appear. Store destination TRG~save~to~8 :[XP~Med~~] Trigger Setup name 4-2. Rotate the jog dial to select the destination trigger setup number (8-11). 4-3. If you want to change the Trigger Setup name, press the [] buttons to move the flashing cursor to the character you want to edit, then rotate the jog dial to select a character. A Trigger Setup name can contain a maximum of eight characters, and these can be selected from the following list. space 0123456789:;?@ ABCDEFGHIJKLMNOPQRSTUVWXYZ[\]^_` abcdefghijklmnopqrstuvwxyz{|}≥≤ 34 DTX500 Owner's Manual
-
 1
1 -
2
-
3
-
4
-
5
-
6
-
7
-
8
-
9
-
10
-
11
-
12
-
13
-
14
-
15
-
16
-
17
-
18
-
19
-
20
-
21
-
22
-
23
-
24
-
25
-
26
-
27
-
28
-
 29
29 -
 30
30 -
 31
31 -
 32
32 -
 33
33 -
 34
34 -
 35
35 -
 36
36 -
 37
37 -
 38
38 -
 39
39 -
40
-
41
-
42
-
43
-
44
-
45
-
46
-
47
-
48
 |
 |
