Yamaha DTXPLORER Owner's Manual - Page 19
Using the Groove Check Function - pad set
 |
View all Yamaha DTXPLORER manuals
Add to My Manuals
Save this manual to your list of manuals |
Page 19 highlights
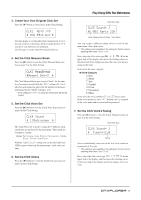
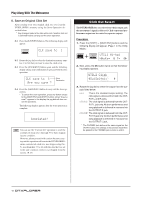
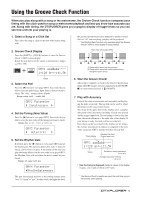
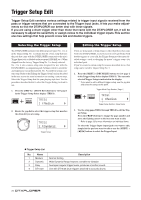
Using the Groove Check Function When you play along with a song or the metronome, the Groove Check function compares your timing with the clock used for song or metronome playback and lets you know how accurate you are. Along with timing, the DTXPLORER gives you a graphic display of trigger levels so you can see how uniform your playing is. 1. Select a Song or a Click Set First, select the song or click set that you want to play along with. 2. Groove Check Display Press the [SHIFT] + [CLICK] buttons to view the Groove Check's (GRV1) main display. Rotate the jog dial to set the song's or metronome's tempo (q=30 to 300). GRV1 120 Gr=-1œ1.5, the greater amount of precision required to produce sound. Set it to "off" and everything you play will be produced. * The Rhythm Gate function only operates when the Groove Check's (GRV1) main display is being viewed. Note value set in page GRV3 B AB AB A B A: Range within sound can be produced. B: Range within sound will not be produced even though the pad is struck. Tempo 3. Select the Pad Press the [>] button to view page GRV2, then rotate the jog dial to select the pad (Trigger Input Source) that you want to check. The "ALL" setting selects all pads. Range: snare, tom1, ... pad9, ALL GRV2 Parameter - Input=snare , 4. Set the Timing (Note Value) Press the [>] button to view page GRV3, then rotate the jog dial to select the note value of the timing you want to check. Range: A", «(4), †(8), ©(16), Œ GRV3 Parameter - Note=«(4) , 5. Set the Rhythm Gate If needed, press the [>] button to view page GRV4 and set the rhythm gate. This function defines how early or late your timing can be when you play. If the timing of the note you play obviously differs from the note value set in page GRV3, the Rhythm Gate will not allow the note's sound be produced. Range: off, easy, norm, pro GRV4 Parameter -RhythmGate=easy 6. Start the Groove Check! After setup is complete, go back to the Groove Check's main menu (the GRV1 page) and start song playback ([SONG >/ ■]) or metronome playback ([ ON/OFF]). 7. Play with Accuracy Listen to the song or metronome and concentrate on the playing the pads accurately. The jog dial can be used to adjust the tempo for the song or metronome. The meter in the upper half of the display gives a graphic indication of the inaccuracy in timing of each note played and the trigger input level. If your timing is slower than just time, the mark will move to the right side of the display. If your timing is early, the mark will move to the left. Data shown in the lower half of the display are for tempo, the average inaccuracies in timing as compared to the note value set in page GRV3, and the deviation of each shot. Timing display Indicates Pad Input (Trigger Input level) GRV1 120 Gr=-1œ1.5, Tempo Deviation in timing inaccuracy (0.0 to 9.9) Average inaccuracy in timing (-9 to +9) * How the timing is displayed (Guide to values in the display) 0 (just), 1 to 9 (unit is 1/24 of a 16th note) The gate increasingly narrows as the setting changes from "easy" to "norm" to "pro". In other words, the higher the level, * The Groove Check's results are reset the next time song or metronome starts playing. 19
-
 1
1 -
2
-
3
-
4
-
5
-
6
-
7
-
8
-
9
-
10
-
11
-
12
-
13
-
 14
14 -
 15
15 -
 16
16 -
 17
17 -
 18
18 -
 19
19 -
 20
20 -
 21
21 -
 22
22 -
 23
23 -
 24
24 -
25
-
26
-
27
-
28
-
29
-
30
-
31
-
32
-
33
-
34
-
35
-
36
 |
 |
