Yamaha DTXPRESS Owner's Manual - Page 11
Setting up with Acoustic Drums - used
 |
View all Yamaha DTXPRESS manuals
Add to My Manuals
Save this manual to your list of manuals |
Page 11 highlights
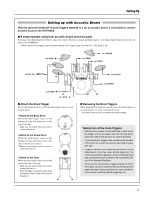
Setting Up Setting up with Acoustic Drums With the optional Yamaha DT10 Drum Triggers attached to a set of acoustic drums, it is possible to connect acoustic drums to the DTXPRESS. ■ A setup example using both acoustic drums and drum pads. Referring to the illustration shown below, connect the output cable from each pad and drum trigger to each Trigger Input Jack located on the rear panel of the DTXPRESS. * When using the drum triggers, appoint suitable settings in the Trigger Setup Edit mode's [1-1. Pad Type]. (P. 36) to 6 RIDE 9 to 7 CRASH to 4 TOM2 to 3 TOM1 to 9/10 10 to 8 HI HAT to 2 SNARE to 5 TOM3 to 1 KICK ■ Attach the Drum Trigger Use the following procedure to attach the drum trigger sensors to your acoustic drums. • Attach to the Bass Drum Mount the drum trigger sensor on the batterhead of the bass drum close to the edge of the rim. * Make sure the sensor does not come in contact with the rim. • Attach to the Snare Drum Mount the drum trigger sensor on the batterhead of the snare drum close to the edge of the rim across player. * Make sure the sensor does not come in contact with the rim. • Attach to the Toms Mount the drum trigger sensor on the shell close to the edge of the rim. * Make sure the sensor does not come in contact with the rim. * Place the trigger in a position where other instruments (drum or percussion) will not influence it. ■ Removing the Drum Triggers When changing the batterhead, carefully remove the drum trigger sensors with a knife, etc. before loosening the head. * Be careful not to pull the cord when removing the trigger. Taking Care of the Drum Triggers • Make sure the surface of the batterhead or shell where the trigger is to be mounted is free from dirt and grime. Clean the surface with alcohol, etc. before attaching. • To prevent broken trigger cords caused by the vibration of the drum rim, secure the sensors and cords in place with tape. • Irregular vibration and sustained resonance on the batterhead or shell may cause double-triggering. This can be prevented by applying a mute to the batterhead and controlling excessive vibration. We recommend the use of the Yamaha Ring Mute. • Once you have removed drum triggers and want to mount them again, be sure completely remove the old tape and apply new tape. Using used tape may cause problems such as poor sensitivity, double-triggering, etc. 11
-
 1
1 -
2
-
3
-
4
-
5
-
 6
6 -
 7
7 -
 8
8 -
 9
9 -
 10
10 -
 11
11 -
 12
12 -
 13
13 -
 14
14 -
 15
15 -
 16
16 -
17
-
18
-
19
-
20
-
21
-
22
-
23
-
24
-
25
-
26
-
27
-
28
-
29
-
30
-
31
-
32
-
33
-
34
-
35
-
36
-
37
-
38
-
39
-
40
-
41
-
42
-
43
-
44
-
45
-
46
-
47
-
48
-
49
-
50
-
51
-
52
-
53
-
54
-
55
-
56
-
57
-
58
-
59
-
60
-
61
-
62
-
63
-
64
-
65
-
66
-
67
-
68
-
69
-
70
-
71
-
72
-
73
-
74
-
75
-
76
-
77
-
78
-
79
-
80
-
81
-
82
-
83
-
84
-
85
-
86
-
87
-
88
 |
 |
