Yamaha DTXPRESS Owner's Manual - Page 9
Rear Panel - 2 power supply
 |
View all Yamaha DTXPRESS manuals
Add to My Manuals
Save this manual to your list of manuals |
Page 9 highlights
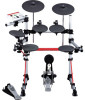
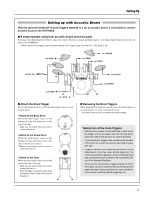
!7 Page Button [PAGEs, PAGEt] These buttons are used to navigate through the display pages. The [PAGEs] button moves to the next page while the [PAGEt] button moves to the previous. Hold the button to continuously move through the pages. Hold the [SHIFT] button and press the [PAGEs] button to mute the drum voice during playback (Rhythm Mute Function). Hold the [SHIFT] button and press the [PAGEt] button to display the Song Tempo Setting (P. 18) Rear Panel @0 @1 Controls and Functions !8 Select Button [SEL] Use these buttons to move the cursor. Hold the [SHIFT] button and press the [SEL>] button to switch to the "Groove Check Function". (P. 17) !9 Value Button (VALUE-, VALUE+) Changes the data value selected with the cursor. Hold the button to continuously change the value. Hold the [VALUE+] button and press the [VALUE-] button to increase the value by 10 continuously. Hold the [VALUE-] button and press the [VALUE+] button to decrease the value by 10 continuously. @2 H L @3 @4 @5 @6 @7 @8 @9 @0 MIDI IN/OUT Jack These jacks are for the transmission and reception of MIDI data to and from external MIDI devices. Connecting external MIDI devices will expand the function of the DTXPRESS. @1 Input Attenuation Switch (INPUT ATTENUATION) Sets the general Input Attenuation for each Trigger Input Jack (1 KICK-6 RIDE). Lowering the switch (L) lowers the attenuation. Raising the switch (H) increases attenuation. This adjusts the input level to meet the specification of pads and trigger sensors connected to the DTXPRESS. (P. 10) @2 Trigger Input Jack (1 KICK-8HI HAT) Connect pads and trigger sensors to these jacks. Connect pads according to the indication below each input. (P. 10) Stereo output pads are also compatible with the DTXPRESS. @3 Trigger Input Jack (9/10) Used to connect a pad to the DTXPRESS. The stereo jack's L corresponds to input 9, R corresponds to input 10. Using a stereo phone plug to connect two pads makes two-trigger input possible. If a monaural phone plug is used, only input 9 is available for use. @4 Hi-Hat Controller Jack (HI HAT CONTROL) This jack is used to connect a hi-hat controller (P. 10). * Use a cable with a stereo plug when connecting a Hi-hat controller. @5 Host Select Switch (HOST SELECT Mac/PC-1/PC-2/MIDI) Set the switch according to the type of computer connected to the TO HOST jack @6. If the MIDI jack is used set the switch to the "MIDI" position. (P. 12, 26) @6 TO HOST Jack This jack is used to connect a computer to the DTXPRESS with a serial cable. Use a cable that is compatible with the type of computer you are using. (P. 26) @7 Output Jacks (OUTPUT L/MONO, R) These jacks are used to connect the DTXPRESS to an external amplifier, mixer, etc. For monaural playback use the L/MONO jack. For stereo playback connect both L/R jacks. @8 Power Supply Jack (DC IN 12V) Connect an AC adaptor to this jack. To prevent the adaptor from becoming unplugged, secure the cord to the cord hook @9. @9 Cord Hook Prevents the power cord from accidentally becoming unplugged. (P. 13) 9
-
 1
1 -
2
-
3
-
 4
4 -
 5
5 -
 6
6 -
 7
7 -
 8
8 -
 9
9 -
 10
10 -
 11
11 -
 12
12 -
 13
13 -
 14
14 -
15
-
16
-
17
-
18
-
19
-
20
-
21
-
22
-
23
-
24
-
25
-
26
-
27
-
28
-
29
-
30
-
31
-
32
-
33
-
34
-
35
-
36
-
37
-
38
-
39
-
40
-
41
-
42
-
43
-
44
-
45
-
46
-
47
-
48
-
49
-
50
-
51
-
52
-
53
-
54
-
55
-
56
-
57
-
58
-
59
-
60
-
61
-
62
-
63
-
64
-
65
-
66
-
67
-
68
-
69
-
70
-
71
-
72
-
73
-
74
-
75
-
76
-
77
-
78
-
79
-
80
-
81
-
82
-
83
-
84
-
85
-
86
-
87
-
88
 |
 |
