Yamaha ELS-02C Owner's Manual - Page 128
Song delete, Instructions when only one [USB TO, DEVICE] terminal is available
 |
View all Yamaha ELS-02C manuals
Add to My Manuals
Save this manual to your list of manuals |
Page 128 highlights
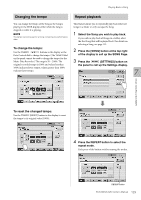
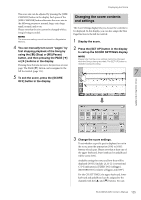
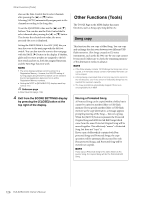
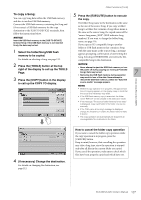
Other Functions (Tools) Instructions when only one [USB TO DEVICE] terminal is available: It is recommended that you use connect both USB flash memories (source and destination) to the [USB TO DEVICE] terminals. However, if there are not enough terminals available, you can copy a Song by following the procedure below. Folder copy cannot be executed with this procedure. 1 Follow steps 1 - 3 on page 127. 2 Press the (UP) button several times until the Media List is displayed. 3 Select "MEMORY" as the destination. 8 Press the [EXECUTE] button to execute Song Copy. Select [CLOSE] or [CANCEL] to abort the operation. The Song is copied with the same name as the source Song. If you copy a Song to a folder that contains a Song whose name is the same as the source Song, the copied Song name will be "source Song name_XXX" (XXX indicates Song number). If you copy an XG-compatible Song to another folder or USB flash memory that contains a Song with the same name as the source Song, a message appears prompting confirmation of overwriting the Song. Selecting [OVERWRITE] overwrites the XGcompatible Song in the destination. If you want to change the Song name, see page 116. NOTE By pressing the [CANCEL] button, you can cancel the operation which is being executed, then return the Protected Song to the original USB flash memory. For details, follow the on-screen instructions. 4 Press the [EXECUTE] button to execute the Song Copy. The Song to be copied is copied to the internal memory of the Electone. The message "Eject the source media" will appear on the display. NOTE If you want to abort the operation, press the [CANCEL] button. NOTICE Never attempt to turn the power off during copying of a Protected Song. Data may be lost. 5 Eject the source USB flash memory. After ejecting the source USB flash memory, the message "Insert the destination media" will appear on the display. 6 Insert the destination USB flash memory to which you want to copy. 7 Select the destination. For details on specifying the destination, see page 112. When moving a data-heavy Protected Song: When the Song being moved contains a large amount of data, the move operation cannot be completed in a single pass. In such a case, repeat steps 6 to 8 by following the on-screen instructions. Song delete You can delete the data of one Song. You can specify for deletion only Registration data, only the performance data, or both (entire Song). Also, only the Songs created on the ELS-02/ELS-02C and XG-compatible Songs can be deleted. Songs created on the EL series instruments such as the EL-900 cannot be deleted. 1 Select the Song to be deleted. For details on selecting a Song, see page 112. 2 Press the [TOOLS] button at the top right of the display to call up the TOOLS Page. 128 ELS-02/ELS-02C Owner's Manual
-
 1
1 -
2
-
3
-
4
-
5
-
6
-
7
-
8
-
9
-
10
-
11
-
12
-
13
-
14
-
15
-
16
-
17
-
18
-
19
-
20
-
21
-
22
-
23
-
24
-
25
-
26
-
27
-
28
-
29
-
30
-
31
-
32
-
33
-
34
-
35
-
36
-
37
-
38
-
39
-
40
-
41
-
42
-
43
-
44
-
45
-
46
-
47
-
48
-
49
-
50
-
51
-
52
-
53
-
54
-
55
-
56
-
57
-
58
-
59
-
60
-
61
-
62
-
63
-
64
-
65
-
66
-
67
-
68
-
69
-
70
-
71
-
72
-
73
-
74
-
75
-
76
-
77
-
78
-
79
-
80
-
81
-
82
-
83
-
84
-
85
-
86
-
87
-
88
-
89
-
90
-
91
-
92
-
93
-
94
-
95
-
96
-
97
-
98
-
99
-
100
-
101
-
102
-
103
-
104
-
105
-
106
-
107
-
108
-
109
-
110
-
111
-
112
-
113
-
114
-
115
-
116
-
117
-
118
-
119
-
120
-
121
-
122
-
 123
123 -
 124
124 -
 125
125 -
 126
126 -
 127
127 -
 128
128 -
 129
129 -
 130
130 -
 131
131 -
 132
132 -
 133
133 -
134
-
135
-
136
-
137
-
138
-
139
-
140
-
141
-
142
-
143
-
144
-
145
-
146
-
147
-
148
-
149
-
150
-
151
-
152
-
153
-
154
-
155
-
156
-
157
-
158
-
159
-
160
-
161
-
162
-
163
-
164
-
165
-
166
-
167
-
168
-
169
-
170
-
171
-
172
-
173
-
174
-
175
-
176
-
177
-
178
-
179
-
180
-
181
-
182
-
183
-
184
-
185
-
186
-
187
-
188
-
189
-
190
-
191
-
192
-
193
-
194
-
195
-
196
-
197
-
198
-
199
-
200
-
201
-
202
-
203
-
204
-
205
-
206
 |
 |
