Yamaha ELS-02C Owner's Manual - Page 69
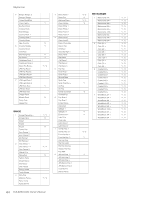
Keyboard Percussion Kit List., ASSIGN
 |
View all Yamaha ELS-02C manuals
Add to My Manuals
Save this manual to your list of manuals |
Page 69 highlights
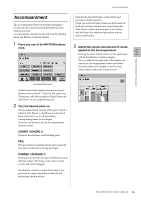
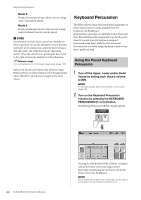
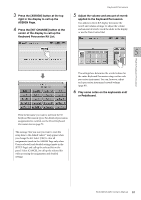
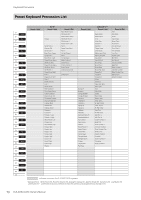
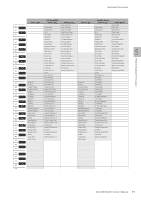
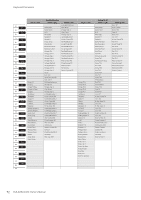
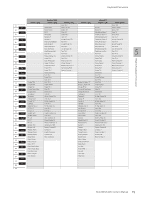
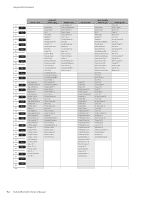
3 Press the [ASSIGN] button at the top right in the display to call up the ASSIGN Page. 4 Press the [KIT CHANGE] button at the center of the display to call up the Keyboard Percussion Kit List. Keyboard Percussion 5 Adjust the volume and amount of reverb applied to the Keyboard Percussion. Two sliders in the K.B.P. display determine the reverb and volume settings. To adjust the volume and amount of reverb, touch the slider in the display or use the Data Control dial. 5 Rhythm/Keyboard Percussion The settings here determine the reverb/volume for the entire Keyboard Percussion setup, not for each percussion instrument. You can, however, adjust each percussion instrument's reverb/volume (page 83). 6 Play some notes on the keyboards and/ or Pedalboard. Press the kit name you want to use from the 38 Keyboard Percussion types. For details of percussion assignments for each kit, see the Preset Keyboard Percussion List on page 70. The message "Are you sure you want to reset the setup data to the default values?" may appear when you change the kit. Select [OK] to clear all assignments (made in the ASSIGN Page only when User is selected) and detailed settings (made in the SETUP Page) and call up the selected kit on the panel. Select [CANCEL] to call up the selected kit without erasing the assignments and detailed settings. ELS-02/ELS-02C Owner's Manual 69
-
 1
1 -
2
-
3
-
4
-
5
-
6
-
7
-
8
-
9
-
10
-
11
-
12
-
13
-
14
-
15
-
16
-
17
-
18
-
19
-
20
-
21
-
22
-
23
-
24
-
25
-
26
-
27
-
28
-
29
-
30
-
31
-
32
-
33
-
34
-
35
-
36
-
37
-
38
-
39
-
40
-
41
-
42
-
43
-
44
-
45
-
46
-
47
-
48
-
49
-
50
-
51
-
52
-
53
-
54
-
55
-
56
-
57
-
58
-
59
-
60
-
61
-
62
-
63
-
 64
64 -
 65
65 -
 66
66 -
 67
67 -
 68
68 -
 69
69 -
 70
70 -
 71
71 -
 72
72 -
 73
73 -
 74
74 -
75
-
76
-
77
-
78
-
79
-
80
-
81
-
82
-
83
-
84
-
85
-
86
-
87
-
88
-
89
-
90
-
91
-
92
-
93
-
94
-
95
-
96
-
97
-
98
-
99
-
100
-
101
-
102
-
103
-
104
-
105
-
106
-
107
-
108
-
109
-
110
-
111
-
112
-
113
-
114
-
115
-
116
-
117
-
118
-
119
-
120
-
121
-
122
-
123
-
124
-
125
-
126
-
127
-
128
-
129
-
130
-
131
-
132
-
133
-
134
-
135
-
136
-
137
-
138
-
139
-
140
-
141
-
142
-
143
-
144
-
145
-
146
-
147
-
148
-
149
-
150
-
151
-
152
-
153
-
154
-
155
-
156
-
157
-
158
-
159
-
160
-
161
-
162
-
163
-
164
-
165
-
166
-
167
-
168
-
169
-
170
-
171
-
172
-
173
-
174
-
175
-
176
-
177
-
178
-
179
-
180
-
181
-
182
-
183
-
184
-
185
-
186
-
187
-
188
-
189
-
190
-
191
-
192
-
193
-
194
-
195
-
196
-
197
-
198
-
199
-
200
-
201
-
202
-
203
-
204
-
205
-
206
 |
 |
