Yamaha EMX3000 Owner's Manual - Page 13
Installation/Connections, Installation, Connection
 |
View all Yamaha EMX3000 manuals
Add to My Manuals
Save this manual to your list of manuals |
Page 13 highlights
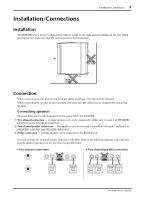
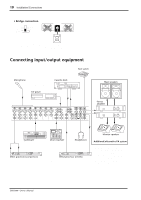
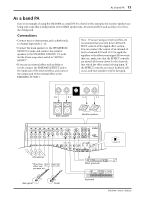
Installation/Connections 9 Installation/Connections Installation The EMX3000 uses a forced cooling system with air intake on the right side and exhaust on the rear. When placing the unit, make sure that the cooling ports are not obstructed. Front Exhaust NO 30cm or less NO 30cm Intake or less Connection When connecting various devices, you must use cables and plugs of the appropriate standard. When connecting the speaker jacks to speakers, you must use only cables that are designed for connecting speakers. s Connecting speakers There are three ways in which speakers can be connected to the EMX3000. 1 Two-channel connection - A single speaker each can be connected to either jack 1 or jack 2 of SPEAKERS L/MONI1 and of SPEAKERS R/MONO. 2 Two-channel parallel connection - Two speakers can be connected in parallel to both jack 1 and jack 2 of SPEAKERS L/MONI1 and SPEAKERS R/MONO. 3 Bridge connection - A single speaker can be connected to the BRIDGE jack. For each of these, the required speaker impedance will differ. Refer to the following diagram, and make sure that the speaker impedance is not less than the specified value. • Two-channel connection ST1 L MONI 1 MONO (BRIDGE) or ST1 R MONO R/MONO 2 1 SPEAKERS No connection BRIDGE L/MONI 1 2 1 ST1 L MONI 1 MONO (BRIDGE) ST1 R MONO 4Ω~8Ω Main Speaker 4Ω~8Ω Main/Monitor Speaker • Two-channel parallel connection R/MONO 2 1 SPEAKERS No connection BRIDGE L/MONI 1 2 1 8Ω~16Ω 8Ω~16Ω Main Speaker 8Ω~16Ω 8Ω~16Ω Main/Monitor Speaker EMX3000-Owner's Manual
-
 1
1 -
2
-
3
-
4
-
5
-
6
-
7
-
 8
8 -
 9
9 -
 10
10 -
 11
11 -
 12
12 -
 13
13 -
 14
14 -
 15
15 -
 16
16 -
 17
17 -
 18
18 -
19
-
20
-
21
-
22
-
23
-
24
 |
 |
