Yamaha HTR-5250 Owner's Manual - Page 9
English, Basic Operation, Advanced Opera, Appendix, Introduction, Preparation
 |
View all Yamaha HTR-5250 manuals
Add to My Manuals
Save this manual to your list of manuals |
Page 9 highlights
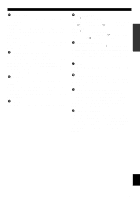
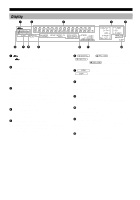
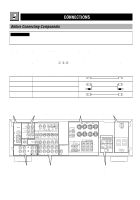
INTRODUCTION PREPARATION q Tone controls These controls are only effective for the sound from the main speakers. a) BASS Turn this control clockwise to increase or counterclockwise to decrease the low-frequency response. The "0" position produces a flat response. b) TREBLE Turn this control clockwise to increase or counterclockwise to decrease the high-frequency response. The "0" position produces a flat response. w TAPE/MD MON / EXT. DECODER Press this button to select a tape or an MD source. The "TAPE/MD MONITOR" indicator lights up on the display. When you press the button again, the "TAPE/MD MONITOR" indicator goes off, "EXT. DECODER" appears on the display and you can listen to a source connected to the EXTERNAL DECODER INPUT terminals. e BALANCE This control is only effective for the sound from the main speakers. Turn the control to adjust the balance of the output volume from the right and left main speakers to compensate for sound imbalance caused by the speaker location or listening room conditions. r A/B/C/D/E Press this button to select one of a group (A to E) of preset stations. CONTROLS AND FUNCTIONS t PRESET/TUNING When " z " appears on the display This button is used to select a preset station number (1 to 8). Press h to select a higher and l to select a lower preset station number. When " z " goes off from the display This button is used for tuning. Press h to tune in to higher frequencies, and l to tune in to lower frequencies. y PRESET/TUNING, EDIT Press this button to turn on or off " z " on the display, and switch the function between storing a broadcasting station (preset tuning) and tuning. This button is also used to exchange the assignment of two preset stations with each other. u FM/AM Press this button to switch the reception band between FM and AM. i MEMORY (MAN'L/AUTO FM) Press this button to store broadcasting stations. Hold down this button for more than three seconds to begin automatic preset tuning. o TUNING MODE (AUTO/MAN'L MONO) Press this button to switch the tuning mode between automatic and manual. To use the automatic tuning method, press this button so that the "AUTO" indicator lights up on the display. To use the manual tuning method, press this button so that the "AUTO" indicator goes off. p VIDEO AUX terminals Connect an auxiliary audio or video input source such as a camcorder to these terminals. If the connected video unit has an S video output terminal, connect it to the S VIDEO terminal to obtain a high-resolution picture. Use INPUT SELECTOR to select the source connected to these terminals. BASIC OPERATION ADVANCED OPERATION APPENDIX English 5
-
 1
1 -
2
-
3
-
 4
4 -
 5
5 -
 6
6 -
 7
7 -
 8
8 -
 9
9 -
 10
10 -
 11
11 -
 12
12 -
 13
13 -
 14
14 -
15
-
16
-
17
-
18
-
19
-
20
-
21
-
22
-
23
-
24
-
25
-
26
-
27
-
28
-
29
-
30
-
31
-
32
-
33
-
34
-
35
-
36
-
37
-
38
-
39
-
40
-
41
-
42
-
43
-
44
-
45
-
46
-
47
-
48
-
49
-
50
-
51
-
52
-
53
-
54
-
55
-
56
-
57
-
58
-
59
-
60
-
61
-
62
-
63
-
64
-
65
-
66
-
67
 |
 |
