Yamaha MD4S Owner's Manual - Page 101
Troubleshooting, Do I have to sacri, ce one track to record timecode?
 |
View all Yamaha MD4S manuals
Add to My Manuals
Save this manual to your list of manuals |
Page 101 highlights
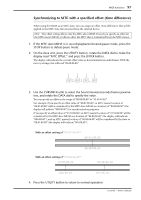
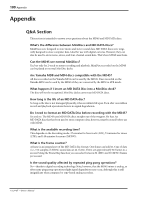
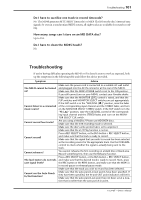
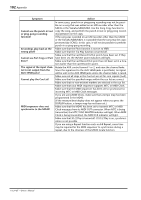
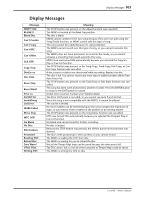
Troubleshooting 101 Do I have to sacrifice one track to record timecode? No. The MD4S generates MTC (MIDI Timecode) or MIDI Clock from the disc's internal sync signals. So even in a synchronized MIDI system, all eight tracks are available for sound recording. How many songs can I store on an MD DATA disc? Up to 254. Do I have to clean the MD4S heads? No. Troubleshooting If you're having difficulty operating the MD4S or if it doesn't seem to work as expected, look up the symptoms in the following table and follow the advice provided. Symptom Advice The MD4S cannot be turned on! Cannot listen to a connected music source! Cannot record four tracks! Cannot record! Cannot rehearse! The level meters do not indicate signal levels! Cannot use the Auto Punch In/Out function! Make sure the power cord is connected to a suitable AC wall outlet and plugged into the AC IN connector at the rear of the MD4S. Make sure that the MD4S POWER switch is set to the ON position. If you still cannot turn on your MD4S, contact your Yamaha dealer. Make sure that the MONITOR LEVEL control is raised, and that the FLIP switches and MONITOR SELECT switches are set appropriately. If the FLIP switch is in the "MIC/LINE ( )" position, raise the fader of the corresponding input channel and the STEREO fader, and turn on the MONITOR SELECT STEREO switch. If the FLIP switch is in the "PB ( )" position, raise the CUE LEVEL control of the corresponding input channel and the STEREO fader, and turn on the MONITOR SELECT CUE switch. Are you using a MiniDisc? Please use MD DATA discs. Make sure that the 4TR recording mode is selected. Make sure the disc's write protect tab is set to unprotect. Make sure that the x1/2 Play function is not on. Press a REC SELECT button, or the BUS button + REC SELECT button, and make sure that the track is ready to record. Make sure that the signal that you wish to record has been selected as the recording source for the appropriate track. Use the CUE LEVEL control to check whether the signal is actually being sent to the track. You cannot rehearse the first recording on a blank disc or blank area. Record something first, then use the Rehearse function. Press a REC SELECT button, or the BUS button + REC SELECT button, and make sure that the desired track is ready to record. Next, press the REC button or the REHE button, and make sure that the MD4S is in record-pause or rehearsal-pause mode. Make sure that the track you wish to record has been selected. Make sure that the auto punch-in/out points have been specified. If they have been specified, the IN and OUT point indicators will be lit. Make sure that the auto punch-out point has not been set at a location that is earlier than the auto punch-in point. -Owner's Manual
-
 1
1 -
2
-
3
-
4
-
5
-
6
-
7
-
8
-
9
-
10
-
11
-
12
-
13
-
14
-
15
-
16
-
17
-
18
-
19
-
20
-
21
-
22
-
23
-
24
-
25
-
26
-
27
-
28
-
29
-
30
-
31
-
32
-
33
-
34
-
35
-
36
-
37
-
38
-
39
-
40
-
41
-
42
-
43
-
44
-
45
-
46
-
47
-
48
-
49
-
50
-
51
-
52
-
53
-
54
-
55
-
56
-
57
-
58
-
59
-
60
-
61
-
62
-
63
-
64
-
65
-
66
-
67
-
68
-
69
-
70
-
71
-
72
-
73
-
74
-
75
-
76
-
77
-
78
-
79
-
80
-
81
-
82
-
83
-
84
-
85
-
86
-
87
-
88
-
89
-
90
-
91
-
92
-
93
-
94
-
95
-
 96
96 -
 97
97 -
 98
98 -
 99
99 -
 100
100 -
 101
101 -
 102
102 -
 103
103 -
 104
104 -
 105
105 -
 106
106 -
107
-
108
-
109
-
110
-
111
-
112
-
113
-
114
-
115
 |
 |