Yamaha MDX-793 Owner's Manual - Page 9
PLAYBACK, Skipping Tracks - minidisc
 |
View all Yamaha MDX-793 manuals
Add to My Manuals
Save this manual to your list of manuals |
Page 9 highlights
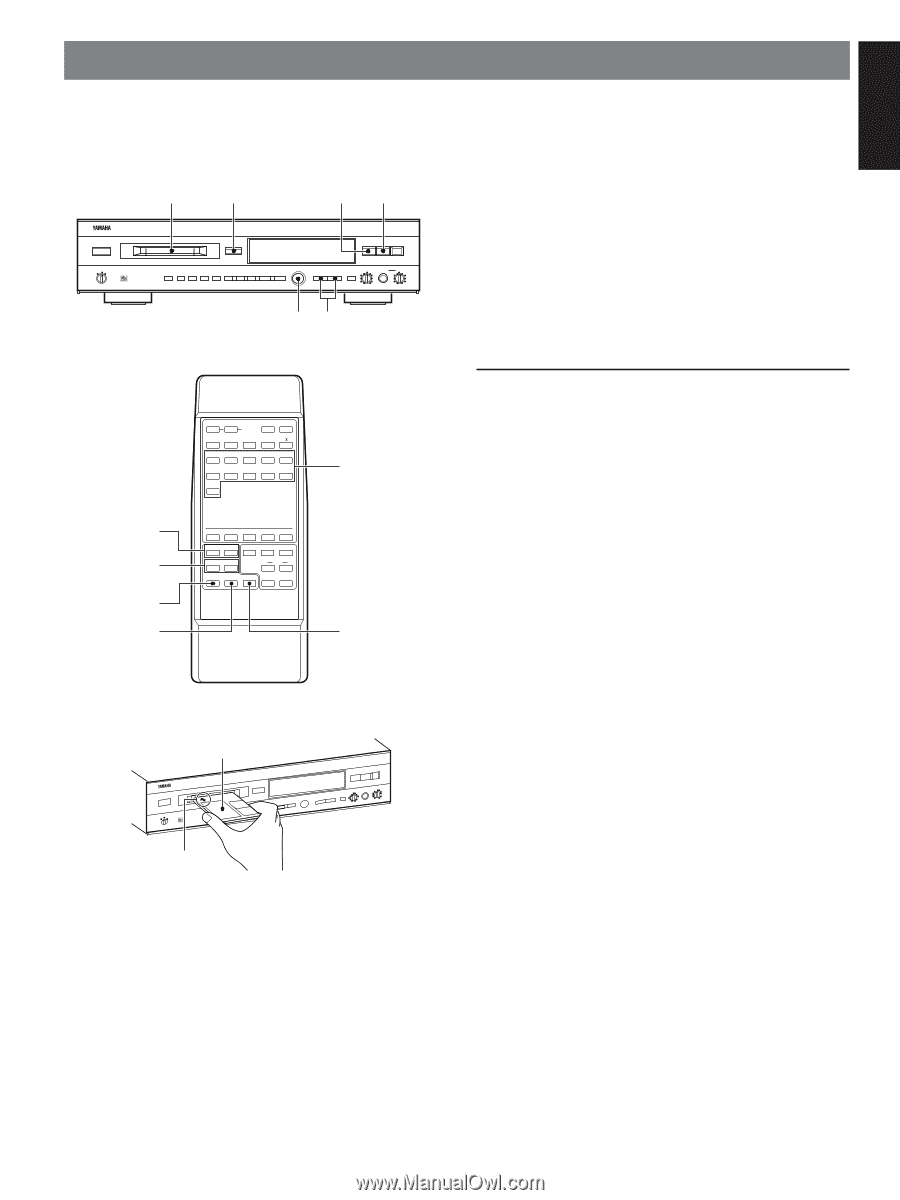
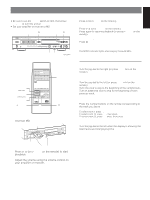
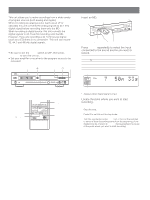
ENGLISH PLAYBACK Preparations • Be sure to set the TIMER switch to OFF, then press POWER to turn this unit on. • Set your amplifier or receiver to MD. 1 ) 2& NATURAL SOUND MINIDISC RECORDER MDX-793 POWER TIMER OFF REC PLAY 0EJECT 3˜8 7 REC RANDOM S/P REPEAT A-B DISPLAY SCROLL TITLE CHARA. DELETE CANCEL EDIT 4 - SET ENTER ¢ + 1 SEARCH ¡ INPUT REC LEVEL PHONES LEVEL 0 10 0 10 jog dial SEARCH ! ⁄ SEARCH ! ⁄ SKIP $ › 2 * PAUSE ! ? DISPLAY SCROLL S/F A-B REPEAT & - ( ) RNDM PROG A B C 1 D E F 2 G H I 3 J K L 4 M N O 5 PQR STU VWX Y Z / 6 7 8 9 0 SPACE +10 TITLE CHAR. NUMBER DELETE SET SEARCH !⁄ M-MARK MONO/ST INPUT SKIP $› REC TIME SYNC PLAY PAUSE STOP REC ‹ * & ? CD-P s MDX Numbers & STOP 1 Insert an MD. Label facing up NATURAL SOUND MINIDISC RECORDER MDX-793 0 To stop Press & (or & STOP on the remote). To pause Press #/* (or * PAUSE on the remote). Press again to resume playback (or press # PLAY on the remote). To eject the MD Press ). Note The MONO indicator lights when playing monaural MDs. Skipping Tracks To skip to the next track Turn the jog dial to the right (or press SKIP › on the remote). To skip to a previous track Turn the jog dial to the left (or press SKIP $ on the remote). Turn one click to skip to the beginning of the current track. Turn an additional click to skip to the beginning of each previous track. To skip to a specific track number Press the number buttons on the remote corresponding to the track you desire. Example: To select track 3, press 3. To select track 13, press +10, then press 3. To select track 23, press +10 twice, then press 3. To skip to the last track on the disc Turn the jog dial to the left when the display is showing the total tracks and total playing time. Arrow pointed toward disc insertion slot 2 Press #/* (or # PLAY on the remote) to start playback. 3 Adjust the volume using the volume control on your amplifier or receiver. Continued on next page 9
-
 1
1 -
2
-
3
-
 4
4 -
 5
5 -
 6
6 -
 7
7 -
 8
8 -
 9
9 -
 10
10 -
 11
11 -
 12
12 -
 13
13 -
 14
14 -
15
-
16
-
17
-
18
-
19
-
20
-
21
-
22
-
23
-
24
-
25
-
26
-
27
-
28
-
29
 |
 |