Yamaha MG206C Owner's Manual - Page 7
Set the STEREO OUT Master fader to, OUT Master fader. - mixer manual
 |
UPC - 086792866277
View all Yamaha MG206C manuals
Add to My Manuals
Save this manual to your list of manuals |
Page 7 highlights
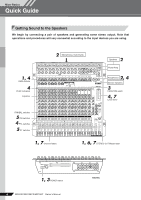
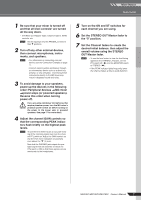
Mixer Basics Quick Guide 1 Be sure that your mixer is turned off and that all level controls* are turned all the way down. * STEREO OUT Master fader, Channel faders, GAIN controls, etc. NOTE Set the equalizer and the PAN/BAL controls to their ▼ positions. 2 Turn off any other external devices, then connect microphones, instruments, and speakers. NOTE • For information on connecting external devices see the Connection Example on page 11. • Connect electric guitars and basses through an intermediary device such as a direct box, preamp, or amp simulator. Connecting these instruments directly to the MG mixer may result in degraded sound and noise. 3 To avoid damage to your speakers, power up the devices in the following order: Peripheral devices → MG mixer → power amps (or powered speakers). Reverse this order when turning power off. CAUTION If you are using condenser microphones that require phantom power, turn the MG mixer's phantom power switch on before turning on the power to the power amp or powered speakers. See page 17 for more detail. 4 Adjust the channel GAIN controls so that the corresponding PEAK indicators flash briefly on the highest peak levels. NOTE To use the level meter to get an accurate reading of the incoming signal level, turn the channel PFL switch on. Adjust the GAIN controls so that the level meter indication occasionally rises above the "▼" (0) level. Note that the PHONES jack outputs the prefader signal from all channels on which the PFL switch is ON so that those signals can be monitored via the headphones. 5 Turn on the ON and ST switches for each channel you are using. 6 Set the STEREO OUT Master fader to the "0" position. 7 Set the Channel faders to create the desired initial balance, then adjust the overall volume using the STEREO OUT Master fader. NOTE • To use the level meter to view the level being applied to the STEREO L/R buses, set the PFL switch off ( ) and the MONITOR switch to STEREO ( ). • If the PEAK indicator lights frequently, lower the Channel faders a little to avoid distortion. MG206C/MG166CX/MG166C Owner's Manual 7
-
 1
1 -
 2
2 -
 3
3 -
 4
4 -
 5
5 -
 6
6 -
 7
7 -
 8
8 -
 9
9 -
 10
10 -
 11
11 -
 12
12 -
13
-
14
-
15
-
16
-
17
-
18
-
19
-
20
-
21
-
22
-
23
-
24
-
25
-
26
-
27
-
28
-
29
 |
 |
