Yamaha MMP1 MMP1 Getting Started [English] - Page 12
Location and, Connections
 |
View all Yamaha MMP1 manuals
Add to My Manuals
Save this manual to your list of manuals |
Page 12 highlights
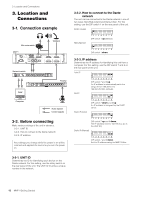
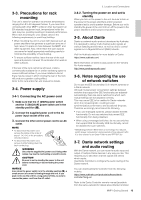
3. Location and Connections 3. Location and Connections 3-1. Connection example 3-2-2. How to connect to the Dante network The unit can be connected to the Dante network in one of two ways: Star (Redundant) and Daisy Chain. For this setting, use the DIP switch 1 on the rear panel of the unit. DAISY CHAIN Mic mute switch MMP1 Network switch DAW Computer Talkback REDUNDANT DIP switch 1 up (default). Preamp DIP switch 1 down. 3-2-3. IP address Determines the IP address for identifying this unit from a computer. For this setting, use the DIP switch 7 and 8 on the rear panel of the unit. Auto IP DHCP DIP switch 7 and 8 up. An IP address is automatically set in the range of from 169.254.0.1 to 169.254.254.254 (default). Audio signals Control signals Static IP (Auto) DIP switch 7 down and 8 up. An IP address is assigned by the DHCP server. 3-2. Before connecting Make various settings of the unit in advance. 3-2-1. UNIT ID 3-2-2. How to connect to the Dante network 3-2-3. IP address Any settings you change while the power is on will be retained and applied the next time you turn the power on. DIP switch 7 up and 8 down. The IP address is set to 192.168.0.xx (xx is the UNIT ID). Static IP (Manual) DIP switch 7 and 8 down. Set the IP address using the MMP1 Editor. 3-2-1. UNIT ID Determines the ID for identifying each device on the Dante network. For this setting, use the rotary switch on the rear panel of the unit. The UNIT ID must be a unique number in the network. 12 MMP1 Getting Started
-
 1
1 -
2
-
3
-
4
-
5
-
6
-
 7
7 -
 8
8 -
 9
9 -
 10
10 -
 11
11 -
 12
12 -
 13
13 -
 14
14 -
 15
15 -
 16
16 -
 17
17 -
18
-
19
-
20
-
21
-
22
-
23
-
24
-
25
-
26
-
27
-
28
-
29
 |
 |
