Yamaha MOX8 Owner's Manual - Page 53
Remote-controlling the software, from the MOX6/MOX8 Remote - drivers
 |
UPC - 086792950907
View all Yamaha MOX8 manuals
Add to My Manuals
Save this manual to your list of manuals |
Page 53 highlights
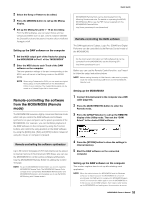
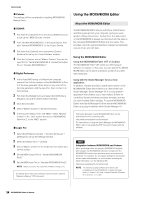
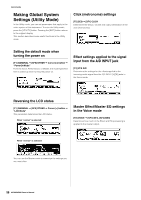
2 Select the Song or Pattern to be edited. 3 Press the [MIXING] button to call up the Mixing display. 4 Set up the Mixing for parts 1 - 16 as necessary. From the Mixing display, you can select Voices and set various parameters such as pan, volume, balance between the Chorus/Reverb and dry sound, Insertion effect on/off and Arpeggio on/off. Setting up the DAW software on the computer 1 Set the MIDI output port of the Tracks for playing the MOX6/MOX8 to Port 1 of the "MOX6/MOX8" 2 Enter the MIDI data to each Track of the DAW software on the computer. The tone generator settings of the part corresponding to the MIDI Track will be set in the Mixing mode on the MOX6/ MOX8. NOTE When using Cubase as the DAW, you can create an original Mixing setup of the MOX6/MOX8 from the MOX6/MOX8 Editor on your computer. The created Mixing setup can be saved as a Cubase Project file for future recall. Remote-controlling the software from the MOX6/MOX8 (Remote mode) The MOX6/MOX8 features a highly convenient Remote mode which lets you control the DAW software and software synthesizer on your computer via the panel operations of the MOX6/MOX8. For example, you can start/stop playback of the DAW software on the computer by using the Function buttons and control the song position on the DAW software by using the [DATA] dial, [INC] and [DEC] buttons instead of using the mouse or computer keyboard. Remote-controlling the software synthesizer Up to 50 Control Templates of VST Instruments can be stored to internal memory of this instrument. With these, you can use the MOX6/MOX8 to control various software synthesizers. Use the MOX6/MOX8 Remote Editor for editing the Control Template. NOTE To use the MOX6/MOX8 Remote Editor, you need to install the MOX6/MOX8 Remote Tools. The MOX6/MOX8 Remote Tools consists of two components: MOX6/MOX8 Remote Editor and MOX6/MOX8 Extension, which enables you to use the MOX6/ MOX8 along with Cubase series 5. Quick Guide MOX6/MOX8 Remote Tools can be downloaded from the following Yamaha web site. For details on operating the MOX6/ MOX8 Remote Editor, see the PDF manual supplied with the MOX6/MOX8 Remote Editor. http://www.yamahasynth.com/download/ Remote-controlling the DAW software The DAW applications Cubase, Logic Pro, SONAR and Digital Performer can be controlled via the Remote Control mode of the MOX6/MOX8. For the most recent information on DAW software that can be controlled from the MOX6/MOX8, see the following URL: http://www.yamahasynth.com/ Before you can use the Remote Control function, you'll need to follow the setup instructions below. NOTE Before making the setup of DAW Remote, make sure to properly install the Yamaha Steinberg USB Driver and the MOX6/MOX8 Remote Tools. Setting up the MOX6/MOX8 1 Connect this instrument to the computer via a USB cable (page 50). 2 Press the [DAW REMOTE] button to enter the Remote mode. 3 Press the [UTILITY] button to call up the REMOTE display of the Utility mode. Then set the "DAW Select" to the desired DAW software. 4 Press the [STORE] button to store the settings to internal memory. 5 Start the DAW software on the connected computer. Setting up the DAW software on the computer This section explains how to set up after starting each application. NOTE When the cable between the MOX6/MOX8 and the Windows computer is disconnected or the MOX6/MOX8 is turned off accidentally, the DAW will not recognize the MOX6/MOX8 again even if you connect the cable again or turn the MOX6/MOX8 on. If this occurs, exit the DAW software, then restart it after setting up the MOX6/MOX8 and making sure the connection is secure. 53 MOX6/MOX8 Owner's Manual
-
 1
1 -
2
-
3
-
4
-
5
-
6
-
7
-
8
-
9
-
10
-
11
-
12
-
13
-
14
-
15
-
16
-
17
-
18
-
19
-
20
-
21
-
22
-
23
-
24
-
25
-
26
-
27
-
28
-
29
-
30
-
31
-
32
-
33
-
34
-
35
-
36
-
37
-
38
-
39
-
40
-
41
-
42
-
43
-
44
-
45
-
46
-
47
-
 48
48 -
 49
49 -
 50
50 -
 51
51 -
 52
52 -
 53
53 -
 54
54 -
 55
55 -
 56
56 -
 57
57 -
 58
58 -
59
-
60
-
61
-
62
-
63
-
64
-
65
-
66
-
67
-
68
-
69
-
70
-
71
-
72
-
73
-
74
-
75
-
76
 |
 |
