Yamaha MRX MTX/MRX system Firmware Update Guide - Page 7
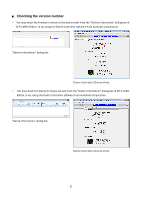
■ Computer TCP/IP setting (for Dante), The Network Setup dialog box appears
 |
View all Yamaha MRX manuals
Add to My Manuals
Save this manual to your list of manuals |
Page 7 highlights
Computer TCP/IP setting (for Dante) To update Dante firmware, configure computer TCP/IP settings. 1. Start up MTX-MRX Editor. The "User Account Control" dialog box may appear. Click [Continue] or [Yes]. 2. The "Network Setup" dialog box appears, click [Open Network Connection]. "Network Connections" will appear. You can also access the "Network Setup" dialog box by choosing [System] menu -> [Network Setup]. 3. Right-click the adapter to which the device(s) are connected, and choose [Properties]. The "Local Area Connection Properties" dialog box will appear. 4. Choose [Internet Protocol Version 4 (TCP/IPv4)], and then click [Properties]. The "Internet Protocol Version 4 (TCP/IPv4) Properties" dialog box will appear. 5. Click [Obtain an IP address automatically]. 6. Click [OK]. In some cases, Windows firewall may block MTX-MRX Editor when you make this setting. Select the [Private Network] check box, and click [Allow Access]. 7
-
 1
1 -
 2
2 -
 3
3 -
 4
4 -
 5
5 -
 6
6 -
 7
7 -
 8
8 -
 9
9 -
 10
10 -
 11
11 -
 12
12 -
13
-
14
 |
 |
