Yamaha P-850 P-850 OWNERS MANUAL - Page 6
IP-850
 |
View all Yamaha P-850 manuals
Add to My Manuals
Save this manual to your list of manuals |
Page 6 highlights
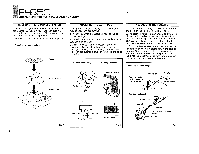
IP-850 ASSEMBLING THE TURNTABLE AND Tt►ngEARM MOUNTING THE TURNTABLE PLATTER 1. Insert your fingers into the two holes in the turntable platter as shown in fig. 1 and then securely position it over the center shaft. Check to make sure that the platter is securely positioned. 2. Place the rubber mat on top of the turntable platter. Mounting the turntable platter Rubber mat Turntable platter Center shaft Fig. 1 5 MOUNTING THE CARTRIDGE Cartridges with weights ranging from 2.5 to 10 grams may be used with this turntable. 1. Properly connect the headshell leads to the pins on the cartridge. 2. Loosely mount the cartridge to the headshell with cartridge mounting bolts. 3. Align the stylus with the accessory overhang gauge and after adjusting the overhang, secure the cartridge mounting bolts. Overhang is correct when the + on the overhang gauge lines up with the tip of the stylus. Mounting the cartridge Overhang adjustment ASSEMBLING THE TONEARM 1. To mount the main weight rotate the black knob in the direction indicated by the arrow in fig. 3. 2. The grooves inside the main weight and the click stopper on the end of the tonearm interlock, thus when the main weight knob is rotated in a counterclockwise direction (as seen from the front of the unit) the main weight will smoothly move forward. 3. To mount the headshell, loosen the headshell locking screw and insert the headshell with the cartridge in place. Next, securely tighten the locking screw. Be sure to keep the headshell straight when inserting it into the tonearm as it is very easy to damage the four contact pins inside the headshell. Mounting the main weight Red (+R) White (+L) Blue (- L) Green (- R) Overhang gauge *Be sure that the weight faces the right direction Main weight - End of tonearm Cartridge White (+L) Red (+R) Blue (- L) G een (- R) Overhang gauge Fig. 2 Mounting the headshell Locking screw Headshell a 4$1° Tonearm Push the headshell straight into the tonearm Cartridge Fig. 3
-
 1
1 -
 2
2 -
 3
3 -
 4
4 -
 5
5 -
 6
6 -
 7
7 -
 8
8 -
 9
9 -
 10
10 -
 11
11 -
 12
12
 |
 |
