Yamaha P-850 P-850 OWNERS MANUAL - Page 8
horizontally
 |
View all Yamaha P-850 manuals
Add to My Manuals
Save this manual to your list of manuals |
Page 8 highlights
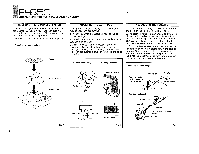
ADJUSTING TRACKING FORCE 1. Make sure that the position of the main weight does not move once the tonearm has been horizontally balanced. 2. Move the tracking force adjustment weight along the tracking force scale on the tonearm until it corresponds with the rated tracking force of your cartridge. The scale is marked in units of 0.1 gram. Tonearm Tracking force adjustment weight ADJUSTING THE ANTI•SKATING Align the index mark on the anti-skating knob with the scale marking which corresponds to the rated tracking force of your cartridge. Note: If the anti-skating is not set correctly, the tonearm will deviate horizontally as it lowers onto the record, and it may miss the correct lead-in position. Be sure the anti-skating control setting is correct. Adjusting the anti skating CONNECTIONS TO YOUR AMPLIFIER Perform these connections after turntable and tonearm assembly and all adjustments have been completed. 1. Connect the output cords from the rear panel of the cabinet to the Phono terminals on the audio amplifier. Make sure that the left and right channels are properly matched. The white cord signifies the left (L) channel and the red the right (R) channel. 2. Connect the black ground wire to the Ground (GND) terminal on the audio amplifier. Depending on the amplifier, better sound is sometimes obtained by not connecting the ground wire. 3. Connect the power plug to the AC wall outlet or an auxiliary outlet on the audio amplifier. Connections to your amplifier Fig. 7 PHONO terminals 3 ANTI-SKATING ANTI- KNOB SKATING Index mark Fig. 8 White is for left (L) channel rca ( Red is for right (R) channel Ground wire Fig. 9 7
-
 1
1 -
2
-
 3
3 -
 4
4 -
 5
5 -
 6
6 -
 7
7 -
 8
8 -
 9
9 -
 10
10 -
 11
11 -
 12
12
 |
 |
