Yamaha PSR-170 Owner's Manual - Page 8
Setting Up, Power Requirements, Turning On the Power - power adaptor
 |
View all Yamaha PSR-170 manuals
Add to My Manuals
Save this manual to your list of manuals |
Page 8 highlights
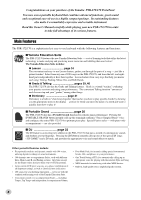
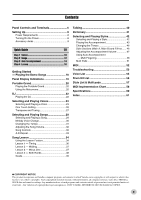
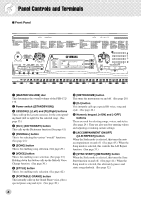
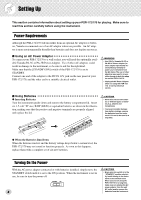
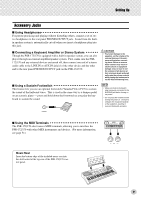
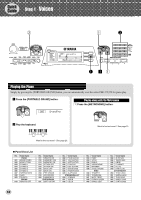
Setting Up This section contains information about setting up your PSR-172/170 for playing. Make sure to read this section carefully before using the instrument. Power Requirements Although the PSR-172/170 will run either from an optional AC adaptor or batteries, Yamaha recommends use of an AC adaptor whenever possible. An AC adaptor is more environmentally friendly than batteries and does not deplete resources. I Using an AC Power Adaptor To connect your PSR-172/170 to a wall socket, you will need the optionally available Yamaha PA-3C or PA-3B Power Adaptor. Use of other AC adaptors could result in damage to the instrument, so be sure to ask for the right kind. Make sure that the [STANDBY/ON] switch of the PSR-172/170 is set to STANDBY. Connect one end of the adaptor to the DC IN 12V jack on the rear panel of your PSR-172/170, and the other end to a suitable electrical outlet. • Use ONLY a Yamaha PA-3C or PA-3B AC Power Adaptor (or other adaptor specifically recommended by Yamaha) to power your instrument from the AC mains. The use of other adaptors may result in irreparable damage to both the adaptor and the PSR-172/170. • Unplug the AC Power Adaptor when not using the PSR-172/ 170, or during electrical storms. I Using Batteries G Inserting Batteries Turn the instrument upside-down and remove the battery compartment lid. Insert six 1.5-volt "D" size, R20P (LR20) or equivalent batteries as shown in the illustration, making sure that the positive and negative terminals are properly aligned, and replace the lid. • Never mix old and new batteries or different types of batteries (e.g., alkaline and manganese). • To prevent possible damage from battery leakage, remove the batteries from the instrument if it is not to be used for a long time. G When the Batteries Run Down When the batteries run low and the battery voltage drops below a certain level, the PSR-172/170 may not sound or function properly. As soon as this happens, replace them with a complete set of six new batteries. Turning On the Power With the AC power adaptor connected or with batteries installed, simply move the STANDBY switch until it is set to the ON position. When the instrument is not in use, be sure to turn the power off. 8 • Even when the switch is in the "STANDBY" position, electricity is still flowing to the instrument at the minimum level. When you are not using the PSR-172/170 for a long time, make sure you unplug the AC power adaptor from the wall AC outlet, and/or remove the batteries from the instrument.
-
 1
1 -
2
-
 3
3 -
 4
4 -
 5
5 -
 6
6 -
 7
7 -
 8
8 -
 9
9 -
 10
10 -
 11
11 -
 12
12 -
 13
13 -
14
-
15
-
16
-
17
-
18
-
19
-
20
-
21
-
22
-
23
-
24
-
25
-
26
-
27
-
28
-
29
-
30
-
31
-
32
-
33
-
34
-
35
-
36
-
37
-
38
-
39
-
40
-
41
-
42
-
43
-
44
-
45
-
46
-
47
-
48
-
49
-
50
-
51
-
52
-
53
-
54
-
55
-
56
-
57
-
58
-
59
-
60
-
61
-
62
-
63
-
64
 |
 |