Yamaha PSR-E283 PSR-E283_YPT-280 Owners Manual - Page 13
Rear Panel
 |
View all Yamaha PSR-E283 manuals
Add to My Manuals
Save this manual to your list of manuals |
Page 13 highlights
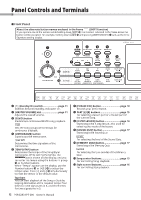
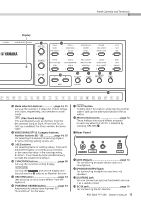
Display !3 !4 Panel Controls and Terminals !5 !6 !7 !8 !9 @0 !3 Mode selection buttons page 14, 15 Calls up the selection displays for Voices, Songs, and Styles, respectively, and switches to each mode. (One Touch Setting) This automatically calls up the best Voice for the selected Song or Style. When One Touch Setting is enabled, the Voice number becomes "000". !4 VOICE/SONG/STYLE Category buttons, Number buttons [0] - [9 page 14, 15 For selecting the desired Voice/Song/Style or directly entering setting values, etc. !5 [+]/[-] buttons For selecting items or setting values. Press and hold either button to continuously increase or decrease the value in the corresponding direction. Press these buttons simultaneously to reset the value to the default. !6 [FUNCTION] button page 20 Calls up the Function setting display. Calls up the icon on the display and lets you use the !4 buttons as Number buttons. !7 [SFX KIT] button page 14 Lets you play various sound effects from the keyboard. !8 [PORTABLE GRAND] buttona page 14 Automatically selects Voice Number 001 "Grand Piano" for the Voice. !9 button Holding down this button and pressing another button calls up the alternate function of that button. @0 SFX Kit illustrations page 14 These indicate the sound effects assigned to each key when the SFX Kit is selected by pressing [SFX KIT] !7. „„Rear Panel @1 [AUX IN] jack page 14 For connecting an audio device such as a smartphone. @2 [PHONES/OUTPUT] jack For connecting headphones and external speakers. @3 [SUSTAIN] jack You can connect an optional footswitch and use it as a sustain pedal. @4 DC IN jack page 10 For connecting the AC adaptor. PSR-E283 YPT-280 Owner's Manual 13
-
 1
1 -
2
-
3
-
4
-
5
-
6
-
7
-
 8
8 -
 9
9 -
 10
10 -
 11
11 -
 12
12 -
 13
13 -
 14
14 -
 15
15 -
 16
16 -
 17
17 -
 18
18 -
19
-
20
-
21
-
22
-
23
-
24
-
25
-
26
-
27
-
28
 |
 |
