Yamaha PSR-E423 Owner's Manual - Page 80
System Requirements, Software Installation, Installing / Updating the USB-MIDI, Driver - software download
 |
UPC - 086792317021
View all Yamaha PSR-E423 manuals
Add to My Manuals
Save this manual to your list of manuals |
Page 80 highlights
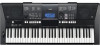
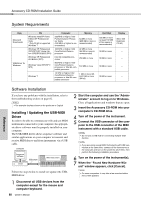
Accessory CD-ROM Installation Guide System Requirements Data Musicsoft Downloader USB Driver for Windows OS Windows 2000/XP Home Edition/XP Professional/ Vista * Only 32-bit is supported. Windows 7 Windows XP Professional (SP2/SP3)/XP Home Edition (SP2/SP3)/2000 (SP4) Windows XP Professional x64 Edition (SP2) Windows Vista (SP0/SP1/ SP2) Windows 7 Computer Memory 233 MHz or higher; Intel Pentium/Celeron Processor family (500 MHz or higher is recommended) 64 MB or more (256 MB or more is recommended) 166 MHz or higher; Intel Core/Pentium/Celeron processor 32 MB or more (64 MB or more is recommended) Intel 64 compatible processor 256 MB or more 800 MHz or higher; Intel Core/Pentium/Celeron processor or Intel 64 compatible processor 512 MB or more 1.4 GHz or higher; Intel Core/Pentium/Celeron processor or Intel 64 compatible processor 1 GB or more (32bit)/2 GB or more (64-bit) Hard Disk 128 MB or more (at least 512 MB of free space is recommended) 10 MB or more 10 MB or more 10 MB or more 10 MB or more Display 800 x 600 HighColor (16-bit) - - - - Software Installation If you have any problems with the installation, refer to the troubleshooting section on page 82. NOTE • The example displays shown in this guide are in English. Installing / Updating the USB-MIDI Driver In order to be able to communicate with and use MIDI instruments connected to your computer, the appropriate driver software must be properly installed on your computer. The USB-MIDI driver allows sequence software and similar applications on your computer to transmit and receive MIDI data to and from instruments via a USB cable. Computer Sequence software Driver USB Cable MIDI instrument Follow the steps below to install (or update) the USBMIDI driver. 1 Disconnect all USB devices from the computer except for the mouse and computer keyboard. 80 Owner's Manual 2 Start the computer and use the "Administrator" account to log on to Windows. Close all applications and windows that are open. 3 Insert the Accessory CD-ROM into your computer's CD-ROM drive. 4 Turn off the power of the instrument. 5 Connect the USB connector of the com- puter to the USB connector of the MIDI instrument with a standard USB cable. NOTE • Do not use a USB hub for connecting multiple USB devices. NOTE • If you are using several MIDI instruments with USB con- nection at the same time, connect all the instruments to the computer and turn on the power for all of them, then perform the following installation procedure. 6 Turn on the power of the instrument(s). 7 When the "Found New Hardware Wiz- ard" window appears, click [Cancel]. NOTE • On some computers, it may take a few minutes before this screen appears. Reference
-
 1
1 -
2
-
3
-
4
-
5
-
6
-
7
-
8
-
9
-
10
-
11
-
12
-
13
-
14
-
15
-
16
-
17
-
18
-
19
-
20
-
21
-
22
-
23
-
24
-
25
-
26
-
27
-
28
-
29
-
30
-
31
-
32
-
33
-
34
-
35
-
36
-
37
-
38
-
39
-
40
-
41
-
42
-
43
-
44
-
45
-
46
-
47
-
48
-
49
-
50
-
51
-
52
-
53
-
54
-
55
-
56
-
57
-
58
-
59
-
60
-
61
-
62
-
63
-
64
-
65
-
66
-
67
-
68
-
69
-
70
-
71
-
72
-
73
-
74
-
 75
75 -
 76
76 -
 77
77 -
 78
78 -
 79
79 -
 80
80 -
 81
81 -
 82
82 -
 83
83 -
 84
84 -
 85
85 -
86
-
87
-
88
-
89
-
90
-
91
-
92
 |
 |
