Yamaha QL1 Owner's Manual - Page 16
Rear panel, LAMP connectors, OMNI OUT jacks, INPUT jacks, Exhaust port, Power Switch, AC IN connector
 |
View all Yamaha QL1 manuals
Add to My Manuals
Save this manual to your list of manuals |
Page 16 highlights
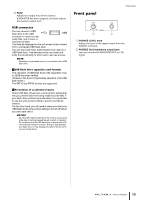
Controls and functions Rear panel 2 1 3 4 5 6 7 8 9 0A 1 LAMP connectors Four-pin female XLR output jacks that supply power to separately-sold gooseneck lamps (such as the Yamaha LA1L). (The QL5 includes these connectors at two locations. The QL1 includes one.) 2 OMNI OUT jacks XLR-3-32 male output jacks for outputting analog audio signals. (The QL5 has 16 of these jacks. The QL1 has 8.) These jacks are used mainly to output the signals of MIX channels or MATRIX channels. The nominal output level is +4dBu. Female XLR plug 2 (Hot) 3 (Cold) 1 (Ground) NOTE • The nominal output level of the OMNI OUT jacks is +4dBu (maximum level +24dBu), but if necessary, this can be changed to -2dBu (maximum level +18dBu) by setting an internal switch (a fee will be charged). For details, contact a Yamaha service center listed at the end of the owner's manual. 3 INPUT jacks Balanced XLR-3-31 female input jacks for inputting analog audio signals from line level devices or microphones. (The QL5 has 32 of these jacks, and the QL1 has 16.) The input level range is from -62dBu to +10dBu. Male XLR connector 1 (Ground) 3 (Cold) 2 (Hot) 4 Exhaust port The QL series consoles have cooling fans. Please be sure that you do not block the air intakes or exhaust vents. B CDE F 5 | / (Power Switch) This switch turns the power on/off (|/ ). Caution • Rapidly turning the unit on and off in succession can cause it to malfunction. After turning the unit off, wait for at least 6 seconds before turning it on again. • Even when the power switch is turned off, a small amount of current is flowing through the unit. If you plan not to use the unit for a long period of time, remove the power cable from the AC outlet. 6 AC IN connector Connect the supplied AC power cord here. First connect the AC power cable to the QL unit, then insert the power cable plug into an AC power outlet. Insert the cable plug all the way until it locks in securely. The supplied AC power cable features a V-lock mechanism via a latch, which prevents the power cable from coming off accidentally. Caution Be sure to turn the power off before connecting or disconnecting the power cable. To disconnect the power cable, remove it while pressing the latch on the plug. 7 Grounding screw The supplied AC power cable is a 3-wire type. Therefore, if the AC outlet used is properly grounded, the QL will be grounded as well. Also, grounding this screw may effectively eliminate noise such as hum and interference. 16 Owner's Manual
-
 1
1 -
2
-
3
-
4
-
5
-
6
-
7
-
8
-
9
-
10
-
 11
11 -
 12
12 -
 13
13 -
 14
14 -
 15
15 -
 16
16 -
 17
17 -
 18
18 -
 19
19 -
 20
20 -
 21
21 -
22
-
23
-
24
-
25
-
26
-
27
-
28
-
29
-
30
-
31
-
32
-
33
-
34
-
35
-
36
-
37
-
38
-
39
-
40
-
41
-
42
-
43
-
44
-
45
-
46
-
47
-
48
-
49
-
50
-
51
-
52
-
53
-
54
-
55
-
56
-
57
-
58
 |
 |
