Yamaha RX-V795 Owner's Manual - Page 13
Controls and their functions, Front panel - av receiver
 |
View all Yamaha RX-V795 manuals
Add to My Manuals
Save this manual to your list of manuals |
Page 13 highlights
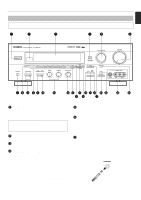
English Controls and their functions Front panel 1 2 3 GETTING STARTED 45 6 NATURAL SOUND AV RECEIVER CINEMA DSP STANDBY/ON PHONES TAPE/MD MON /EXT. DECODER A/B/C/D/E 1 2 3 SPEAKERS A B ON OFF BASS TONE EXTENSION BYPASS ON OFF 4 5 BASS l 0l 2 2 3 3 4 5 4 5 TUNING 6 7 8 MEMORY EDIT MODE FM/AM MAN'L/AUTO FM AUTO/MAN'L MONO TREBLE l 0l 2 2 3 3 4 5 4 5 BALANCE l 0l 2 2 3 3 4 L5 4 5R DOWN TUNING UP SET LEVEL MENU INPUT SELECTOR INPUT MODE VOLUME l6 20 l2 28 8 40 4 60 2 0 -dB EFFECT PROGRAM VIDEO AUX S VIDEO VIDEO L AUDIO R 7 8 9 0A B C For the remote controller, refer to pages 61 to 68. D E G IJK M N O P FH L 1 STANDBY/ON switch Press this switch to turn on the power. Press this switch again to set this unit in the standby mode. * A click from the switch and the initial rotation of the built-in fan will be heard when the power is turned on. Standby mode This unit is still using a small amount of power in this mode in order to be ready to receive infrared-signals from the remote controller. 2 Remote control sensor Receives signals from the remote controller. 3 Display panel Displays a variety of information. (Refer to page 11 for details.) 4 TAPE/MD MON/EXT. DECODER button Press this button repeatedly until the "TAPE/MD MONITOR" indicator is illuminated on the display. Sound source played or recorded on the unit connected to the TAPE/MD IN (PLAY)/OUT (REC) AUDIO SIGNAL terminals on the rear of this unit is selected as the input source taking priority of the INPUT SELECTOR's setting. Press this button repeatedly until the "EXT. DECODER" appears on the display. Sound signals input to the EXTERNAL DECODER INPUT terminals on the rear of this unit is selected as the input source taking priority of the INPUT SELECTOR's setting. Press this button repeatedly until the original display mode is restored to cancel the above input sources. 5 INPUT SELECTOR Turn this knob to select the input source. The selected source will be shown on the display. 6 Master VOLUME control Simultaneously controls volume for all output sounds; main, rear, center and subwoofer. (The REC OUT level is not affected.) * The indicator on the master VOLUME control will flash when the volume is decreased by pressing the MUTE key on the remote controller. 7 PHONES jack Headphones can be plugged into this jack for private listening. You can listen to the sound to be output from the main speakers through headphones. When listening with headphones privately, set both SPEAKERS A and B switches to the OFF position and turn off the digital sound field processor by pressing the EFFECT button so that no DSP program name is illuminated on the display panel. PHONES 9
-
 1
1 -
2
-
3
-
4
-
5
-
6
-
7
-
 8
8 -
 9
9 -
 10
10 -
 11
11 -
 12
12 -
 13
13 -
 14
14 -
 15
15 -
 16
16 -
 17
17 -
 18
18 -
19
-
20
-
21
-
22
-
23
-
24
-
25
-
26
-
27
-
28
-
29
-
30
-
31
-
32
-
33
-
34
-
35
-
36
-
37
-
38
-
39
-
40
-
41
-
42
-
43
-
44
-
45
-
46
-
47
-
48
-
49
-
50
-
51
-
52
-
53
-
54
-
55
-
56
-
57
-
58
-
59
-
60
-
61
-
62
-
63
-
64
-
65
-
66
-
67
-
68
-
69
-
70
-
71
-
72
-
73
-
74
-
75
-
76
-
77
-
78
-
79
-
80
-
81
-
82
-
83
-
84
-
85
-
86
-
87
-
88
-
89
-
90
-
91
-
92
 |
 |
