Yamaha TSX-20 Owners Manual - Page 4

Contents, Setting Up This System

Page 4 highlights

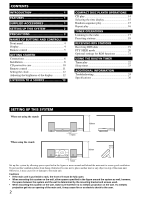
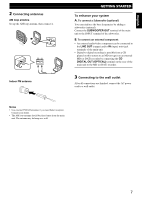
CONTENTS INTRODUCTION 1 FEATURES 1 SUPPLIED ACCESSORIES 1 SETTING UP THIS SYSTEM 2 PRECAUTIONS 3 NAMES OF BUTTONS AND CONTROLS Front panel 4 Display 4 Remote control 5 GETTING STARTED Connections 6 Installation 8 CD preventive care 10 Remote control 11 Setting the clock 12 Adjusting the brightness of the display 12 LISTENING TO A SOURCE 13 COMPACT DISC PLAYER OPERATIONS CD play 14 Selecting the time display 15 Random-sequence play 15 Repeat play 16 TUNER OPERATIONS Listening to the radio 17 Presetting stations 18 RECEIVING RDS STATIONS Receiving RDS data 19 PTY SEEK mode 20 Optional settings for RDS functions 21 USING THE BUILT-IN TIMER Timer play 22 Sleep timer 23 ADDITIONAL INFORMATION Troubleshooting 24 Specifications 26 SETTING UP THIS SYSTEM When not using the stands 100mm 10mm 400mm 100mm When using the stands 400mm 50mm 100mm TIME ADJ TIMER 10mm Set up this system by allowing spaces specified in the figure or more around and behind the main unit to assure good ventilation. To prevent the ventilation holes from being obstructed, be sure not to place another unit or any object on top of the main unit. Otherwise, it may cause fire or damage to the main unit. Cautions • If the main unit is put inside a rack, the front of it must be fully open. • When mounting this system on the wall, allow spaces specified in the figure around the system as well, however, the space between the system and the wall is determined by the mounting bracket and screws used. • When mounting this system on the wall, make sure that there is no metalic projection on the wall. If a metallic projection get into an opening of the main unit, it may cause fire or an electric shock to the user. 2

  • 1
  • 2
  • 3
  • 4
  • 5
  • 6
  • 7
  • 8
  • 9
  • 10
  • 11
  • 12
  • 13
  • 14
  • 15
  • 16
  • 17
  • 18
  • 19
  • 20
  • 21
  • 22
  • 23
  • 24
  • 25
  • 26
  • 27
  • 28

2
INTRODUCTION
.....................................
1
FEATURES
..............................................
1
SUPPLIED ACCESSORIES
.......................
1
SETTING UP THIS SYSTEM
....................
2
PRECAUTIONS
.......................................
3
NAMES OF BUTTONS AND CONTROLS
Front panel
...........................................................
4
Display
.................................................................
4
Remote control
....................................................
5
GETTING STARTED
Connections
.........................................................
6
Installation
...........................................................
8
CD preventive care
............................................
10
Remote control
..................................................
11
Setting the clock
................................................
12
Adjusting the brightness of the display
.............
12
LISTENING TO A SOURCE
....................
13
COMPACT DISC PLAYER OPERATIONS
CD play
..............................................................
14
Selecting the time display
..................................
15
Random-sequence play
......................................
15
Repeat play
........................................................
16
TUNER OPERATIONS
Listening to the radio
.........................................
17
Presetting stations
..............................................
18
RECEIVING RDS STATIONS
Receiving RDS data
..........................................
19
PTY SEEK mode
...............................................
20
Optional settings for RDS functions
.................
21
USING THE BUILT-IN TIMER
Timer play
.........................................................
22
Sleep timer
.........................................................
23
ADDITIONAL INFORMATION
Troubleshooting
.................................................
24
Specifications
....................................................
26
CONTENTS
Set up this system by allowing spaces specified in the figure or more around and behind the main unit to assure good ventilation.
To prevent the ventilation holes from being obstructed, be sure not to place another unit or any object on top of the main unit.
Otherwise, it may cause fire or damage to the main unit.
Cautions
If the main unit is put inside a rack, the front of it must be fully open.
When mounting this system on the wall, allow spaces specified in the figure around the system as well, however,
the space between the system and the wall is determined by the mounting bracket and screws used.
When mounting this system on the wall, make sure that there is no metalic projection on the wall. If a metallic
projection get into an opening of the main unit, it may cause fire or an electric shock to the user.
SETTING UP THIS SYSTEM
When using the stands
10mm
100mm
100mm
400mm
50mm
400mm
10mm
100mm
When not using the stands