Yamaha V740 Owners Manual - Page 48
Input 2 Input Mode, Option 1 Display Set, Input, Rename
 |
UPC - 027108916507
View all Yamaha V740 manuals
Add to My Manuals
Save this manual to your list of manuals |
Page 48 highlights
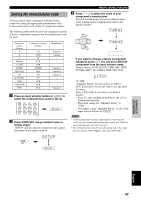
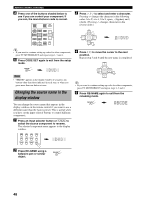
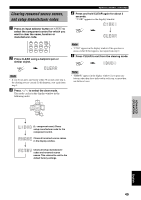
SET MENU INPUT 2 INPUT MODE (initial input mode) Use this feature to designate the input mode for sources connected to the DIGITAL INPUT jacks when you turn this unit on (see page 25 for details about the input mode). Choices: AUTO, LAST AUTO Select this setting to allow the unit to automatically detect the type of input signal and select the appropriate input mode. LAST Select this setting to set this unit to automatically select the last input mode used for the respective sources. INPUT 3 INPUT RENAME Use this feature to change the name of the input which appears on the OSD or the front panel display. 1 Press an input selector button to select the input name you want to change. 3 INPUT RENAME DVD -> DVD -/+ : Position / : Character 2 Press AMP and then use j / i to place the _ (under-bar) under the space or character you want to edit. 3 INPUT RENAME DVD -> DVD -/+ : Position / : Character 3 Press u / d to select the character you want to use and j / i to move to the next one. • Press d to change the character in the following order, or press u to go in the reverse order. A to Z, a space, 0 to 9, a space, a to z, a space, #, *, +, and so on. • Follow the foregoing procedure to rename other inputs. Note • You can use up to 8 characters to rename the inputs. 4 Press i repeatedly to exit from INPUT RENAME. OPTION 1 DISPLAY SET I DIMMER Use this to adjust the brightness of the front panel display. Control range: -4 to 0 I OSD SHIFT (OSD off-set position) This setting adjusts the vertical position of the OSD. Control range: +5 (downward) to -5 (upward) Initial setting: 0 Press + to lower the position of the OSD. Press - to raise the position of the OSD. I GRAY BACK Selecting AUTO for the on-screen display setting to display a gray background when there is no video signal input. Nothing is displayed on the screen, including the on-screen display if you select OFF. Choices: AUTO, OFF Note • If "GRAY BACK" is set to OFF, no information is displayed on the screen when the unit is not receiving a video signal. I V CONV. (Video conversion) (With the exception of China and General models) Use this feature to turn on/off the conversion of composite signals to S-video signals to output through the S-video jack when the unit is receiving a video signal that is not in the S-video format. Choices: ON, OFF ON Select ON to convert composite signals to S-video signals. OFF Select OFF to stop the conversion of composite signals to S-video signals. 3 INPUT RENAME DVD -> DVD1 -/+ : Position / : Character 44
-
 1
1 -
2
-
3
-
4
-
5
-
6
-
7
-
8
-
9
-
10
-
11
-
12
-
13
-
14
-
15
-
16
-
17
-
18
-
19
-
20
-
21
-
22
-
23
-
24
-
25
-
26
-
27
-
28
-
29
-
30
-
31
-
32
-
33
-
34
-
35
-
36
-
37
-
38
-
39
-
40
-
41
-
42
-
 43
43 -
 44
44 -
 45
45 -
 46
46 -
 47
47 -
 48
48 -
 49
49 -
 50
50 -
 51
51 -
 52
52 -
 53
53 -
54
-
55
-
56
-
57
-
58
-
59
-
60
-
61
-
62
-
63
-
64
-
65
-
66
-
67
-
68
-
69
-
70
-
71
 |
 |
