Yamaha YAS-101 Owners Manual - Page 12
Additional Information, Adjust the volume level, Adjust the subwoofer level, Audio delay control - external subwoofer
 |
View all Yamaha YAS-101 manuals
Add to My Manuals
Save this manual to your list of manuals |
Page 12 highlights
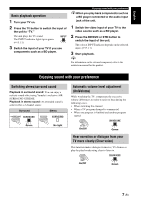
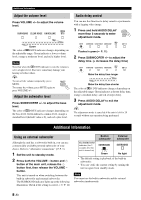
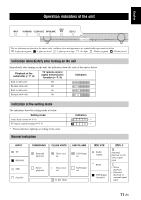
Additional Information Adjust the volume level Press VOLUME +/- to adjust the volume level. Up Audio delay control You can use this function to delay sound to synchronize with a lagging video image. 1 Press and hold AUDIO DELAY more than 3 seconds to enter adjustment mode. Down The color of qD DTS indicator changes depending on the adjustable range. Green indicates a lower volume level, orange a moderate level, and red a higher level. Note Note that when the qD DTS indicator is red, the volume is set to a higher level. Excessive sound may damage your hearing or bother others. y To turn off the volume temporarily, press MUTE. To resume the volume, press MUTE again or press VOLUME +/-. Adjust the subwoofer level Press SUBWOOFER +/- to adjust the bass level. The color of qD DTS indicator changes depending on the bass level. Green indicates a minus level, orange a standard level (default value is 0), and red a plus level. Flashes in green (☞ P. 11) 2 Press SUBWOOFER +/- to adjust the delay time. (+ increases the delay time) Make the delay time longer Make the delay time shorter The color of qD DTS indicator changes depending on the adjustable range. Green indicates a shorter delay time, orange a medium delay, and red a longer delay. 3 Press AUDIO DELAY to exit the adjustment mode. y The adjustment mode is canceled if the unit is left for 20 seconds without any operation being performed. Additional Information Using an external subwoofer Although the unit has a subwoofer built-in, you can use commercially available powered subwoofer of your choice. Refer to "Alternative connections" (☞ P. 5). 1 Set the unit to standby mode. 2 Press both the VOLUME - button and button of the main unit, release the button first, then release the VOLUME - button. This unit is turned on when switching between the built-in subwoofer and external subwoofer. The SURROUND indicator lights up as the following illustration. Check if the setting is correct. ( ☞ P. 11) The SURROUND indicator (for 2 seconds after the unit is turned on) Built-in subwoofer Green External subwoofer No light • The default setting is playback of the built-in subwoofer. • You can verify the current setting by turning the unit on again from standby mode. Note You cannot use the built-in subwoofer and the external subwoofer simultaneously. 8 En
-
 1
1 -
2
-
3
-
4
-
5
-
6
-
 7
7 -
 8
8 -
 9
9 -
 10
10 -
 11
11 -
 12
12 -
 13
13 -
 14
14 -
 15
15 -
 16
16 -
 17
17 -
18
-
19
-
20
 |
 |