Yamaha YMC10 YMC10 Owners Manual Image - Page 9
Recording, Track, Synchronized, Playback - manual
 |
View all Yamaha YMC10 manuals
Add to My Manuals
Save this manual to your list of manuals |
Page 9 highlights
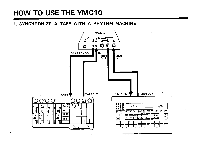
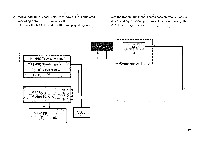
RECORDING THE SYNC TRACK HI Connect a MIDI rhythm machine (such as the RX7) to the YMC10 and multi-track tape recorder (such as the MT100) as shown. 121 Set the YMC10 mode switch to MIDI IN. 3 Begin recording on tape (track 1), and start the RX7. CAUTION • When recording the sync signal, set the recording volume on the MT100 so that the MT100 level meter will read about OVU. • When in MIDI IN mode, there will always be a steady tone sent from the TAPE OUT jack. When the song begins, the steady tone will change to a warble, and when the song is over, it will change back to a steady tone. There is no need to listen to this, but it can be a useful checkpoint. SYNCHRONIZED PLAYBACK Set the YMC10 mode switch to TAPE IN. 2 Set the RX7 sync to MIDI CLOCK. (See the RX7 owners manual.) Play the tape, and the RM7 will begin playing in sync with the tape. (If you use the MT100 pitch control to change the tape speed, the RX7 tempo will change accordingly.) CAUTION • Before playback, be sure to rewind the tape to a bit before the point where the tape sync signal starts. When using other MTR equipment to record and reproduce the sync signal, be sure the recording level is correct. Otherwise, it may not sync. Also, some equipment may reverse the phase of the sync signal, making synchronization impossible. 8
-
 1
1 -
2
-
3
-
 4
4 -
 5
5 -
 6
6 -
 7
7 -
 8
8 -
 9
9 -
 10
10 -
 11
11 -
 12
12 -
 13
13 -
 14
14 -
15
-
16
-
17
-
18
-
19
 |
 |