Zanussi ZHT610X User Manual - Page 6
– Wall unit installation, 3.3 - Connecting suction or filter hoods, fig.7, fig. 9 - charcoal filter
 |
View all Zanussi ZHT610X manuals
Add to My Manuals
Save this manual to your list of manuals |
Page 6 highlights
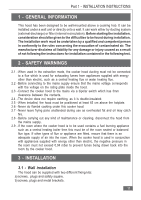
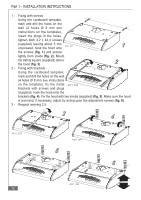
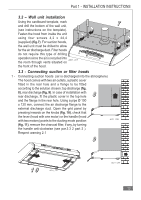
Part 1 - INSTALLATION INSTRUCTIONS 3.2 - Wall unit installation Using the cardboard template, mark and drill the bottom of the wall unit, 7 (see instructions on the template). Fasten the hood from inside the unit using four screws 4,2 x 44,4 (supplied) (fig.7). For suction hoods, the wall unit must be drilled to allow for the air discharge duct. Filter hoods do not require this type of drilling operation since the air is recycled into the room through vents situated on the front of the hood. 3.3 - Connecting suction or filter hoods 1 - Connecting suction hoods (air is discharged into the atmosphere) The hood comes with two air outlets, a plastic cover fitted in the rear hole and a flange to be fitted according to the solution chosen: top discharge (fig. 8 8), rear discharge (fig. 9). In case of installation with rear discharge, fit the plastic cover in the top hole and the flange in the rear hole. Using a pipe Ø 100 o 120 mm, connect the air discharge flange to the external discharge duct. Open the grid panel by pressing inwards on the knobs (fig. 10), check that the lever (hood with one motor) or the handle (hood with two motors) points to the ducting mode position (fig. 11), remove the charcoal filter, if any, by turning the handle anti-clockwise (see par.3.3 2 part 2°). Respect warning 2.1 9 10 13
-
 1
1 -
 2
2 -
 3
3 -
 4
4 -
 5
5 -
 6
6 -
 7
7 -
 8
8 -
 9
9 -
 10
10
 |
 |
