eMachines E181H Service Guide - Page 32
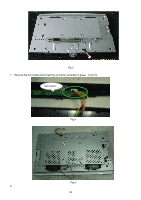
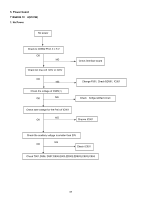
The monitor disassembly completely. Fig 12
 |
View all eMachines E181H manuals
Add to My Manuals
Save this manual to your list of manuals |
Page 32 highlights
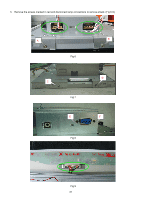
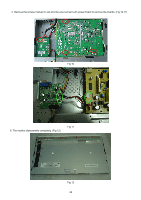
4. Remove the screws marked in red and the wire connect with power board to remove the boards. (Fig 10,11) Fig 10 6. The monitor disassembly completely. (Fig 12) Fig 11 Fig 12 32
-
 1
1 -
2
-
3
-
4
-
5
-
6
-
7
-
8
-
9
-
10
-
11
-
12
-
13
-
14
-
15
-
16
-
17
-
18
-
19
-
20
-
21
-
22
-
23
-
24
-
25
-
26
-
 27
27 -
 28
28 -
 29
29 -
 30
30 -
 31
31 -
 32
32 -
 33
33 -
 34
34 -
 35
35 -
 36
36 -
 37
37 -
38
-
39
-
40
-
41
-
42
-
43
-
44
-
45
-
46
-
47
-
48
-
49
-
50
-
51
-
52
-
53
-
54
-
55
-
56
-
57
-
58
-
59
-
60
-
61
 |
 |

32
4. Remove the screws marked in red and the wire connect with power board to remove the boards. (Fig 10,11)
Fig 10
Fig 11
6. The monitor disassembly completely. (Fig 12)
Fig 12