2011 Dodge Avenger User Guide - Page 30
2011 Dodge Avenger Manual

Page 30 highlights
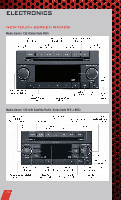
ELECTRONICS Audio Jack • The Audio Jack allows a portable device, such as an MP3 player or a cassette player, to be plugged into the radio and utilize the vehicle's audio system, using a 3.5 mm audio cable, to amplify the source and play through the vehicle speakers. • Pressing the AUX button will change the mode to auxiliary device if the Audio Jack is connected, allowing the music from your portable device to play through the vehicle's speakers. • The functions of the portable device are controlled using the device buttons. The volume may be controlled using the radio or portable device. Clock Setting • Press and hold the TIME button until the hours blink; turn the TUNE/SCROLL control knob to set the hours. • Press the TUNE/SCROLL control knob until the minutes begin to blink; turn the TUNE/SCROLL control knob to set the minutes. • Press the TUNE/SCROLL control knob to save the time change. • To exit, press any button/knob or wait five seconds. Store Radio Presets • Press the SET/RND button once and SET 1 will show in the display. Then select button (1-6). • A second station may be added to each push button. Press the SET/RND button twice and SET 2 will show in the display. Then select button (1-6). How To Load Multiple CDs/DVDs Media Center 230 (Sales Code REQ) Only • Press the LOAD button and then press the button with the corresponding number (1-6) where the CD is being loaded. The radio will display PLEASE WAIT and prompt when to INSERT DISC. • After the radio displays INSERT DISC, insert the CD into the player. The radio display will show LOADING DISC when the disc is loading and "READING DISC" when the radio is reading the disc. • Press the eject button and then the corresponding number (1-6) to eject the desired disc. 28
-
 1
1 -
2
-
3
-
4
-
5
-
6
-
7
-
8
-
9
-
10
-
11
-
12
-
13
-
14
-
15
-
16
-
17
-
18
-
19
-
20
-
21
-
22
-
23
-
24
-
 25
25 -
 26
26 -
 27
27 -
 28
28 -
 29
29 -
 30
30 -
 31
31 -
 32
32 -
 33
33 -
 34
34 -
 35
35 -
36
-
37
-
38
-
39
-
40
-
41
-
42
-
43
-
44
-
45
-
46
-
47
-
48
-
49
-
50
-
51
-
52
-
53
-
54
-
55
-
56
-
57
-
58
-
59
-
60
-
61
-
62
-
63
-
64
-
65
-
66
-
67
-
68
-
69
-
70
-
71
-
72
-
73
-
74
-
75
-
76
-
77
-
78
-
79
-
80
 |
 |