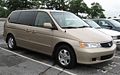
2001 Honda Odyssey Owner's Manual - Page 82
2001 Honda Odyssey Manual
Page 82 highlights
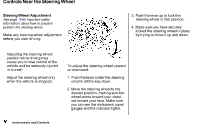
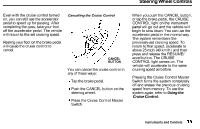
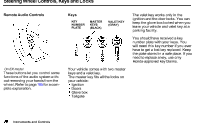
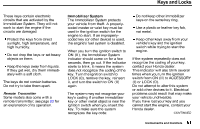
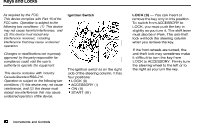
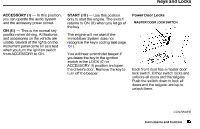
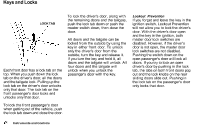
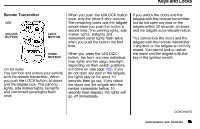
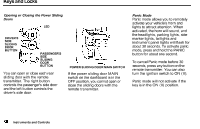
Keys and Locks These keys contain electronic circuits that are activated by the Immobilizer System. They will not work to start the engine if the circuits are damaged. Protect the keys from direct sunlight, high temperature, and high humidity. Do not drop the keys or set heavy objects on them. Keep the keys away from liquids. If they get wet, dry them immediately with a soft cloth. The keys do not contain batteries. Do not try to take them apart. Remote Transmitter Immobilizer System The Immobilizer System protects your vehicle from theft. A properlycoded master or valet key must be used in the ignition switch for the engine to start. If an improperlycoded key (or other device) is used, the engine's fuel system is disabled. When you turn the ignition switch to ON (II), the Immobilizer System indicator should come on for a few seconds, then go out. If the indicator starts to blink, it means the system does not recognize the coding of the key. Turn the ignition switch to LOCK (0), remove the key, reinsert it, and turn the switch to ON (II) again. The system may not recognize your key's coding if another immobilizer key or other metal object is near the ignition switch when you insert the key. To make sure the system recognizes the key code: Do not keep other immobilizer keys on the same key ring. Use a plastic or leather key fob, not metal. Keep other keys away from your vehicle's key and the ignition switch while trying to start the engine. If the system repeatedly does not recognize the coding of your key, contact your Honda dealer. This indicator will also blink several times when you turn the ignition switch from ON (II) to ACCESSORY (I) or LOCK (0). Do not attempt to alter this system or add other devices to it. Electrical problems could result that may make your vehicle undriveable. If you have lost your key and you cannot start the engine, contact your Honda dealer. CONTINUED Some models also come with a remote transmitter; see page 85 for an explanation of its operation. Instruments and Controls
-
 1
1 -
2
-
3
-
4
-
5
-
6
-
7
-
8
-
9
-
10
-
11
-
12
-
13
-
14
-
15
-
16
-
17
-
18
-
19
-
20
-
21
-
22
-
23
-
24
-
25
-
26
-
27
-
28
-
29
-
30
-
31
-
32
-
33
-
34
-
35
-
36
-
37
-
38
-
39
-
40
-
41
-
42
-
43
-
44
-
45
-
46
-
47
-
48
-
49
-
50
-
51
-
52
-
53
-
54
-
55
-
56
-
57
-
58
-
59
-
60
-
61
-
62
-
63
-
64
-
65
-
66
-
67
-
68
-
69
-
70
-
71
-
72
-
73
-
74
-
75
-
76
-
 77
77 -
 78
78 -
 79
79 -
 80
80 -
 81
81 -
 82
82 -
 83
83 -
 84
84 -
 85
85 -
 86
86 -
 87
87 -
88
-
89
-
90
-
91
-
92
-
93
-
94
-
95
-
96
-
97
-
98
-
99
-
100
-
101
-
102
-
103
-
104
-
105
-
106
-
107
-
108
-
109
-
110
-
111
-
112
-
113
-
114
-
115
-
116
-
117
-
118
-
119
-
120
-
121
-
122
-
123
-
124
-
125
-
126
-
127
-
128
-
129
-
130
-
131
-
132
-
133
-
134
-
135
-
136
-
137
-
138
-
139
-
140
-
141
-
142
-
143
-
144
-
145
-
146
-
147
-
148
-
149
-
150
-
151
-
152
-
153
-
154
-
155
-
156
-
157
-
158
-
159
-
160
-
161
-
162
-
163
-
164
-
165
-
166
-
167
-
168
-
169
-
170
-
171
-
172
-
173
-
174
-
175
-
176
-
177
-
178
-
179
-
180
-
181
-
182
-
183
-
184
-
185
-
186
-
187
-
188
-
189
-
190
-
191
-
192
-
193
-
194
-
195
-
196
-
197
-
198
-
199
-
200
-
201
-
202
-
203
-
204
-
205
-
206
-
207
-
208
-
209
-
210
-
211
-
212
-
213
-
214
-
215
-
216
-
217
-
218
-
219
-
220
-
221
-
222
-
223
-
224
-
225
-
226
-
227
-
228
-
229
-
230
-
231
-
232
-
233
-
234
-
235
-
236
-
237
-
238
-
239
-
240
-
241
-
242
-
243
-
244
-
245
-
246
-
247
-
248
-
249
-
250
-
251
-
252
-
253
-
254
-
255
-
256
-
257
-
258
-
259
-
260
-
261
-
262
-
263
-
264
-
265
-
266
-
267
-
268
-
269
-
270
-
271
-
272
-
273
-
274
-
275
-
276
-
277
-
278
-
279
-
280
-
281
-
282
-
283
-
284
-
285
-
286
-
287
-
288
-
289
-
290
-
291
-
292
-
293
-
294
-
295
-
296
-
297
-
298
-
299
-
300
-
301
-
302
-
303
-
304
-
305
-
306
-
307
-
308
-
309
-
310
-
311
-
312
-
313
-
314
-
315
-
316
-
317
-
318
-
319
-
320
-
321
-
322
-
323
-
324
-
325
-
326
-
327
-
328
-
329
-
330
-
331
-
332
-
333
-
334
-
335
-
336
-
337
-
338
-
339
-
340
-
341
-
342
-
343
-
344
-
345
-
346
-
347
-
348
-
349
-
350
-
351
-
352
-
353
-
354
-
355
-
356
-
357
-
358
-
359
-
360
 |
 |
