2006 Honda Accord Owner's Manual - Page 123
2006 Honda Accord Manual
Page 123 highlights
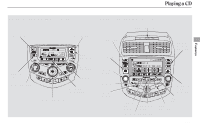
Playing a CD, CD Changer For Vehicles with in-dash CD Changer 1. Press the LOAD button until you hear a beep and see ''LOAd'' in the display. 2. The disc number for an empty position is highlighted and the red light starts blinking. 3. Insert the disc into the CD slot when the green CD load indicator comes on. Insert it only about halfway; the drive will pull it in the rest of the way. You will see ''BUSY'' in the display as the CD load indicator turns red and blinks as the CD is loaded. 4. When the CD load indicator turns green and ''LOAD'' appears in the screen again, insert the next CD in the slot. 5. Repeat steps 1 through 3 until all six positions are loaded. If you are not loading all six positions, the system begins playing the last CD loaded. You can also load a CD into an empty position while a CD is playing. Select the empty position (the disc number indicator is not highlighted) and press the appropriate preset bar or touch a disc icon. The current CD stops playing and starts the loading sequence. The CD just loaded will play. You operate the CD changer with the same controls used for the radio. The numbers of the disc and track playing are shown in the display. On vehicles with navigation system, these numbers also appear in the upper display. For Vehicles with in-dash CD Changer To select a different disc, press the appropriate side of a preset bar (1 6) or use the Preset 5 (DISC ) to select the previous disc or Preset 6 (DISC ) to select the next disc in sequence. On vehicles with navigation system, touch the appropriate disc icon or press the or side of the CH/DISC bar. If you select an empty position in the CD changer, the system will try to load the CD in the next available slot. Features 125
-
 1
1 -
2
-
3
-
4
-
5
-
6
-
7
-
8
-
9
-
10
-
11
-
12
-
13
-
14
-
15
-
16
-
17
-
18
-
19
-
20
-
21
-
22
-
23
-
24
-
25
-
26
-
27
-
28
-
29
-
30
-
31
-
32
-
33
-
34
-
35
-
36
-
37
-
38
-
39
-
40
-
41
-
42
-
43
-
44
-
45
-
46
-
47
-
48
-
49
-
50
-
51
-
52
-
53
-
54
-
55
-
56
-
57
-
58
-
59
-
60
-
61
-
62
-
63
-
64
-
65
-
66
-
67
-
68
-
69
-
70
-
71
-
72
-
73
-
74
-
75
-
76
-
77
-
78
-
79
-
80
-
81
-
82
-
83
-
84
-
85
-
86
-
87
-
88
-
89
-
90
-
91
-
92
-
93
-
94
-
95
-
96
-
97
-
98
-
99
-
100
-
101
-
102
-
103
-
104
-
105
-
106
-
107
-
108
-
109
-
110
-
111
-
112
-
113
-
114
-
115
-
116
-
117
-
 118
118 -
 119
119 -
 120
120 -
 121
121 -
 122
122 -
 123
123 -
 124
124 -
 125
125 -
 126
126 -
 127
127 -
 128
128 -
129
-
130
-
131
-
132
-
133
-
134
-
135
-
136
-
137
-
138
-
139
-
140
-
141
-
142
-
143
-
144
-
145
-
146
-
147
-
148
-
149
-
150
-
151
-
152
-
153
-
154
-
155
-
156
-
157
-
158
-
159
-
160
-
161
-
162
-
163
-
164
-
165
-
166
-
167
-
168
-
169
-
170
-
171
-
172
-
173
-
174
-
175
-
176
-
177
-
178
-
179
-
180
-
181
-
182
-
183
-
184
-
185
-
186
-
187
-
188
-
189
-
190
-
191
-
192
-
193
-
194
-
195
-
196
-
197
-
198
-
199
-
200
-
201
-
202
-
203
-
204
-
205
-
206
-
207
-
208
-
209
-
210
-
211
-
212
-
213
-
214
-
215
-
216
-
217
-
218
-
219
-
220
-
221
-
222
-
223
-
224
-
225
-
226
-
227
-
228
-
229
-
230
-
231
-
232
-
233
-
234
-
235
-
236
-
237
-
238
-
239
-
240
-
241
-
242
-
243
-
244
-
245
-
246
-
247
-
248
-
249
-
250
-
251
-
252
-
253
-
254
-
255
-
256
-
257
-
258
-
259
-
260
-
261
-
262
-
263
-
264
-
265
-
266
-
267
-
268
-
269
-
270
-
271
-
272
-
273
-
274
-
275
-
276
-
277
-
278
-
279
-
280
-
281
-
282
-
283
-
284
-
285
-
286
 |
 |