1996 Nissan Sentra Owner's Manual - Page 179
1996 Nissan Sentra Manual

Page 179 highlights
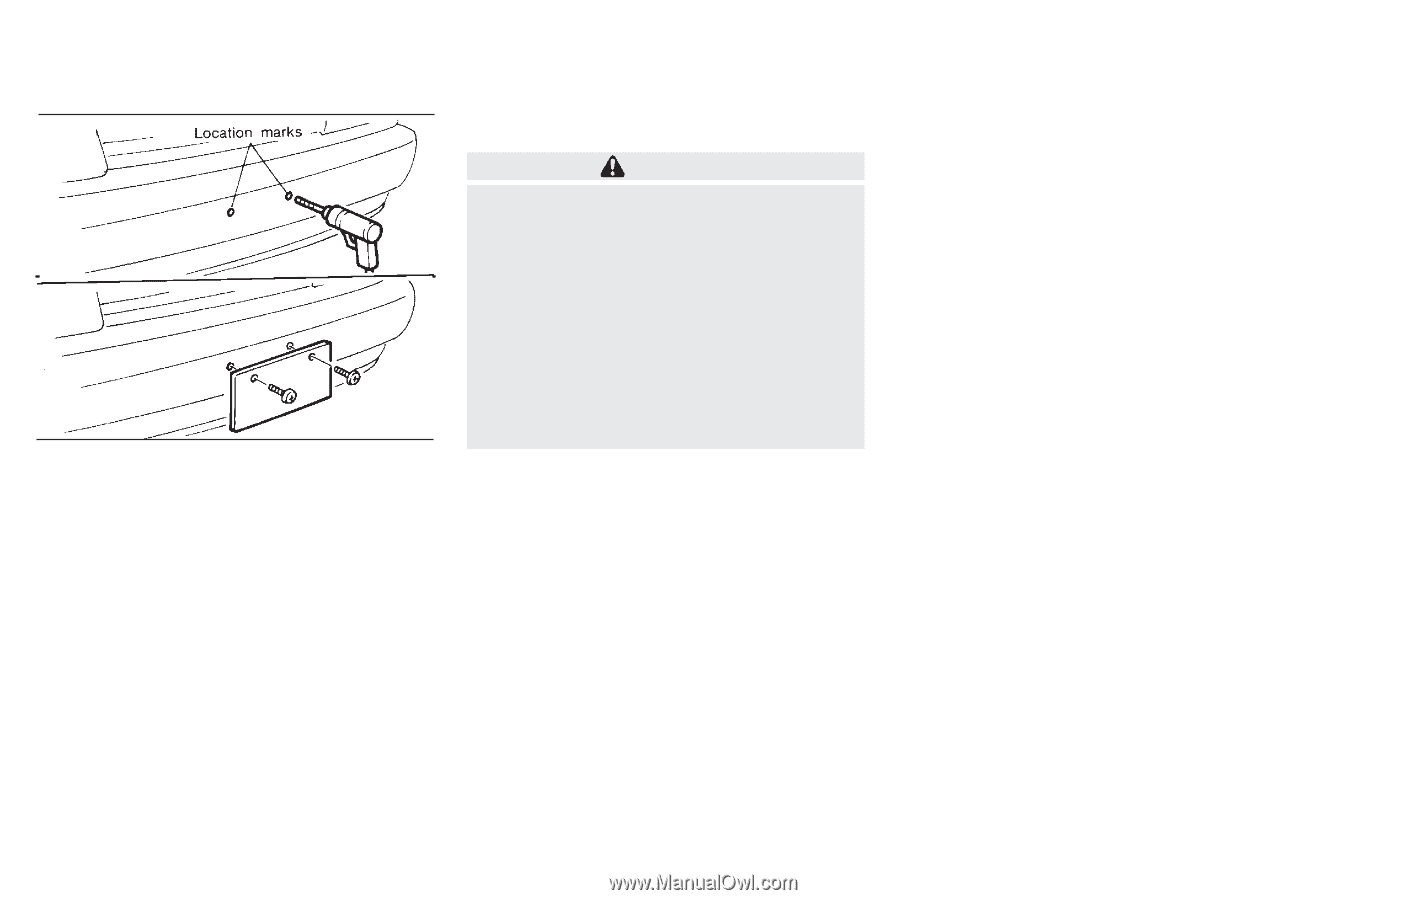
INSTALLING LICENSE PLATE VEHICLE LOADING INFORMATION WARNING ● It is extremely dangerous to ride in a cargo area inside of a vehicle. In a collision, people riding in these areas are more likely to be seriously injured or killed. ● Do not allow people to ride in any area of your vehicle that is not equipped with seats and seat belts. TI1077MA ● GVWR (Gross Vehicle Weight Rating) maximum total weight (load) limit specified for the vehicle. ● GAWR (Gross Axle Weight Rating) maximum weight (load) limit specified for the front or rear axle. Determining Vehicle Load Capacity The load capacity of this vehicle is determined by weight, not by available cargo space. For example, a luggage rack, bike carrier, cartop carrier or similar equipment does not increase load carrying capacity of your vehicle. To determine vehicle load capacity: Vehicle weight can be determined by using a commercial-grade scale, found at places such as a truck stop, gravel quarry, grain elevator, or a scrap metal recycling facility. 1) Determine the curb weight of your vehicle. 2) Compare the curb weight amount to the GVWR specified for your vehicle to determine how much more weight your vehicle can carry. 3) After loading (cargo and passengers), ● Be sure everyone in your vehicle is in a seat and using a seat belt properly. Use the following steps to mount the license plate: 1. Make a hole in each plastic finisher at the location mark (small dimple) using a 0.31 in (8 mm) drill. To avoid damaging the threads behind the finisher, apply only light pressure to the drill. 2. Mount the license plate using two M6-14mm bolts. License plate bolt tightening torque: 3.8 to 4.7 ft-lb (5.10 to 6.37 N m) Terms It is important to familiarize yourself with the following terms before loading your vehicle: ● Curb Weight (actual weight of your vehicle) - vehicle weight including: standard and optional equipment, fluids, emergency tools, and spare tire assembly. This weight does not include passengers and cargo. ● GVW (Gross Vehicle Weight) - curb weight plus the combined weight of passengers and cargo. 9-14
-
 1
1 -
2
-
3
-
4
-
5
-
6
-
7
-
8
-
9
-
10
-
11
-
12
-
13
-
14
-
15
-
16
-
17
-
18
-
19
-
20
-
21
-
22
-
23
-
24
-
25
-
26
-
27
-
28
-
29
-
30
-
31
-
32
-
33
-
34
-
35
-
36
-
37
-
38
-
39
-
40
-
41
-
42
-
43
-
44
-
45
-
46
-
47
-
48
-
49
-
50
-
51
-
52
-
53
-
54
-
55
-
56
-
57
-
58
-
59
-
60
-
61
-
62
-
63
-
64
-
65
-
66
-
67
-
68
-
69
-
70
-
71
-
72
-
73
-
74
-
75
-
76
-
77
-
78
-
79
-
80
-
81
-
82
-
83
-
84
-
85
-
86
-
87
-
88
-
89
-
90
-
91
-
92
-
93
-
94
-
95
-
96
-
97
-
98
-
99
-
100
-
101
-
102
-
103
-
104
-
105
-
106
-
107
-
108
-
109
-
110
-
111
-
112
-
113
-
114
-
115
-
116
-
117
-
118
-
119
-
120
-
121
-
122
-
123
-
124
-
125
-
126
-
127
-
128
-
129
-
130
-
131
-
132
-
133
-
134
-
135
-
136
-
137
-
138
-
139
-
140
-
141
-
142
-
143
-
144
-
145
-
146
-
147
-
148
-
149
-
150
-
151
-
152
-
153
-
154
-
155
-
156
-
157
-
158
-
159
-
160
-
161
-
162
-
163
-
164
-
165
-
166
-
167
-
168
-
169
-
170
-
171
-
172
-
173
-
 174
174 -
 175
175 -
 176
176 -
 177
177 -
 178
178 -
 179
179 -
 180
180 -
 181
181 -
 182
182 -
 183
183 -
 184
184 -
185
-
186
-
187
-
188
-
189
-
190
-
191
 |
 |