1996 Nissan Sentra Owner's Manual - Page 77
1996 Nissan Sentra Manual

Page 77 highlights
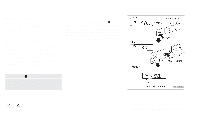
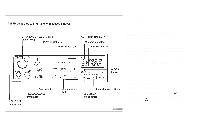
Do not force the cassette tape into the tape door. Pressing strongly could cause player damage. The cassette tape automatically changes directions to play the other side when the first side is complete. At this time, the arrow in the display window changes direction. ● To maintain good quality sound, NISSAN recommends using cassette tapes of 60 minutes or shorter in length. ● Cassette tapes should be removed from the player when not in use. Store cassettes in their protective cases and away from direct sunlight, heat, moisture and magnetic sources. ● Direct sunlight can cause the cassette to become deformed. The use of deformed cassettes may cause the cassette to jam in the player. ● Do not use cassettes with labels which are peeling and loose. If used, the label could jam in the player. ● If a cassette has loose tape, insert a pencil through one of the cassette hubs and rewind the tape firmly AHA0522 Adjusting tone quality and sound balance To adjust BASS, TREB (treble), FADER, and BAL (balance) the control knobs must be released from their stowed positions. Pushing the knobs once moves them to the released position. In the released position, the knobs control tone quality. Turn the control knobs to adjust BASS and TREB to the most pleasing level. From the released position, the knobs must be pulled out in order to control FADER and BAL. FADER adjusts the sound level between the front and rear speakers, and BAL adjusts the sound level between the right and left speakers. Cassette tape operation Turn the ignition key to ACC or ON, then lightly insert the cassette tape into the tape door. The cassette tape automatically pulls into the player. The word TAPE and an arrow indicating tape side illuminates in the display window. 3-16
-
 1
1 -
2
-
3
-
4
-
5
-
6
-
7
-
8
-
9
-
10
-
11
-
12
-
13
-
14
-
15
-
16
-
17
-
18
-
19
-
20
-
21
-
22
-
23
-
24
-
25
-
26
-
27
-
28
-
29
-
30
-
31
-
32
-
33
-
34
-
35
-
36
-
37
-
38
-
39
-
40
-
41
-
42
-
43
-
44
-
45
-
46
-
47
-
48
-
49
-
50
-
51
-
52
-
53
-
54
-
55
-
56
-
57
-
58
-
59
-
60
-
61
-
62
-
63
-
64
-
65
-
66
-
67
-
68
-
69
-
70
-
71
-
 72
72 -
 73
73 -
 74
74 -
 75
75 -
 76
76 -
 77
77 -
 78
78 -
 79
79 -
 80
80 -
 81
81 -
 82
82 -
83
-
84
-
85
-
86
-
87
-
88
-
89
-
90
-
91
-
92
-
93
-
94
-
95
-
96
-
97
-
98
-
99
-
100
-
101
-
102
-
103
-
104
-
105
-
106
-
107
-
108
-
109
-
110
-
111
-
112
-
113
-
114
-
115
-
116
-
117
-
118
-
119
-
120
-
121
-
122
-
123
-
124
-
125
-
126
-
127
-
128
-
129
-
130
-
131
-
132
-
133
-
134
-
135
-
136
-
137
-
138
-
139
-
140
-
141
-
142
-
143
-
144
-
145
-
146
-
147
-
148
-
149
-
150
-
151
-
152
-
153
-
154
-
155
-
156
-
157
-
158
-
159
-
160
-
161
-
162
-
163
-
164
-
165
-
166
-
167
-
168
-
169
-
170
-
171
-
172
-
173
-
174
-
175
-
176
-
177
-
178
-
179
-
180
-
181
-
182
-
183
-
184
-
185
-
186
-
187
-
188
-
189
-
190
-
191
 |
 |
