3Com 3CRWE20096A User Guide - Page 8
Connecting the, Access Point, Checking the LED, Indicators - default ip
 |
UPC - 662705444925
View all 3Com 3CRWE20096A manuals
Add to My Manuals
Save this manual to your list of manuals |
Page 8 highlights
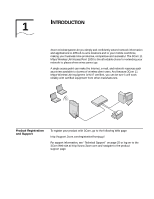
8 CHAPTER 2: INSTALLING AN ACCESS POINT Connecting the Access Point Property Default Setting Access Point Network Obtain an IP address automatically (Used if a DHCP server is available. If a DHCP server does not assign it an IP address, the access point's default IP address is 169.254.xxx.1, where xxx is the last byte of the access point's MAC address)) Wireless DHCP Server Enabled Clear Channel Select Automatically select the best channel Network Traffic Accelerator Off (Wi-Fi interoperable) Data Preamble Long (Wi-Fi interoperable) Encryption Setting No Security (Open System) Administration Password None If the configuration that was set at the factory does not meet your network requirements, or if you want to customize settings, see "Summary of Configuration Steps" on page 9. Place the access point on a flat surface such as a table, desktop, or the top of a cabinet and connect it to power and to a port on your hub or switch as shown below. Crossover cable Checking the LED Indicators For correct operation, use the provided Ethernet crossover cable. If you use a standard straight-through (UTP) Ethernet cable, you must connect to the hub's uplink (MDIX) port. When the access point is connected to power, two LEDs indicate activity as follows: LED Indicator Location Description Wireless association On the top of s On-Unit is receiving power. the access point s Off-Unit is not receiving power. s Blinking-The unit is transmitting or receiving. Faster blinking indicates faster transmission speed. Ethernet connection At the RJ45 s On-Unit has an Ethernet connection. Ethernet conn ector s Off-Unit does not have an Ethernet connection. s Blinking-Wired LAN traffic is detected. Faster blinking indicates heavier traffic.
-
 1
1 -
2
-
 3
3 -
 4
4 -
 5
5 -
 6
6 -
 7
7 -
 8
8 -
 9
9 -
 10
10 -
 11
11 -
 12
12 -
 13
13 -
14
-
15
-
16
-
17
-
18
-
19
-
20
-
21
-
22
-
23
-
24
-
25
-
26
-
27
-
28
-
29
-
30
-
31
-
32
 |
 |
