AIWA NSX-Aj14 Operating Instructions
AIWA NSX-Aj14 Manual
 |
View all AIWA NSX-Aj14 manuals
Add to My Manuals
Save this manual to your list of manuals |
AIWA NSX-Aj14 manual content summary:
- AIWA NSX-Aj14 | Operating Instructions - Page 1
CHAINE STEREO AVEC LECTEUR DE DISQUES COMPACTS NSX-AJ14 OPERATING INSTRUCTIONS MANUAL DE INSTRUCCIONES MODE D'EMPLOI En (English) when you contact your Aiwa dealer in case of difficulty. Model No. Serial No. For assistance and information call toll free 1-800-BUY-AIWA (United States and - AIWA NSX-Aj14 | Operating Instructions - Page 2
. The exclamation point within an equilateral triangle is intended to alert the user to the presence of important operating and maintenance (servicing) instructions in the literature accompanying the appliance. NOTE This equipment has been tested and found to comply with the limits for a Class - AIWA NSX-Aj14 | Operating Instructions - Page 3
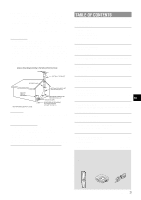
proper grounding of the mast, supporting structure, and the lead-in Instructions. Damage Requiring Service Have the units serviced by a qualified service RADIO RECEPTION MANUAL TUNING 9 TROUBLESHOOTING GUIDE 18 SPECIFICATIONS 19 PARTS INDEX Back cover Check your system and accessories NSX-AJ14 - AIWA NSX-Aj14 | Operating Instructions - Page 4
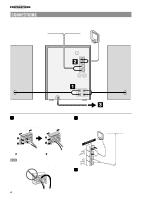
AM antenna to AM LOOP terminals. AM antenna FM antenna The speaker cord with the white stripe should be connected to 0 terminal and the black cord to 9 terminal. Be sure to connect the speaker cords correctly. Improper connections can cause short circuits in SPEAKERS terminals. 3 Connect the AC - AIWA NSX-Aj14 | Operating Instructions - Page 5
PREPARATIONS • Do not leave objects generating magnetism, such as credit cards, near the speakers, as these objects may be damaged. • Do not bring the FM antenna near metal objects or curtain rails. • Do not bring the AM antenna near other optional equipment, the stereo system itself, the AC cord - AIWA NSX-Aj14 | Operating Instructions - Page 6
is selected. ECO OFF • The power economizing mode does not function. 6 ENGLISH 4 Press a within 4 seconds. If the clock is not set, the unit does not black out. Instead, the DEMO will begin when the power is turned off. DIMMER MODE To change the display dimmer mode 1 Press ECO repeatedly until "DIM - AIWA NSX-Aj14 | Operating Instructions - Page 7
in which low frequency sound is originally emphasized. In this case, cancel the T-BASS system. If the power-economizing mode (page 6) is on, the unit blacks out when the power is turned off. To view the clock, press CLOCK while pressing SHIFT so that the time is displayed for 4 seconds. 7 ENGLISH - AIWA NSX-Aj14 | Operating Instructions - Page 8
GRAPHIC EQUALIZER TAPE PLAYBACK BASIC OPERATIONS This unit provides the following three different equalization curves. ROCK: Powerful sound emphasizing treble and bass POP: More presence in the vocals and midrange CLASSIC: Enriched sound with heavy bass and fine treble. Press one of ROCK, POP or - AIWA NSX-Aj14 | Operating Instructions - Page 9
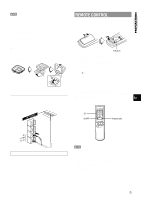
) Keep f DOWN or g UP pressed until the frequency starts to change rapidly. After tuning in to a station, the search stops. To stop the Auto Search manually, press f DOWN or g UP. • The Auto Search may not stop at stations with very weak signals. When an FM stereo broadcast contains noise Press MONO - AIWA NSX-Aj14 | Operating Instructions - Page 10
CD PLAYING BASIC OPERATIONS PLAYING DISCS Load discs. To play all discs in the disc compartment, press c. Play begins with the disc on tray 1. LOADING DISCS Press CD, then press z OPEN/CLOSE to open the disc compartment. Load disc(s) with the label side up. To play one or two discs, place the - AIWA NSX-Aj14 | Operating Instructions - Page 11
CD PLAYING RANDOM /REPEAT PLAY Use the remote control. RANDOM play All the tracks on the selected disc or all the discs can be played randomly. REPEAT play A single disc or all the discs can be played repeatedly. Press RANDOM/REPEAT while pressing SHIFT . Each time it is pressed, the function can - AIWA NSX-Aj14 | Operating Instructions - Page 12
RECORDING BASIC RECORDING Preparation • Use Type I (normal) tapes only. • Set the tape to the point where recording will start. 1 Insert the tape to be recorded on into deck 1. Press s/z to open the cassette holder and insert the tape with the side to be recorded on first facing out from the unit. - AIWA NSX-Aj14 | Operating Instructions - Page 13
RECORDING AI EDIT RECORDING 6 Press w on deck 1 to start recording on the first side. CD play and recording of edited tracks for the first side start simultaneously. When the end of the tape is reached, deck 1 enters the recording stop mode. After entering the recording stop mode, go to step 7. 7 - AIWA NSX-Aj14 | Operating Instructions - Page 14
PROGRAMMED EDIT RECORDING 6 Repeat step 5 for the rest of the tracks for side A. A track whose playing time is longer than the remaining time cannot be programmed. 7 Press CD EDIT/CHECK while pressing SHIFT on the remote control to select side B and program the tracks for side B. After confirming - AIWA NSX-Aj14 | Operating Instructions - Page 15
RECORDING TIMER SETTING THE TIMER 6 Prepare the source. To listen to a CD, load the disc to be played first on tray 1. To listen to a tape, insert the tape into deck 1 or 2. To listen to the radio, select the band and tune in to a station. 7 Press POWER to turn off the power. When the timer-on - AIWA NSX-Aj14 | Operating Instructions - Page 16
SETTING THE SLEEP TIMER OTHER FEATURES DEMO (Demonstration) The unit can be turned off automatically at a specified time. Use the remote control. 1 Press SLEEP while pressing SHIFT. 2 Within 4 seconds, press f or g to specify the time until the power is turned off. The time changes between 5 and - AIWA NSX-Aj14 | Operating Instructions - Page 17
OTHER CONNECTIONS OTHER FEATURES Refer to the operating instructions of the connected equipment for details. • The and the white plug to the VIDEO/AUX L jack. When connecting a turntable Use an Aiwa turntable equipped with a built-in equalizer amplifier. CD DIGITAL OUT (OPTICAL) JACK This unit - AIWA NSX-Aj14 | Operating Instructions - Page 18
TROUBLESHOOTING GUIDE the unit fails to perform as described in these Operating Instructions, check the following guide. GENERAL There is no sound. • Is the AC or a malfunction occurs. © Reset the unit as stated below. The unit blacks out when the power is turned off. • Is the power economizing mode - AIWA NSX-Aj14 | Operating Instructions - Page 19
SPECIFICATIONS Main unit CX-NAJ14 FM tuner section Tuning range Usable sensitivity (IHF) Antenna terminals 87.5 MHz to 108 MHz 13.2 dBf 75 ohms (unbalanced) AM tuner section Tuning range Usable sensitivity Antenna 530 kHz to 1710 kHz (10 kHz step) 531 kHz to 1602 kHz (9 kHz step) 350 µV/m Loop - AIWA NSX-Aj14 | Operating Instructions - Page 20
6,7,9-11,13-16 t/gUP 6,7,9-11,13-16 sCLEAR 6,7,9-11,13,14,16 cPRESET 6,9-11,16 VOL(N,M 7 For assistance and information call toll free 1-800-BUY-AIWA (United States and Puerto Rico) Printed in Malaysia - AIWA NSX-Aj14 | Operating Instructions - Page 21
de instrucciones. Energía eléctrica 1 Fuentes de alimentación - Conecte solamente esta unidad a las fuentes de alimentación especificadas en el manual de instrucciones, y como está marcado en la unidad. 2 Polarización - Como característica de seguridad, algunas unidades están equipadas con clavijas - AIWA NSX-Aj14 | Operating Instructions - Page 22
trasera Mantenimiento Limpie la unidad sólo como se recomienda en el manual de instrucciones. Daños que necesitan ser reparados Haga que un DE REPARAR LA UNIDAD USTED MISMO. Compruebe su sistema y los accesorios NSX-AJ14 CX-NAJ14 Sintonizador, amplificador, platina de casete y reproductor de discos - AIWA NSX-Aj14 | Operating Instructions - Page 23
PREPARATIVOS CONEXIONES Antes de conectar el cable de alimentación de CA La tensión nominal de su unidad, mostrada en el panel trasero, es de 120 V CA. Asegúrese de que la tensión nominal coincida con la tensión empleada en su localidad. IMPORTANTE Conecte primero los altavoces, las antenas y todos - AIWA NSX-Aj14 | Operating Instructions - Page 24
PREPARATIVOS • No deje objetos que generen magnetismo, tales como tarjetas de crédito, cerca de los altavoces porque podrían estropearse. • No ponga la antena de FM cerca de objetos metálicos o rieles de cortinas. • No ponga la antena de AM cerca de otros equipos opcionales, el propio sistema esté - AIWA NSX-Aj14 | Operating Instructions - Page 25
ANTES DE LA OPERACION ECO AUTO • Además de las tres operaciones de ECO ON, la unidad se apagará automáticamente si usted no la utiliza y la función está en el modo de parada durante 10 minutos cuando se selecciona CD o TAPE. ECO OFF • El modo de ahorro de energía no funciona. 1 Pulse ECO. Se - AIWA NSX-Aj14 | Operating Instructions - Page 26
PUESTA EN HORA DEL RELOJ SONIDO AJUSTES DE AUDIO PREPARATIVOS SONIDO Utilice el control remoto. 1 Pulse CLOCK mientras pulsa SHIFT. Cuando utilice la unidad, pulse a mientras la unidad esté desconectada. El reloj se visualiza. (":" entre las horas y los minutos parpadeará.) 2 Antes de que pasen - AIWA NSX-Aj14 | Operating Instructions - Page 27
ECUALIZADOR GRAFICO REPRODUCCION DE CINTAS OPERACIONES BASICAS Platina 1 Platina 2 Esta unidad ofrece las tres curvas de ecualización diferentes siguientes: ROCK: Sonido potente que realza los agudos y los graves. POP: Más presencia en las voces y en la gama de registro medio. CLASSIC: Sonido - AIWA NSX-Aj14 | Operating Instructions - Page 28
RECEPCION DE LA RADIO SINTONIZACION MANUAL PREAJUSTE DE EMISORAS RECEPTION DE LA RADIO REPRODUCCION DE CINTAS SONIDO 1 Pulse repetidamente TUNER/BAND para seleccionar la banda deseada. FM AM Cuando se pulse - AIWA NSX-Aj14 | Operating Instructions - Page 29
REPRODUCCION DE DISCOS COMPACTOS OPERACIONES BASICAS INTRODUCCION DE DISCOS Pulse CD, y luego pulse z OPEN/CLOSE para abrir el compartimiento de los discos. Introduzca el(los) disco(s) con el lado de la etiqueta hacia arriba. Para reproducir uno o dos discos, ponga los discos en las bandejas 1 y 2. - AIWA NSX-Aj14 | Operating Instructions - Page 30
REPRODUCCION DE DISCOS COMPACTOS REPRODUCCION ALEATORIA/REPETICION DE REPRODUCCION Utilice el control remoto. Reproducción aleatoria Todas las canciones del disco seleccionado o de todos los discos podrán reproducirse aleatoriamente. Repetición de reproducción Un solo disco o todos ellos podrán - AIWA NSX-Aj14 | Operating Instructions - Page 31
GRABACION GRABACION BASICA Preparación • Utilice solamente cintas tipo I (normales). • Bobine la cinta hasta el punto donde vaya a empezar la grabación. 1 Inserte la cinta que vaya a grabar en la platina 1. Pulse Z para abrir el portacasete e insertar la cinta con la cara que vaya a grabar en primer - AIWA NSX-Aj14 | Operating Instructions - Page 32
GRABACION GRABACION CON EDICION AI La función de grabación con edición AI permite grabar discos compactos sin preocuparse de la duración de la cinta y de las canciones. Cuando se inserte un disco compacto, la unidad calculará automáticamente la duración total de las canciones. En caso de ser - AIWA NSX-Aj14 | Operating Instructions - Page 33
GRABACION CON EDICION PROGRAMADA 6 Repita el paso 5 para el resto de las canciones para la cara A. Una canción cuyo tiempo de reproducción sea superior al tiempo restante no podrá ser programada. 7 Pulse CD EDIT/CHECK mientras pulsa SHIFT del control remoto para seleccionar la cara B y programe las - AIWA NSX-Aj14 | Operating Instructions - Page 34
TEMPORIZADOR AJUSTE DEL TEMPORIZADOR La unidad podrá encenderse a la hora especificada todos los días gracias al temporizador incorporado. Preparación Asegúrese de que la hora del reloj sea correcta. 1 Pulse uno de los botones de función para seleccionar una fuente. 2 Pulse TIMER mientras pulse - AIWA NSX-Aj14 | Operating Instructions - Page 35
AJUSTE DEL TEMPORIZADOR PARA DORMIR OTRAS CARACTERISTICAS DEMO (Demonstración) La unidad se podrá apagar automáticamente después de transcurrido un tiempo especificado. Utilice el control remoto. 1 Pulse SLEEP mientras pulsa SHIFT. 2 Antes de que pasen 4 segundos, pulse f o g para especificar el - AIWA NSX-Aj14 | Operating Instructions - Page 36
EXTERNAS OTRAS CONEXIONES OTRAS CARACTERISTICAS TEMPORIZADOR Consulte el manual de instrucciones del equipo conectado para tener más . Obtenga los cables de conexión necesarios. • Consulte con su concesionario AIWA en cuanto al equipo opcional. TOMAS VIDEO/AUX Esta unidad puede introducir - AIWA NSX-Aj14 | Operating Instructions - Page 37
de alimentación de CA y conectándolo de nuevo. Luego ejecute el paso 2. 18 ESPAÑOL Si la unidad no funciona como se describe en este manual de instrucciones, compruebe la guía siguiente: GENERALIDADES No hay sonido. • ¿Está bien conectado el cable de alimentación de CA? • ¿Hay alguna conexión mal - AIWA NSX-Aj14 | Operating Instructions - Page 38
GENERALIDADES ESPECIFICACIONES Unidad principal CX-NAJ14 Sección del sintonizador de FM Gama de sintonización 87,5 MHz a 108 MHz Sensibilidad útil (IHF) 13,2 dBf Terminales de antena 75 ohmios (desequilibrada) Sección del sintonizador de AM Gama de sintonización 530 kHz a 1710 kHz (pasos - AIWA NSX-Aj14 | Operating Instructions - Page 39
ral sert à prévenir l'utilisateur de la présence d'instructions importantes concernant l'utilisation et l'entretien (ou la réparation) de appareil pas les orifices de ventilation. 6 Chariot et support - Si l'appareil est posé ou monté sur un support ou un chariot, déplacer ce dernier avec précaution - AIWA NSX-Aj14 | Operating Instructions - Page 40
de la mise à la terre du mât, de la structure de support et du conducteur arrivant à l'unité de décharge d'antenne et 18 EN CAS DE PROBLEME 18 SPECIFICATIONS 19 NOMENCLATURE -MEME. Contrôler la chaîne et les accessoires NSX-AJ14 CX-NAJ14 Récepteur magnétocassette lecteur de disques compacts - AIWA NSX-Aj14 | Operating Instructions - Page 41
PREPARATIONS CONNEXIONS Avant de brancher le cordon secteur La tension nominale d'alimentation secteur de l'appareil, indiquée au dos de ce dernier, est de 120V. S'assurer que cette tension nominale correspond à celle du secteur local. IMPORTANT Commencer par connecter les enceintes, les antennes - AIWA NSX-Aj14 | Operating Instructions - Page 42
PREPARATIONS • Ne pas laisser d'objets produisant un champ magnétique,tels que des cartes de crédit, près des enceintes, ils pourraient être endommagés. • Ne pas mettre l'antenne FM près d'objets métalliques ou de tringles à rideaux. • Ne pas mettre l'antenne AM près d'un appareil optionnel, de la - AIWA NSX-Aj14 | Operating Instructions - Page 43
affichée à la place du mode DEMO. Appuyer sur c pour activer. (Pour plus de détails au sujet du mode DEMO, voir page 16) MISE EN SERVICE DU MODE ECONOMIE D'ENERGIE Quand on règle le mode économie d'énergie sur "ECO ON" ou "ECO AUTO", l'appareil diminue sa consommation électrique en effectuant les - AIWA NSX-Aj14 | Operating Instructions - Page 44
sur SHIFT avant de terminer l'étape 3. Ceci annule tout nouveau réglage. Pour faire apparaître l'horloge quand un autre affichage est en service Appuyer sur CLOCK tout en appuyant sur SHIFT. L'heure est affichée pendant quatre secondes puis l'affichage initial réapparaît. Toutefois, l'heure ne peut - AIWA NSX-Aj14 | Operating Instructions - Page 45
EGALISEUR GRAPHIQUE LECTURE DE CASSETTES OPERATIONS DE BASE Platine 1 Platine 2 Cet appareil possède les trois courbes d'égalisation différentes suivantes. ROCK: Son puissant accentuant les aigus et les graves POP: Présence accrue des parties vocales et de la gamme moyenne CLASSIC: Son enrichi - AIWA NSX-Aj14 | Operating Instructions - Page 46
RECEPTION RADIO ACCORD MANUEL MEMORISATION DE STATIONS SON RECEPTION RADIO LECTURE DE CASSETTES 1 Appuyer sur TUNER/BAND à plusieurs reprises pour sélectionner la gamme souhaitée. FM AM Quand on appuie sur TUNER/BAND alors que l'alimentation est coupée, l'appareil est mis sous tension - AIWA NSX-Aj14 | Operating Instructions - Page 47
LECTURE DE DISQUES COMPACTS OPERATIONS DE BASE MISE EN PLACE DE DISQUES Appuyer sur CD, puis appuyer sur z OPEN/CLOSE pour ouvrir le compartiment à disques. Mettre le(s) disque(s) en place avec l'étiquette en haut. Pour lire un ou deux disques, mettre les disques sur les plateaux 1 et 2. Pour lire - AIWA NSX-Aj14 | Operating Instructions - Page 48
LECTURE DE DISQUES COMPACTS LECTURE ALEATOIRE/REPETEE Utiliser la télécommande. Lecture aléatoire Toutes les plages du disque sélectionné ou tous les disques peuvent être lues dans un ordre aléatoire. Lecture répétée Un seul disque ou tous les disques peuvent être lus à plusieurs reprises. Appuyer - AIWA NSX-Aj14 | Operating Instructions - Page 49
une station. Pour enregistrer à partir d'une source connectée, appuyer sur VIDEO/AUX. 3 Appuyer sur w pour démarrer l'enregistrement. c est mise en service simultanément. Lors de l'enregistrement à partir d'une source connectée, mettre cette source en lecture. Quand la fonction sélectionnée est CD - AIWA NSX-Aj14 | Operating Instructions - Page 50
ENREGISTREMENT AVEC MONTAGE ET CALCUL DU TEMPS La fonction enregistrement avec montage et calcul du temps permet d'enregistrer à partir de disques compacts sans se préoccuper de la durée de la cassette et des durées des plages. Quand on met un disque compact en place, l'appareil calcule - AIWA NSX-Aj14 | Operating Instructions - Page 51
ENREGISTREMENT AVEC MONTAGE PROGRAMME 6 Répéter l'étape 5 pour le reste des plages de la face A. Une plage dont la durée de lecture est supérieure au temps restant ne peut pas être programmée. 7 Appuyer sur CD EDIT/CHECK tout en appuyant sur SHIFT de la télécommande pour sélectionner la face B, - AIWA NSX-Aj14 | Operating Instructions - Page 52
MINUTERIE ENREGISTREMENT MINUTERIE REGLAGE DE LA MINUTERIE 7 Appuyer sur POWER pour mettre l'appareil hors tension. Quand l'heure de la mise sous tension par la minuterie est atteinte, l'appareil est mis sous tension et la lecture commence sur la source sélectionnée. 8 Effectuer les préparations - AIWA NSX-Aj14 | Operating Instructions - Page 53
REGLAGE DE LA MINUTERIE D'ARRET AUTRES CARACTERISTIQUES DEMO (Démonstration) L'appareil peut être mis hors tension automatiquement au bout d'un temps spécifié. Utiliser la télécommande. 1 Appuyer sur SLEEP tout en appuyant sur SHIFT. 2 Dans les quatre secondes, appuyer f ou g pour spécifier le - AIWA NSX-Aj14 | Operating Instructions - Page 54
la fiche rouge à la prise VIDEO/AUX R et la fiche blanche à la prise VIDEO/AUX L. Pour connecter un tourne-disque Utiliser un tourne-disque Aiwa muni d'un amplificateur à égaliseur intégré. PRISE CD DIGITAL OUT (OPTICAL) Cet appareil peut sortir les signaux sonores numériques de disque compact par - AIWA NSX-Aj14 | Operating Instructions - Page 55
CAS DE PROBLEME Un entretien appareil ne fonctionne pas comme décrit dans ce mode d'emploi, contrôler le guide suivant. GENERALITES Il n'y a pas de son. • Le cordon secteur est-il enceinte. • Une touche de fonction incorrecte n'est-elle pas en service? Le son ne sort que par une enceinte. • L'autre - AIWA NSX-Aj14 | Operating Instructions - Page 56
absorbée en attente Dimensions (L × H × P) Poids Secteur 120 V, 60 Hz 38 W 8,0 W avec le mode économie d'énergie hors service 0,9 W avec le mode économie d'énergie en service 260 × 324 × 348 mm 4,8 kg Enceintes acoustiques SX-NAJ11 Enceinte acoustique 2 voies, bass-reflex (Type à blindage
-
 1
1 -
 2
2 -
 3
3 -
 4
4 -
 5
5 -
 6
6 -
 7
7 -
8
-
9
-
10
-
11
-
12
-
13
-
14
-
15
-
16
-
17
-
18
-
19
-
20
-
21
-
22
-
23
-
24
-
25
-
26
-
27
-
28
-
29
-
30
-
31
-
32
-
33
-
34
-
35
-
36
-
37
-
38
-
39
-
40
-
41
-
42
-
43
-
44
-
45
-
46
-
47
-
48
-
49
-
50
-
51
-
52
-
53
-
54
-
55
-
56
 |
 |
COMPACT DISC STEREO SYSTEM
SISTEMA ESTEREO CON REPRODUCTOR DE DISCOS COMPACTOS
CHAINE STEREO AVEC LECTEUR DE DISQUES COMPACTS
NSX-AJ14
OPERATING INSTRUCTIONS
MANUAL DE INSTRUCCIONES
MODE D’EMPLOI
U
En
(English)
E
(Español)
8A-NFZ-923-01
000415AKH-U-9
F
(Français)
For assistance and information
call toll free 1-800-BUY-AIWA
(United States and Puerto Rico)
Owner’s record
For your convenience, record the model number and serial number (you will find
them on the rear of your set) in the space provided below. Please refer to them
when you contact your Aiwa dealer in case of difficulty.
Model No.
Serial No.