AIWA NSX-Aj14 Operating Instructions - Page 7
Audio Adjustments, Setting The Clock
 |
View all AIWA NSX-Aj14 manuals
Add to My Manuals
Save this manual to your list of manuals |
Page 7 highlights
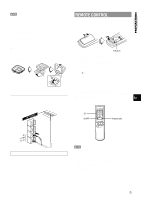
SETTING THE CLOCK SOUND AUDIO ADJUSTMENTS SOUND PREPARATIONS Use the remote control. 1 Press CLOCK while pressing SHIFT. When using the unit, press a while the power is off. The clock is displayed. (The ":" between the hours and minutes flashes.) 2 Within 4 seconds, press f or g to designate the hour and the minute. Pressing either button changes both the hour and the minute. Holding it down will vary the time rapidly by 10-minute interval, and pressing it repeatedly will vary by 1 minute interval. 3 Press a. The clock starts from 00 seconds. To restore an original clock setting Press CLOCK while pressing SHIFT before completing step 3 to restore the previous time setting. This cancels any new setting. To view the clock when another display is in the display Press CLOCK while pressing SHIFT. The time is displayed for 4 seconds and then the original display reappears. However, the clock cannot be displayed during recording. To switch to the 24-hour standard Press CLOCK while pressing SHIFT and then press s within 4 seconds. Repeat the same procedure to restore the 12-hour standard. In the 12-hour standard, "AM 12:00" indicates midnight and "PM12:00" indicates noon. If the clock display flashes If the display flashes when the clock is displayed, it indicates that the clock has stopped due to a power failure or the removal of the power cord. The current time needs to be reset. VOLUME Turn VOLUME on the main unit, or press VOL on the remote control. The volume level is displayed as a number from 0 to MAX (31). The volume level is automatically set to 16 when the power is turned off with the volume level set to 17 or more. SUPER T-BASS SYSTEM The T-BASS system enhances the realism of low-frequency sound. Press T-BASS. En Each time it is pressed, the level changes. Select one of the three levels, or the off position to suit your preference. To select with the remote control Press T-BASS while pressing SHIFT. Low frequency sound may be distorted when the T-BASS system is used for a disc or tape in which low frequency sound is originally emphasized. In this case, cancel the T-BASS system. If the power-economizing mode (page 6) is on, the unit blacks out when the power is turned off. To view the clock, press CLOCK while pressing SHIFT so that the time is displayed for 4 seconds. 7 ENGLISH
-
 1
1 -
 2
2 -
 3
3 -
 4
4 -
 5
5 -
 6
6 -
 7
7 -
 8
8 -
 9
9 -
 10
10 -
 11
11 -
 12
12 -
13
-
14
-
15
-
16
-
17
-
18
-
19
-
20
-
21
-
22
-
23
-
24
-
25
-
26
-
27
-
28
-
29
-
30
-
31
-
32
-
33
-
34
-
35
-
36
-
37
-
38
-
39
-
40
-
41
-
42
-
43
-
44
-
45
-
46
-
47
-
48
-
49
-
50
-
51
-
52
-
53
-
54
-
55
-
56
 |
 |
