ASRock 939S56-M RAID Utility for Windows Guide
ASRock 939S56-M Manual
 |
View all ASRock 939S56-M manuals
Add to My Manuals
Save this manual to your list of manuals |
ASRock 939S56-M manual content summary:
- ASRock 939S56-M | RAID Utility for Windows Guide - Page 1
Guide to SiS RAID Utility for Windows XP / 2000 1. General 1. After installing the SiS RAID utility, go to "Start" menu and choose "Programs." From the " want to re-configure the RAID type, we suggest you to re-configure it in "SiS RAID BIOS Setting Utility" rather than this "SiS RAID Utility for - ASRock 939S56-M | RAID Utility for Windows Guide - Page 2
2. The SiS RAID Utility window opens as below. The main interface has two tabs: View and Configuration. You can switch to different tabs by clicking on it. On "View" tab, - ASRock 939S56-M | RAID Utility for Windows Guide - Page 3
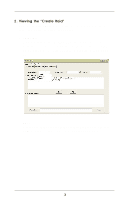
2. Viewing the "Create Raid" Click the tab Create Raid, you can find three drop-down box and three panes. Those meaning will be showing below. 1. Raid Type: Click the drop-down box "Raid Type". This box enables the user to select array type. There are three array types that the user can select: JBOD - ASRock 939S56-M | RAID Utility for Windows Guide - Page 4
2. Block Size: If user selected RAID 0 array types in the "RAID Type" box, the "Block Size" drop-down box will be enabled and user must select a block size. Clicking the drop-down box "Block Size", there are seven block size that the user can select: 8k, 16k, 32k, 64k, 128k, 256k and 512k. User can - ASRock 939S56-M | RAID Utility for Windows Guide - Page 5
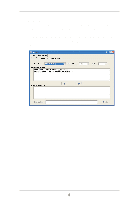
3. Mode Type: Click the drop-down box "Mode Type". This box enables the user to select mode type. There are two mode types that the user can select: PIO and DMA. User can select any one mode type to create a RAID set. The default selection is DMA. NOTE For the "Mode" option, you may select between " - ASRock 939S56-M | RAID Utility for Windows Guide - Page 6
select the first!", "Please select the first!", "Please select the first!", "Please select the disk you want first!", "Mirror supports TWO DISKS only.", "Raid Created successful! Reboot please!!" or "Raid Creation failed!". 6 - ASRock 939S56-M | RAID Utility for Windows Guide - Page 7
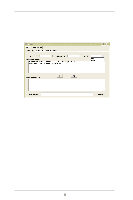
3. Create Raid A. To create a JBOD array, follow these steps: 1. Configuration "Create Raid" "Raid Type" JBOD. 2. From the drop-down box "Mode Type", select the mode type you want or use the default value "DMA". 3. From the pane, select the disk and click downward arrow icon or - ASRock 939S56-M | RAID Utility for Windows Guide - Page 8
to cancel. 5. Next, another message box will pop up to tell user that disk setting has been changed and ask whether to restart the computer or not. Click Yes button to restart the computer or click Cancel button to skip restarting. NOTE New Setting will be activated only after you restart the - ASRock 939S56-M | RAID Utility for Windows Guide - Page 9
B. To create a RAID 0 (Stripe) array, follow these steps: 1. Configuration "Create Raid" "Raid Type" RAID 0. 2. From the drop-down box "Block Size", select the block size you want. 3. From the drop-down box "Mode Type", select the mode type you want. 4. From the pane, select the - ASRock 939S56-M | RAID Utility for Windows Guide - Page 10
5. When the RAID0 array's configuration is finished, click the Create button. Then a "Create Stripe RaidSet" dialog will pop up. Source: Target: Create Only: Source is not a boot device: Source is a boot device: OK: The first selected disk. The second selected disk. Select - ASRock 939S56-M | RAID Utility for Windows Guide - Page 11
7. If the operation is "Split data into Raid0", a warning message will pop up. See below: Next, you may click Yes button to start the operation or click No button to cancel. When this operation is beginning, you still can click the destroy button on the "Create Stripe RaidSet" dialog to stop this - ASRock 939S56-M | RAID Utility for Windows Guide - Page 12
. When you click "Yes" button to start this operation, the following warning message will popup. Next, you can click "Ok" button to restart the windows and start the operation "Source is a boot device" of . Or click "Cancel" button to suspend this operation. But, this - ASRock 939S56-M | RAID Utility for Windows Guide - Page 13
C. To create a RAID 1 (Mirror) array, follow these steps: 1. Configuration "Create Raid" "Raid Type" RAID 1. 2. From the drop-down box "Mode Type", select the mode type you want. 3. From the pane, select the disk and click downward arrow icon or double click it to add the disk on - ASRock 939S56-M | RAID Utility for Windows Guide - Page 14
4. When the RAID1 array's configuration is finished, click the Create button. Then a "Create Mirror RaidSet" dialog will pop up. Source: Target: Create Only: Create and Duplicate: OK: Cancel: The first selected disk. The second selected disk. Select this option will destroy - ASRock 939S56-M | RAID Utility for Windows Guide - Page 15
"Yes" button to start this operation, the following warning message will popup. Click "OK" button to start this duplicating action. Don't restart your computer or it will cause the action fail. 7. When the operation is finished, the restart warning message will popup as well as JBOD array creation - ASRock 939S56-M | RAID Utility for Windows Guide - Page 16
4. Explaining the RaidType Information General case: RAID0 (A = B C | D E) RAID0: Raid Type A: total number of disks in this Raid B,C: the serial number of each disk in this Raid D,E: a) Raid is correct, B=D C=E b) Raid is error, D or E will show "?" or "!". In that case, the meaning of - ASRock 939S56-M | RAID Utility for Windows Guide - Page 17
17 - ASRock 939S56-M | RAID Utility for Windows Guide - Page 18
the tab "Delete Raid", you can find some panes and two buttons. The RaidType meaning will show below. 1. Connfiguration "Delete Raid", the following windows will appear: 2. Highlight the disk array in the pane, and then click the Information button, or double click the array. You - ASRock 939S56-M | RAID Utility for Windows Guide - Page 19
to cancel. 4. Next, another message will pop up to tell user the setting of these disks have been changed and ask whether to restart the computer. 19 - ASRock 939S56-M | RAID Utility for Windows Guide - Page 20
6. Raid Recovery NOTE The recovering operation is workable only when error RAID1 set exist. 1. Click the tab Raid Recovery, you can find two panes and some buttons. Those meaning will be showing below. 2. First, you can click the button Available Raid to find whether any error RAID set existing. See - ASRock 939S56-M | RAID Utility for Windows Guide - Page 21
the Stop button to cancel this operation. This operation can be broken off if you want to close this RAID utility or shut down your computer, and it can continue when you open this RAID utility again or restart you - ASRock 939S56-M | RAID Utility for Windows Guide - Page 22
to Single SATA drive. 2. SiS Hot-Plug Utility only supports Windows 2000 and XP. 3. Usually, each power wire will 5 seconds. How to use SiS964/SiS180 Hot-Plug Utility 1. After installing the SiS RAID driver, the SiS Hot-Plug Utility will be installed automatically. And this Hot-Plug utility will - ASRock 939S56-M | RAID Utility for Windows Guide - Page 23
2. Next, you can click the "SATA Status" and the SiS Hot-Plug Utility window opens as below. You can click the drop-down box "Adapter" to select the controller you want to use. The default value is the information - ASRock 939S56-M | RAID Utility for Windows Guide - Page 24
4. If you want to remove any one SATA device and hope that the data can be protected. You can click the grid in front of "SATAx Safely Remove", and then click the button "OK" to remove it. The following message will be popup to tell you that hard disk can be removed safely now. 5. If you plug in a
-
 1
1 -
 2
2 -
 3
3 -
 4
4 -
 5
5 -
 6
6 -
 7
7 -
8
-
9
-
10
-
11
-
12
-
13
-
14
-
15
-
16
-
17
-
18
-
19
-
20
-
21
-
22
-
23
-
24
 |
 |

1
Guide to SiS RAID Utility for Windows XP / 2000
1. General
1.
After installing the SiS RAID utility, go to “Start” menu and choose
“Programs.” From the “Programs” menu, choose “SiS RAID Utility” and
click on “SiSRaid”
NOTE
If your working OS is installed in the SATA hard disk(s) and you want to
re-configure the RAID type, we suggest you to re-configure it in “SiS
RAID BIOS Setting Utility” rather than this “SiS RAID Utility for Windows.