ASRock 939S56-M RAID Utility for Windows Guide - Page 8
Create, Cancel
 |
View all ASRock 939S56-M manuals
Add to My Manuals
Save this manual to your list of manuals |
Page 8 highlights
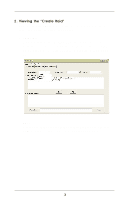
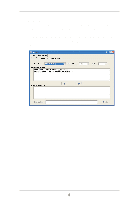
4. When the JBOD array's configuration is finished, click the Create button. Then a warning message will pop up. Pay attention to the warning message, and then click Yes button to finish the creation of JBOD array, or click No button to cancel. NOTE If the disk you selected has the ability of booting, another warning message will pop up before "SiS Software RAID" message. You may click Yes button to continue or click No button to cancel. 5. Next, another message box will pop up to tell user that disk setting has been changed and ask whether to restart the computer or not. Click Yes button to restart the computer or click Cancel button to skip restarting. NOTE New Setting will be activated only after you restart the computer. 8
-
 1
1 -
2
-
 3
3 -
 4
4 -
 5
5 -
 6
6 -
 7
7 -
 8
8 -
 9
9 -
 10
10 -
 11
11 -
 12
12 -
 13
13 -
14
-
15
-
16
-
17
-
18
-
19
-
20
-
21
-
22
-
23
-
24
 |
 |

8
4.
When the JBOD array’s configuration is finished, click the
Create
button. Then a warning message will pop up. Pay attention to the
warning message, and then click
Yes
button to finish the creation of
JBOD array, or click
No
button to cancel.
NOTE
If the disk you selected has the ability of booting,
another warning message will pop up before “SiS
Software RAID” message. You may click
Yes
button
to continue or click
No
button to cancel.
5.
Next, another message box will pop up to tell user that disk setting
has been changed and ask whether to restart the computer or not.
Click
Yes
button to restart the computer or click
Cancel
button to
skip restarting.
NOTE
New Setting will be activated only after you restart
the computer.