Adaptec FS4500 User Guide - Page 39
Hot-swapping Drive Carriers, About the Drive Carriers, Important Safety Precautions - controller
 |
UPC - 760884144275
View all Adaptec FS4500 manuals
Add to My Manuals
Save this manual to your list of manuals |
Page 39 highlights
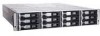
Removing and Replacing Enclosure Components Hot-swapping Drive Carriers This section provides basic information about the drive carriers and carrier removal instructions. For drive carrier installation instructions, see page 2-9. About the Drive Carriers The drive carriers are located on the front of the Storage Enclosure. (See Figure 1-1 on page 1-4.) The drive carriers have a mechanical button-activated cam system that helps control installation and removal, and have an optional disk drive shield attached. Carrier blanks are provided for drive slots without disk drives installed. Holes in the front of the drive carriers and carrier blanks allow air to flow into the enclosure and cool the disk drives and enclosure. During installation, ensure that the cooling holes in the carriers or carrier blanks are not obstructed. Either a drive carrier or a carrier blank must be installed in every drive slot to maintain proper airflow and cooling inside the enclosure. Failed drive carriers can be hot-swapped. Important Safety Precautions Before you remove a drive carrier, read these important cautionary notes: ! Caution: Although the drive carriers are hot-swappable, stop all I/O activity on the disk drive to be replaced to avoid data loss. Removing a disk drive during I/O activity could also hang the host system. ! Caution: Do not attempt to remove more than one drive carrier or carrier blank at one time. Damage to the drive carrier locking tabs can occur if adjacent drive carriers are removed at the same time. 4-2
-
 1
1 -
2
-
3
-
4
-
5
-
6
-
7
-
8
-
9
-
10
-
11
-
12
-
13
-
14
-
15
-
16
-
17
-
18
-
19
-
20
-
21
-
22
-
23
-
24
-
25
-
26
-
27
-
28
-
29
-
30
-
31
-
32
-
33
-
 34
34 -
 35
35 -
 36
36 -
 37
37 -
 38
38 -
 39
39 -
 40
40 -
 41
41 -
 42
42 -
 43
43 -
 44
44 -
45
-
46
-
47
-
48
-
49
-
50
-
51
-
52
-
53
-
54
-
55
-
56
-
57
-
58
-
59
-
60
-
61
-
62
-
63
-
64
-
65
-
66
-
67
-
68
-
69
-
70
-
71
-
72
-
73
-
74
-
75
-
76
-
77
-
78
-
79
-
80
-
81
-
82
-
83
-
84
-
85
-
86
-
87
-
88
-
89
-
90
-
91
 |
 |
