Adobe 65011817 User Guide - Page 77
Working with vector objects, Basic shapes, Draw and edit basic shapes, Draw a line
 |
UPC - 883919157368
View all Adobe 65011817 manuals
Add to My Manuals
Save this manual to your list of manuals |
Page 77 highlights
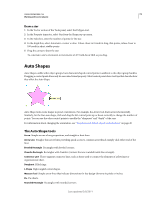
71 Chapter 6: Working with vector objects A vector object is a computer graphic whose shape is defined by a path. The shape of a vector path is determined by points that are plotted along the path. A vector object's stroke color follows the path, and its fill occupies the area inside the path. The stroke and fill determine how the graphic looks when published in print or on the web. Vector object shapes include basic shapes, Auto Shapes (vector object groups that have special controls for adjusting their attributes), and free-form shapes. You can use a variety of tools and techniques to draw and edit vector objects. Basic shapes Basic shapes include lines, rectangles, ellipses, rounded rectangles, polygons, and stars. Draw and edit basic shapes The Rectangle tool and the Rounded Rectangle tool draw rectangles as grouped objects. To move a rectangle corner point independently, ungroup the rectangle or use the Subselection tool . For more information on resizing and scaling objects, see "Transform and distort objects and selections" on page 45. Draw a line, rectangle, or ellipse 1 From the Tools panel, select the Line, Rectangle, or Ellipse tool. 2 (Optional) Set the stroke and fill attributes in the Property inspector. 3 Drag on the canvas to draw the shape. • For the Line tool, Shift-drag to constrain lines to 45° increments. • For the Rectangle or Ellipse tool, Shift-drag to constrain shapes to squares or circles. Increase the sharpness of lines Use the Snap To Pixel (Modify > Snap To Pixel) command to increase the sharpness of lines. The command does not work for paths. Resizing the object can make the line blurred again. Note: You cannot undo the Snap To Pixel command. Scenario Problem Solution A rectangle drawn using Snap To Pixels is The rectangle doesn't snap to pixels. scaled with Scale Strokes and Effects option disabled in the Preferences dialog box. Select the the object, rightclick, and select Snap To Pixel. A line with even stroke width is drawn using The line appears blurred. the Line tool. Select the object, and select Modify > Snap To Pixel. A straight line vector path drawn using the The path appears blurred. Pen tool. Right-click the path, and select Snap To Pixel. Draw a shape from the center point ❖ Position the pointer at the intended center point and Alt-drag (Windows) or Option-drag (Mac OS) the drawing tool. To constrain proportions, also hold down Shift. Last updated 3/8/2011
-
 1
1 -
2
-
3
-
4
-
5
-
6
-
7
-
8
-
9
-
10
-
11
-
12
-
13
-
14
-
15
-
16
-
17
-
18
-
19
-
20
-
21
-
22
-
23
-
24
-
25
-
26
-
27
-
28
-
29
-
30
-
31
-
32
-
33
-
34
-
35
-
36
-
37
-
38
-
39
-
40
-
41
-
42
-
43
-
44
-
45
-
46
-
47
-
48
-
49
-
50
-
51
-
52
-
53
-
54
-
55
-
56
-
57
-
58
-
59
-
60
-
61
-
62
-
63
-
64
-
65
-
66
-
67
-
68
-
69
-
70
-
71
-
 72
72 -
 73
73 -
 74
74 -
 75
75 -
 76
76 -
 77
77 -
 78
78 -
 79
79 -
 80
80 -
 81
81 -
 82
82 -
83
-
84
-
85
-
86
-
87
-
88
-
89
-
90
-
91
-
92
-
93
-
94
-
95
-
96
-
97
-
98
-
99
-
100
-
101
-
102
-
103
-
104
-
105
-
106
-
107
-
108
-
109
-
110
-
111
-
112
-
113
-
114
-
115
-
116
-
117
-
118
-
119
-
120
-
121
-
122
-
123
-
124
-
125
-
126
-
127
-
128
-
129
-
130
-
131
-
132
-
133
-
134
-
135
-
136
-
137
-
138
-
139
-
140
-
141
-
142
-
143
-
144
-
145
-
146
-
147
-
148
-
149
-
150
-
151
-
152
-
153
-
154
-
155
-
156
-
157
-
158
-
159
-
160
-
161
-
162
-
163
-
164
-
165
-
166
-
167
-
168
-
169
-
170
-
171
-
172
-
173
-
174
-
175
-
176
-
177
-
178
-
179
-
180
-
181
-
182
-
183
-
184
-
185
-
186
-
187
-
188
-
189
-
190
-
191
-
192
-
193
-
194
-
195
-
196
-
197
-
198
-
199
-
200
-
201
-
202
-
203
-
204
-
205
-
206
-
207
-
208
-
209
-
210
-
211
-
212
-
213
-
214
-
215
-
216
-
217
-
218
-
219
-
220
-
221
-
222
-
223
-
224
-
225
-
226
-
227
-
228
-
229
-
230
-
231
-
232
-
233
-
234
-
235
-
236
-
237
-
238
-
239
-
240
-
241
-
242
-
243
-
244
-
245
-
246
-
247
-
248
-
249
-
250
-
251
-
252
-
253
-
254
-
255
-
256
-
257
-
258
-
259
-
260
-
261
-
262
-
263
-
264
-
265
-
266
-
267
-
268
-
269
-
270
-
271
-
272
-
273
-
274
-
275
-
276
-
277
-
278
-
279
-
280
-
281
-
282
-
283
-
284
-
285
-
286
-
287
-
288
-
289
-
290
-
291
-
292
-
293
-
294
-
295
-
296
-
297
-
298
-
299
-
300
 |
 |