Airlink AMPS230 Quick Installation Guide
Airlink AMPS230 Manual
 |
UPC - 658729087262
View all Airlink AMPS230 manuals
Add to My Manuals
Save this manual to your list of manuals |
Airlink AMPS230 manual content summary:
- Airlink AMPS230 | Quick Installation Guide - Page 1
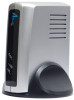
Ver. 1A Quick Installation Guide USB2.0 1-Port Multi-Functional Printer Server Model # AMPS230 Package Content: • 1-Port MFP Server • Power Adapter • Ethernet Cable • Driver & Utility CD • Quick Installation Guide Section 1 This Quick Installation Guide only provides basic instructions. For detailed - Airlink AMPS230 | Quick Installation Guide - Page 2
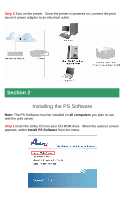
Step 4 Turn on the printer. Once the printer is powered on, connect the print server's power adapter to an electrical outlet. Section 2 Installing the PS Software Note: The PS Software must be installed on all computers you plan to use with the print server. Step 1 Insert the Utility CD into your CD - Airlink AMPS230 | Quick Installation Guide - Page 3
Note: If the autorun window does not appear automatically, go to Start -> Run and type D:\Utility\Setup.exe (where D is the letter of your CD-ROM drive) and click OK. Step 2 Select your setup language and click OK. Step 3 Click Next at the welcome screen. - Airlink AMPS230 | Quick Installation Guide - Page 4
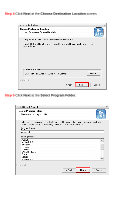
Step 4 Click Next at the Choose Destination Location screen. Step 5 Click Next at the Select Program Folder. - Airlink AMPS230 | Quick Installation Guide - Page 5
box is checked and click Finish. Section 3 Configuring the Printer Server Note: The following steps only need to be performed one time from one computer. Step 1 Click the Discover button and your printer should show up under Server Name. If your print server does not show up, check all power and - Airlink AMPS230 | Quick Installation Guide - Page 6
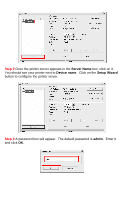
Step 2 Once the printer server appears in the Server Name box, click on it. You should see your printer next to Device name. Click on the Setup Wizard button to configure the printer server. Step 3 A password box will appear. The default password is admin. Enter it and click OK. - Airlink AMPS230 | Quick Installation Guide - Page 7
Click Next at the welcome screen. Step 5 At the System screen you can change the Server Name, Port Name, and Password. Click Next after making the desired changes. If you do not have a specific Server Name, Port Name, or Password that you would like to use, click Next to accept the default settings. - Airlink AMPS230 | Quick Installation Guide - Page 8
Step 6 If you have a specific IP address you would like to assign to the print server, select Manually Assign and enter your custom settings. Otherwise, select DHCP Assign Automatically and click Next. Step 7 If your network uses a workgroup name other than WORKGROUP, you - Airlink AMPS230 | Quick Installation Guide - Page 9
Step 8 If you have specific AppleTalk settings, you can enter them here or accept the default settings, and click Next. Step 9 Click Save to save the changes to your print server. - Airlink AMPS230 | Quick Installation Guide - Page 10
on all computers you plan to use with the print server. Step 1 Double click on the PS-Link icon in the system tray to open the PS-Link software. Step 2 Click the Discover button and your printer should show up under Server Name. If your print server does not show up, check all power and network - Airlink AMPS230 | Quick Installation Guide - Page 11
Step 3 Select your print server from the Server Name box and click the Link button. Step 4 Click OK at the Link Successfully screen. You will see notices appearing in the bottom right-hand corner of your screen while Windows configures the printer. Step 5 Once you see a notice that says Your new - Airlink AMPS230 | Quick Installation Guide - Page 12
plan to use with the print server. After installing the printer server on your computer(s), you might have to use the applications in Windows to scan instead of the original software from your printer manufacturer. For the instructions on how to scan via the printer server, you can refer to Section - Airlink AMPS230 | Quick Installation Guide - Page 13
Section 5 Technical Support E-mail: [email protected] Toll Free: 1-888-746-3238 Website: www.airlink101.com *Printer server may not support all printers. Go to the AirLink101 website to view the printer compatibility list *Actual data throughput will vary. Network conditions and environmental
-
 1
1 -
 2
2 -
 3
3 -
 4
4 -
 5
5 -
 6
6 -
 7
7 -
8
-
9
-
10
-
11
-
12
-
13
 |
 |

Quick Installation Guide
USB2.0 1-Port Multi-Functional Printer Server
Model # AMPS230
This Quick Installation Guide only provides basic instructions.
For detailed
information on using this product, please refer to the User’s Manual on the
supplied CD.
Connecting the Printer Server
WARNING:
Only a USB printer may be connected to the USB port of the
Printer Server.
Connecting any other USB device to the Printer Server may
damage the Printer Server.
Note:
Before connecting the Printer Server, you must install the printer driver
on each computer you plan to use with the printer.
Make sure that you are able
to print, scan, and fax from each with your multi-functional printer directly
connected to your computer(s).
Step 1
Power down the printer and the printer server.
Step 2
Connect one end of a networking cable to your router, then connect the
other end to the Ethernet port on the back of the print server.
Step 3
Connect the USB cable coming from your printer into the USB port on
the printer server.
Section 1
Ver. 1A
Package Content:
•
1-Port MFP Server
•
Power Adapter
•
Ethernet Cable
•
Driver & Utility CD
•
Quick Installation Guide