Airlink AR686WV2 Quick Installation Guide
Airlink AR686WV2 Manual
 |
View all Airlink AR686WV2 manuals
Add to My Manuals
Save this manual to your list of manuals |
Airlink AR686WV2 manual content summary:
- Airlink AR686WV2 | Quick Installation Guide - Page 1
Quick Installation Guide 300N Multi-Function Wireless Router Model # AR686WV2 Ver. 1A - Airlink AR686WV2 | Quick Installation Guide - Page 2
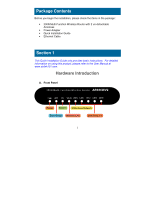
• 300N Multi-Function Wireless Router with 2 un-detachable Antennas • Power Adapter • Quick Installation Guide • Ethernet Cable Section 1 This Quick Installation Guide only provides basic instructions. For detailed information on using this product, please refer to the User Manual at www.airlink101 - Airlink AR686WV2 | Quick Installation Guide - Page 3
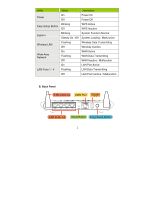
LEDs Status Description On Power On Power Off Power Off Blinking Easy-Setup Button Off WPS Active WPS Inactive System Blinking System Function Normal Steady On / Off System Loading / Malfunction Wireless LAN Flashing Off Wireless Data Transmitting Wireless Inactive Wide-Area Network - Airlink AR686WV2 | Quick Installation Guide - Page 4
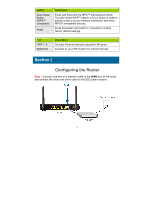
Button Easy-Setup Button (WPS™ compatible) Reset Description Press and hold until the WPS™ light begins to blink. This will initiate WPS™ search on your router in order to quickly create a secure network connection with other WPS™-compatible devices. Press this button and hold for 7 seconds to - Airlink AR686WV2 | Quick Installation Guide - Page 5
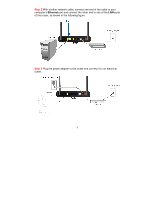
Step 2 With another network cable, connect one end of the cable to your computer's Ethernet port and connect the other end to one of the LAN ports of the router, as shown in the following figure. Step 3 Plug the power adapter to the router and connect it to an electrical outlet. 4 - Airlink AR686WV2 | Quick Installation Guide - Page 6
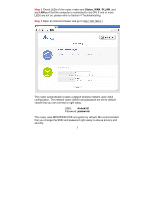
ON. If one or more LEDs are not on, please refer to Section 4 Troubleshooting. Step 5 Open an internet browser and go to http://192.168.2.1 The router set to default values that you can connect to right away. SSID: Airlink101 Password: password The router uses WPA/WPA2-PSK encryption by default. We - Airlink AR686WV2 | Quick Installation Guide - Page 7
Step 6 Clear the SSID and enter your own unique name. The SSID you enter will be the name of your wireless network. You can keep the default SSID if you'd like. Step 7 We highly recommend changing the password. To do so, clear the default password and enter your own unique password. The password - Airlink AR686WV2 | Quick Installation Guide - Page 8
in order to establish a wireless connection to the router. In this section, you can find the instructions of how to connect to the router wirelessly with your Windows 7 computer. You can also refer to the manual of your wireless adapter on how to connect to the router. Step 1 Click on the wireless - Airlink AR686WV2 | Quick Installation Guide - Page 9
Step 2 Enter the password you configured in Step 7 if you have enabled the wireless security, then click OK. The wireless connection should be now established. Congratulations! You are now connected to your Wireless Network! If you'd like to learn more about this router's different uses, please - Airlink AR686WV2 | Quick Installation Guide - Page 10
Section 4 Troubleshooting A. Diagnosing problems from LED indicators: 1. If the WAN LED is Cable/DSL modem directly plugged into your computer. 2. If you are using DSL (PPPoE) Internet service, please verify with your ISP that the username and password you entered into the router are correct. - Airlink AR686WV2 | Quick Installation Guide - Page 11
; you can change the Security to WEP, and configure a 10-digit HEX key (0~9, a~f). Section 5 Technical Support E-mail: [email protected] Toll Free: 1-888-746-3238 Website: www.airlink101.com *Theoretical maximum wireless signal rate derived from IEEE standard 802.11 specifications. Actual data
-
 1
1 -
 2
2 -
 3
3 -
 4
4 -
 5
5 -
 6
6 -
 7
7 -
8
-
9
-
10
-
11
 |
 |
Quick Installation Guide
300N Multi-Function Wireless Router
Model # AR686WV2
Ver. 1A