Alpine HCE-C114 Owners Manual - Page 7
Attention
 |
View all Alpine HCE-C114 manuals
Add to My Manuals
Save this manual to your list of manuals |
Page 7 highlights
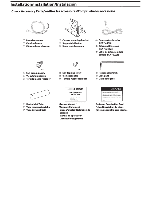
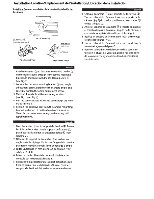
Adjustjna the Camera Angle/Rtialage de I'angle de Ia camera/Ajuste del Pngylo de Ia c6mara English • Attach the camera in a position where it does not touch the license plate. • Use retail touch-up paint to paint the surface and surrounding area when a hole has been made in a metal surface. • Waterproof securely the hole made for the camera cable using a commercially-available waterproof tape or sealing material. • If necessary, use a self-tapping screw@ to fix the camera mounting bracket (In the case ofa plastic mount area). &caution When adjusting the camera angle, do so after turning off the engine and applying the hand brake to avoid an accident. Put the gear shift into reverse (R), and check the image from the camera on the display. 2 Loosen the camera mounting bracket® and angle adjustment screw. Determine the camera angle, and carefully tighten the angle adjustment screw. Fran~ais • Fixez la camera de fw;on ace qu'elle ne touche pas la plaque d'immatriculation. • Si vous avez perce un trou dans une surface metallique, une retouche est necessaire sur et autour de la surface avec une peinture speciale. • Les passes-fils a l'interieur du vehicule doivent etre impermeables ; pour cela, utilisez du ruban adhesif impermeable ou un autre produit detancheite vendu dans le commerce. • Si besoin est, utilisez une vis autotaraudeuse @ pour fixer le support de la camera (notamment si la surface de montage est en plastique). ~Attention Veillez a couper le moteur eta mettre le frein a main avant de regler l'angle de Ia camera afin d'tiviter tout accident. Mettez le levier de vitesse en marche arriere (R), puis a verifiez l'image de Ia camera affichee l'ecran. 2 Deserrez le support de Ia camera® et inserez en angle Ia vis de reglage. Choisissez l'angle de Ia camera, puis reserrez delicatement Ia vis dans I'angle. Espanol • Coloque la camara en una posicion en la que no toque Ia matr{cula. • Utilice pintura para retocar la superficie y el area que rodea el agujero realizado en la superficie de metal. • Para garantizar que las arandelas aislantes colocadas en el interior del vehfculo son resistentes al agua, utilice cinta adhesiva resistente al agua o algun tipo de material sellante. • Si es necesario, utilice un tornillo macho roscador @ para fijar el soporte de la camara (en caso de que el area de instalaci6n sea de plastico). ~ Precauci6n Cuando ajuste el angulo de Ia camara, apague primero el motor y ponga el freno de mano para evitar posibles accidentes. Ponga Ia palanca de marchas en marcha atras (R) y compruebe Ia imagen de Ia camara que se muestra en Ia pantalla. 2 Afloje el soporte de Ia camara ® e inserte en angulo el tornillo de ajuste. Calcule el angulo de Ia camara y, con cuidado, apriete el tornillo en dicho angulo.
-
 1
1 -
 2
2 -
 3
3 -
 4
4 -
 5
5 -
 6
6 -
 7
7 -
 8
8 -
 9
9 -
 10
10 -
 11
11 -
 12
12
 |
 |
