Alpine IDA X200 Owners Manual - Page 34
Sound Field Adjustment
 |
UPC - 793276711472
View all Alpine IDA X200 manuals
Add to My Manuals
Save this manual to your list of manuals |
Page 34 highlights
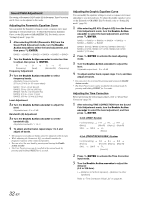
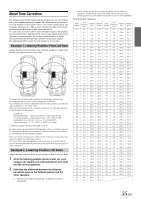
Sound Field Adjustment The setting of Parametric EQ/Graphic EQ Adjustment, Time Correction and X-Over can be adjusted in this mode. Adjusting the Parametric Equalizer Curve You can modify the Equalizer settings to create a response curve more appealing to your personal taste. To adjust the Parametric Equalizer Curve, set the EQ mode to PARAMETRIC EQ. For details, refer to "Setting EQ mode" (page 34). 1 After selecting EQ ADJ (Parametric EQ) from the Sound Field Adjustment mode, turn the Double Action encoder to select the band adjustment, and then press /ENTER. BAND1 BAND2 BAND3 BAND4 BAND5 BAND1 2 Turn the Double Action encoder to select an item to adjust, then press /ENTER. FC LV Q FC (frequency) (level) (bandwidth) (frequency) Frequency Adjustment 3-1 Turn the Double Action encoder to select frequency bands. Adjustable frequency bands: 20 Hz to 20 kHz (in 1/3 octave steps) BAND1: 20 Hz~80 Hz (63 Hz) BAND2: 50 Hz~200 Hz (150 Hz) BAND3: 125 Hz~3.2 kHz (400 Hz) BAND4: 315 Hz~8 kHz (1 kHz) BAND5: 800 Hz~20 kHz (2.5 kHz) Level Adjustment 3-2 Turn the Double Action encoder to adjust the level. Adjustable level: -6 to +6 dB Bandwidth (Q) Adjustment 3-3 Turn the Double Action encoder to set the bandwidth (Q). Adjustable bandwidth: 1, 1.5, 3 4 To adjust another band, repeat steps 1 to 3 and adjust all bands. • The frequencies of adjacent bands cannot be adjusted within 4 steps. • While adjusting the Parametric EQ, you should consider the frequency response of the connected speakers. • You can select the next band by pressing and turning the Double Action encoder. • The User Preset screen can be recalled in the normal mode by pressing and holding PRESET for 2 seconds. Adjusting the Graphic Equalizer Curve You can modify the equalizer settings to create a response curve more appealing to your personal taste. To adjust the graphic equalizer curve, set the EQ mode to GRAPHIC EQ. For details, refer to "Setting EQ mode" (page 34). 1 After selecting EQ ADJ (Graphic EQ) from the Sound Field Adjustment mode, turn the Double Action encoder to select the band adjustment, and then press /ENTER. BAND1 BAND2 BAND3 BAND4 BAND5 BAND6 BAND7 BAND1 BAND-1 (63 Hz) / BAND-2 (150 Hz) / BAND-3 (400 Hz) / BAND-4 (1 kHz) / BAND-5 (2.5 kHz) / BAND-6 (6.3 kHz) / BAND-7 (17.5 kHz) 2 Press /ENTER to activate the level adjusting mode. 3 Turn the Double Action encoder to adjust the level. Adjustable output level: -6 to +6 dB 4 To adjust another band, repeat steps 1 to 3, and then adjust all bands. • You can select the next band by pressing and turning the Double Action encoder. • The User Preset screen can be recalled in the normal mode by pressing and holding PRESET for 2 seconds. Adjusting the Time Correction Before performing the following procedures, refer to "About Time Correction" (page 35). 1 After selecting TIME CORRECTION from the Sound Field Adjustment mode, turn the Double Action encoder to select the band adjustment, and then press /ENTER. 2.2ch (3WAY) System F-L (Initial setting) (Mid-L) SW-L SW-R F-R R-L R-R (Mid-R) (High-L ) (High-R) F-L (Mid-L) 4.2ch (FRONT/REAR/SUBW.) System F-L (Initial setting) (Front-L) SW-L SW-R F-R R-L (Front-R) (Rear-L) F-L (Front-L) R-R (Rear-R) 2 Press /ENTER to activate the Time Correction input mode. 3 Turn the Double Action encoder to adjust the distance (0.0 to 336.6cm). L = (distance to farthest speaker) - (distance to other speakers) Refer to "Time Correction Value List" on page 35. 32-EN
-
 1
1 -
2
-
3
-
4
-
5
-
6
-
7
-
8
-
9
-
10
-
11
-
12
-
13
-
14
-
15
-
16
-
17
-
18
-
19
-
20
-
21
-
22
-
23
-
24
-
25
-
26
-
27
-
28
-
 29
29 -
 30
30 -
 31
31 -
 32
32 -
 33
33 -
 34
34 -
 35
35 -
 36
36 -
 37
37 -
 38
38 -
 39
39 -
40
-
41
-
42
-
43
-
44
-
45
-
46
-
47
-
48
-
49
-
50
-
51
-
52
-
53
-
54
-
55
-
56
-
57
-
58
-
59
-
60
-
61
-
62
-
63
-
64
-
65
-
66
-
67
-
68
-
69
-
70
-
71
-
72
-
73
-
74
-
75
-
76
-
77
-
78
-
79
-
80
-
81
-
82
-
83
-
84
-
85
-
86
-
87
-
88
-
89
-
90
-
91
-
92
-
93
-
94
-
95
-
96
-
97
-
98
-
99
-
100
-
101
-
102
-
103
-
104
-
105
-
106
-
107
-
108
-
109
-
110
-
111
-
112
-
113
-
114
-
115
-
116
-
117
-
118
-
119
-
120
-
121
-
122
-
123
-
124
-
125
-
126
-
127
-
128
-
129
-
130
-
131
-
132
-
133
-
134
-
135
-
136
-
137
-
138
-
139
-
140
-
141
-
142
-
143
-
144
-
145
-
146
 |
 |