Alpine PSS-22WRA Owners Manual - Page 11
Amplifier Installation continued
 |
View all Alpine PSS-22WRA manuals
Add to My Manuals
Save this manual to your list of manuals |
Page 11 highlights
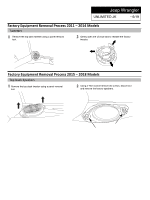
Amplifier Installation (continued) 7 Route the In/Out audio connections behind the dash frame to the radio location. Make all the necessary connections based on your system configuration see pages 17, 18 or 19. Jeep Wrangler UNLIMITED JK • 11/19 8 Route the subwoofer cable and bass level knob down to the center console. 9 Route the subwoofer cable across the center console over to the passenger side seat. 10 Mount the bass level knob in one of the suggested locations. Use a drill bit size 9/32". 11 Use a 10mm socket to mount main harness ground terminal to the OEM chassis ground above the kick panel. 12 Insert the supplied water proof shrink tube into the Power cable. Connect the female connector on the power cable to the male connector on the main harness and shrink the tube using a heat gun.
-
 1
1 -
2
-
3
-
4
-
5
-
 6
6 -
 7
7 -
 8
8 -
 9
9 -
 10
10 -
 11
11 -
 12
12 -
 13
13 -
 14
14 -
 15
15 -
 16
16 -
17
-
18
-
19
 |
 |
