Asko T701 User manual Use & Care Guide Asko T701,721,761,781
Asko T701 Manual
 |
View all Asko T701 manuals
Add to My Manuals
Save this manual to your list of manuals |
Asko T701 manual content summary:
- Asko T701 | User manual Use & Care Guide Asko T701,721,761,781 - Page 1
IMPORTANT SAFETY INSTRUCTIONS SAFETY FEATURES ASKO DRYER FEATURES ENERGY SAVING TIPS INSTALLATION INSTRUCTIONS PREPARING THE LAUNDRY T701 OPERATING INSTRUCTIONS T721 OPERATING INSTRUCTIONS T761 AND T781 OPERATING INSTRUCTIONS CARE AND MAINTENANCE INSTRUCTIONS TROUBLESHOOTING PRODUCT WARRANTY - Asko T701 | User manual Use & Care Guide Asko T701,721,761,781 - Page 2
♦ The interior of the machine and exhaust duct should be cleaned periodically by an authorized ASKO service agent. ♦ Do not attempt to repair or replace any part of the appliance or perform any servicing unless specifically recommended in this guide. SAFETY FEATURES ♦ The dryer is made and marked to - Asko T701 | User manual Use & Care Guide Asko T701,721,761,781 - Page 3
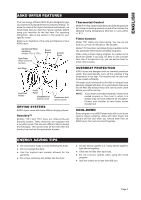
you read this manual carefully before using your machine for the first time. For operating instructions, refer to the section in this guide for your specific model. Below is an illustration of the parts and features of your ASKO dryer. Condensed Water Container (Models T721 & T781) Type Plate (Type - Asko T701 | User manual Use & Care Guide Asko T701,721,761,781 - Page 4
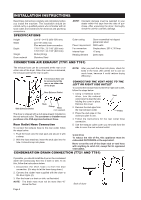
AND T761) The exhaust hose can be connected at the rear or on either side of the dryer. When the machine is CONDENSATION DRAIN CONNECTION (T721 AND T781) If possible, you should install the dryer so the condensed water will continuously flow into a drain or sink. To do this, follow the instructions - Asko T701 | User manual Use & Care Guide Asko T701,721,761,781 - Page 5
spacer must be fitted. Vent spacer FREESTANDING INSTALLATION The dryer can be placed next to the washing machine. It is essential that the machine is leveled and the locknuts are tight to eliminate vibration noise. BUILT-IN INSTALLATION ASKO dryers can be installed beneath a cabinet or worktop with - Asko T701 | User manual Use & Care Guide Asko T701,721,761,781 - Page 6
the washing machine or an equivalent. The supply connection must be 208-240 V, 20 A. ASKO washers rated wire of cord under center screw of terminal block. 8. Connect the other wires to outer screws. 9. Tighten the strain relief screws. 10. Replace terminal box cover on back of dryer. 11. Plug dryer - Asko T701 | User manual Use & Care Guide Asko T701,721,761,781 - Page 7
STACKED INSTALLATION ASKO dryers can be mounted on top of any matching ASKO washer. Mounts are supplied with the machine. The metal brackets are attached to the lower back of the unit. The plastic cups are packed inside the dryer. Two metal brackets for securing the dryer to the washer Two plastic - Asko T701 | User manual Use & Care Guide Asko T701,721,761,781 - Page 8
ASKO dryers are reversible. The dryers you have a condenser dryer, you will need to open the condenser container door.) Replace the screws in the order illustrated at right (a, b, c). 16. Replace the screw you removed in step 13 (d). 17. (If the unit has a condenser, close the condenser door.) Replace - Asko T701 | User manual Use & Care Guide Asko T701,721,761,781 - Page 9
Instructions" on page 2 for a list of specific materials that should never be put in a tumble dryer machine, moisture content, type of fabric, air temperature and humidity. The length of the vent hose can also affect drying times. (See "Connecting to a Ventilation Duct (T701/T761 items. ♦ Wash and dry - Asko T701 | User manual Use & Care Guide Asko T701,721,761,781 - Page 10
have recommended care labels. Read these labels carefully! Care label instructions and warnings should be followed for the best cleaning results. symbols.) As an example, the symbols in the label illustrated below mean: wash in warm water on permanent press setting. Do no bleach. Dry on permanent - Asko T701 | User manual Use & Care Guide Asko T701,721,761,781 - Page 11
ENGLIESNHGLISH T701 OPERATING INSTRUCTIONS THE CONTROL PANEL Power Button Turns the power to the machine off and on. with a thermostat that measures the exhaust temperature coming out of the dryer and automatically turns the machine off when the clothes are appropriately dry. Timed Drying (30, 60 - Asko T701 | User manual Use & Care Guide Asko T701,721,761,781 - Page 12
T721 OPERATING INSTRUCTIONS THE CONTROL PANEL Power Button Turn on power to the machine off and on. Start Button must be on before you can start the machine. START BUTTON This button starts the dryer. If you open the door during a program, the dryer will stop tumbling automatically. To continue the - Asko T701 | User manual Use & Care Guide Asko T701,721,761,781 - Page 13
T761 AND T781 OPERATING INSTRUCTIONS THE CONTROL PANEL Power Button Press to turn on power to the machine seconds. If you stop the dryer this way, it cancels the program in progress. You the display toggles between the program numbers and the wash program names, (e.g., Extra Dry, Dry, etc.) - Asko T701 | User manual Use & Care Guide Asko T701,721,761,781 - Page 14
PROGRAMS ASKO dryers are it detects the appropriate measurements, it automatically shuts off the machine. Preset Program P1 P2 P3 P4 Dry Cycle Extra WARNING! NOTES: (1) The Quick cooling time is 5 minutes. (2) Model T761 is preset for Low dry temperature. Some fabrics may not be able to - Asko T701 | User manual Use & Care Guide Asko T701,721,761,781 - Page 15
basic instructions for the process of changing a program, press the Power button to switch the washer off. When you switch the power back on, the program will be dry program you prefer. You would also use this menu to set the machine for a Timed Dry or Air Fluff program. (See "Timed Dry and Air - Asko T701 | User manual Use & Care Guide Asko T701,721,761,781 - Page 16
. The Delayed Start Program This program lets you delay starting the dryer for up to 24 hours. This feature is useful in areas where can program the T761 and T781 not to start unless the Start button is held down for three seconds. To do this, follow the steps below: 1. Turn the machine off then on. - Asko T701 | User manual Use & Care Guide Asko T701,721,761,781 - Page 17
solutions, call a service technician. ERROR MESSAGE Maximum program time Overflow (T781) Sensor Thermistor SOLUTION Make sure both fuses are intact. Clean the lint filter. Make sure exhaust hose is clear (T761). Clear message by turning the power off then on. Make sure the condensed water container - Asko T701 | User manual Use & Care Guide Asko T701,721,761,781 - Page 18
, the dryer will have to remove more water. To empty the container, follow the steps below: 1. Pull out the container. 2. Pour out the water. 3. Replace the container. You should hear it snap into place. NOTE: Do not remove the water container while the machine is running. The condensed water is - Asko T701 | User manual Use & Care Guide Asko T701,721,761,781 - Page 19
Turn off the main power to the machine. 2. Remove the two 20 torx condenser into a dishwasher. Do not use any sharp metal objects or a wire brush to clean the condenser. Also, do not poke anything between the fins. 6. Make sure the side marked "UP" does face up and carefully replace the condenser - Asko T701 | User manual Use & Care Guide Asko T701,721,761,781 - Page 20
TROUBLESHOOTING If you experience a problem with your dryer, you should review the following list of frequently encountered situations. It could save you the cost and inconvenience of a service call. Even though the product is under warranty, if the problem is not caused by defective product - Asko T701 | User manual Use & Care Guide Asko T701,721,761,781 - Page 21
NOTES Page 21 ENGLEISNHGLISH - Asko T701 | User manual Use & Care Guide Asko T701,721,761,781 - Page 22
NOTES Page 22 - Asko T701 | User manual Use & Care Guide Asko T701,721,761,781 - Page 23
, misuse or abuse. 3. Instruct how to use the appliance. 4. Replace house fuses or correct house wiring. 5. Correct house plumbing, including drainage problems related to improper installation. 6. Clean or service air device in drain line. B. Repair and/or replacement parts for failure of product if - Asko T701 | User manual Use & Care Guide Asko T701,721,761,781 - Page 24
Safety Instructions Sensidry Service Solutions to problems Sorting the laundry Specifications T Temperature control T701 T721 T761 & T781 Temperature menu (T761 & T781) Temperature settings Thermostat Control Timed drying T701 T721 T761 & T781 Timer control knob (T721) Troubleshooting V Ventilation - Asko T701 | User manual Use & Care Guide Asko T701,721,761,781 - Page 25
ASKO GUIDE D'UTILISATION ET D'ENTRETIEN DE LA SÉCHEUSE INSTRUCTIONS DE FONCTIONNEMENT 10 T721 INSTRUCTIONS DE FONCTIONNEMENT 11 T761 AND T781 INSTRUCTIONS DE FONCTIONNEMENT 12 INSTRUCTIONS D'ENTRETIEN ET NETTOYAGE 18 DÉPISTAGE 20 GARANTIE ASKO 23 INDEX 24 CONSERVEZ CES INSTRUCTIONS - Asko T701 | User manual Use & Care Guide Asko T701,721,761,781 - Page 26
instructions destinées à l'utilisateur. ♦ La sécheuse a été conçue pour être recyclée. Si vous devez la changer, appelez votre service municipal de collecte des appareils ménagers et demandez comment vous pouvez recycler votre machine pouvez programmer les Modèles T761 et T781 afin qu'ils ne se - Asko T701 | User manual Use & Care Guide Asko T701,721,761,781 - Page 27
instructions de fonctionnement, référez-vous à la section réservée à votre modèle spécifique, dans ce guide. Ci-dessous, voici une illustration des pièces et caractéristiques de votre sécheuse ASKO: Contenant d'eau condensée (Modèles T721 & T781 d'appeler le service de réparation fois la machine. ♦ - Asko T701 | User manual Use & Care Guide Asko T701,721,761,781 - Page 28
T761) Le boyau d'évacuation peut être raccordé à l'arrière ou sur l'un des côtés de la sécheuse. La machine vous désirez utiliser. 4. Suivez les instructions du raccordement du boyau à l'ouverture arri .) RACCORDEMENT À UN DRAIN DE CONDENSATION (T721/T781) Si possible, vous devriez installer - Asko T701 | User manual Use & Care Guide Asko T701,721,761,781 - Page 29
mm (1/2") d'espace entre la machine à laver et la sécheuse. INSTALLATION DE LA LAVEUSE ENCASTRÉE Les sécheuses T701 et T761 peuvent s'installer sous une à partir du centre du trou. MODÈLES T721 ET T781 Les modèles à condensation fonctionnent mieux quand il y a une bonne circulation de l'air - Asko T701 | User manual Use & Care Guide Asko T701,721,761,781 - Page 30
fournie comme suit: Phase unique,230V, 60Hz, 2500Watt, fusible de 30 A requis. ATTENTION! Le réceptacle à l'arrière de la machine est spécialement conçu pour accommoder les laveuses ASKO SEULEMENT (à 208-240 V.). Pour utiliser ce réceptacle, vous devez utiliser la prise fournie avec la laveuse ou un - Asko T701 | User manual Use & Care Guide Asko T701,721,761,781 - Page 31
es sur les laveuses ASKO correspondantes. Le dispositif de montage en superposition est fourni avec la machine. Les chevilles mé instructions suivantes: 1. Enlevez les vis qui se trouvent en arrière de la machine à laver (20 torx) et utilisez-les pour fixer les deux supports à l'arrière de la machine - Asko T701 | User manual Use & Care Guide Asko T701,721,761,781 - Page 32
INVERSION DES CHARNIÈRES DE PORTES Les charnières des portes des sécheuses ASKO sont réversibles. Les sécheuses sont livrées avec les charnières des portes sur la gauche. Pour les inverser, suivez les étapes suivantes: MISE EN - Asko T701 | User manual Use & Care Guide Asko T701,721,761,781 - Page 33
vous aux sections concernant votre modèle spécifique, pour les instructions et les programmes offerts par ce modèle. Pour obtenir de meilleurs conduit de ventilation (T701/T761)" à la page 5, pour les recommandations d'installation.) ensemble et de préférence dans une machine à moitié plein. Sortez - Asko T701 | User manual Use & Care Guide Asko T701,721,761,781 - Page 34
entretien recommandé. Lisez attentivement toutes les étiquettes d'entretien de vos vêtements!! Vous obtiendrez les meilleurs résultats en respectant les instructions et avertissements inscrits sur ces étiquettes. Le tableau donne la définition des symboles employés sur les étiquettes d'entretien des - Asko T701 | User manual Use & Care Guide Asko T701,721,761,781 - Page 35
FRANÇAIS T701 INSTRUCTIONS DE FONCTIONNEMENT LE PANNEAU DE COMMANDE Bouton de l'option du chage Normal ou Bas, ou le programme de ventilation. BOUTON D'ALLUMAGE Le bouton d'allumage fait démarrer la machine ou l'arrête. Quand le bouton est activé, le voyant lumineux rouge s'allume. Il faut que ce - Asko T701 | User manual Use & Care Guide Asko T701,721,761,781 - Page 36
T721 INSTRUCTIONS DE FONCTIONNEMENT LE PANNEAU DE COMMANDE Bouton de l'option du signal sonore Appuyez sur le bouton pour l'activer ou le désactiver. Bouton d'allumage Met la machine en marche et l'arrête. Bouton de refroidissement Permet de choisir entre un cycle de refroidissement de 9 minutes - Asko T701 | User manual Use & Care Guide Asko T701,721,761,781 - Page 37
T761 & T781 INSTRUCTIONS DE FONCTIONNEMENT LE PANNEAU DE COMMANDE Bouton d'allumage Met la machine en marche et l'arr des températures et la durée du programme. Voyant lumineux S'allume pour indiquer que la machine est en marche. Bouton de démarrage (Start) Appuyez sur ce bouton pour démarrer un - Asko T701 | User manual Use & Care Guide Asko T701,721,761,781 - Page 38
dessous. Grâce au système Sensidry™ de ASKO, vous n'aurez plus à vous inquiéter du appropriés, Sensidry arrête automatiquement la machine. Programme Préétabli P1 P2 P3 minutes. (2) Le Modèle T761 Temp. de Sechage est Faible. MISE EN GARDE! Certains tissus ne supportent pas des températures élev - Asko T701 | User manual Use & Care Guide Asko T701,721,761,781 - Page 39
îchir les habits. Démarrage différé Vous pouvez différer le démarrage de la machine de 1 à 24 heures. Cette option est très pratique dans les régions de minutes, allant de 5 à 90. INSTRUCTIONS DE PROGRAMMATION Vous trouverez ci-dessous les instructions de base pour le changement des programmes pr - Asko T701 | User manual Use & Care Guide Asko T701,721,761,781 - Page 40
Si vous changez d'avis pendant le processus de changement de programme, appuyez sur le bouton de mise en marche pour arrêter la machine. Lorsque vous remettrez la machine en marche, le programme originalement établi sera de nouveau en vigueur. Souvenez-vous que le premier pas à faire pour adapter un - Asko T701 | User manual Use & Care Guide Asko T701,721,761,781 - Page 41
DES ENFANTS Par mesure de sécurité, vous pouvez programmer les modèles T761 et T781 pour qu'ils ne démarrent pas à moins que le bouton START soit que quand vous activez le bouton de protection de démarrage de la machine (sécurité enfant), Le bouton du menu est automatiquement programmé pour être - Asko T701 | User manual Use & Care Guide Asko T701,721,761,781 - Page 42
MESSAGES D'ERREUR- T761/T781 Des messages d'erreurs seront affichés dans la fenêtre Assurez-vous que la pompe pour l'eau de condensation n'est pas obstruée. Ce problème peut survenir si des vêtements secs se trouvent encore dans le tambour lorsque la machine est mise en marche. Annulez le message d' - Asko T701 | User manual Use & Care Guide Asko T701,721,761,781 - Page 43
FRANÇAIS NETTOYAGE DU VENTILATEUR Le ventilateur doit être nettoyé au moins une fois par an. Si vous avez des animaux domestiques, vous devrez probablement le nettoyer plus souvent. Voici comment le nettoyer: 1. Coupez le courant à la source principale. 2. Enlever les deux vis de 20 torques en bas - Asko T701 | User manual Use & Care Guide Asko T701,721,761,781 - Page 44
le Centre-conseil ASKO avant d'appeler un technicien. AVANT D'APPELER LE SERVICE APRÈS-VENTE Avant d'appeler les service après-vente ou ASKO à propos de la type Type: WMxx Numéro de série à 12 chiffres xx x 000000000000 La machine ne veut pas se mettre en marche. ♦ Vérifiez que la porte est bien - Asko T701 | User manual Use & Care Guide Asko T701,721,761,781 - Page 45
FRANÇAIS NOTES Page 21 - Asko T701 | User manual Use & Care Guide Asko T701,721,761,781 - Page 46
NOTES Page 22 - Asko T701 | User manual Use & Care Guide Asko T701,721,761,781 - Page 47
ASKO MODÈLES T701, T721, T761, T781 Assurez-vous de remplir la Carte d'enregistrement de la garantie que nous vous remettons avec votre appareil et de la retourner à AM Appliance cas où votre problème de service ne serait pas résolu localement, écrivez à : AM Appliance Group Ou appelez notre P. - Asko T701 | User manual Use & Care Guide Asko T701,721,761,781 - Page 48
, nettoyage 19 Condensation, raccordement au drain 4 Condensation, vider le Instructions d'installation 4-8 Instructions d'operation T701 11 T721 12 T761 and T781 13-16 Instructions Séchage minuté, programmation 16 Sensidry 3 Service 23 Solutions aux problèmes 20 Spé - Asko T701 | User manual Use & Care Guide Asko T701,721,761,781 - Page 49
T701 INSTRUCCIONES DE OPERACIÓN 11 T721 INSTRUCCIONES DE OPERACIÓN 12 T761 AND T781 INSTRUCCIONES DE OPERACIÓN 13 INSTRUCCIONES DE CUIDADO Y MANTENIMIENTO 18 DIAGNÓSTICO DE AVERÍAS 20 GARANTÍA DE LOS PRODUCTOS ASKO 23 ÍNDICE 24 CONSERVE ESTAS INSTRUCCIONES PARA REFERENCIA FUTURA Página - Asko T701 | User manual Use & Care Guide Asko T701,721,761,781 - Page 50
El servicio debe realizarlo un centro de servicio ASKO autorizado. ♦ No repare o reemplace ninguna pieza pueden encenderse o explotar. NOTA: Este manual no cubre cada condición y situación A PRUEBA DE NIÑOS Usted puede programar los modelos T761 y T781 para que no arranquen a menos que el botón - Asko T701 | User manual Use & Care Guide Asko T701,721,761,781 - Page 51
limpiarse (detrás del tablero) Unidad condensadora (detrás del tablero) SISTEMAS DE SECADO Las secadoras ASKO vienen con tres sistemas de secado diferentes: Sensidry™ Los modelos T761 y T781 tienen nuestro sistema más moderno Sensidry. Estas máquinas están equipadas con un sensor de humedad que - Asko T701 | User manual Use & Care Guide Asko T701,721,761,781 - Page 52
87.6 cm) Ancho 23-7/16 pulg (59.5 cm) Más la conexión de la manguera de expulsión Profundidad T761/T781: 23-7/16 pulg (59.5 cm) T701/T721: 24-7/16 pulg (62 cm) Peso 86 libras (39 no debe estar más arriba de 40 pulg del piso. Página 4 Parte posterior de la secadora Altura máxima de 40 pulg - Asko T701 | User manual Use & Care Guide Asko T701,721,761,781 - Page 53
(T701/T761) 1. apretadas para evitar INSTALACIÓN EMPOTRADA Las secadoras ASKO pueden instalarse debajo de un gabinete o la izquierda, a la derecha o en la parte posterior de la máquina. Vea el diagrama para del orificio. MODELOS T721 AND T781 Los modelos con condensación funcionan mejor cuando - Asko T701 | User manual Use & Care Guide Asko T701,721,761,781 - Page 54
V, 60 Hz, Capacidad nominal del calentador, 2500 Vatios Fusible requerido 30A PRECAUCIÓN: El receptáculo en la parte posterior de la máquina está diseñado para usarse SOLAMENTE con lavadoras ASKO (con capacidad para 208 a 240 voltios). Para usar este receptáculo, debe usar la clavija que viene de - Asko T701 | User manual Use & Care Guide Asko T701,721,761,781 - Page 55
pueden montarse encima de las lavadoras complementarias ASKO. Los montajes se suministran con la máquina. Los ganchos metálicos están sujetos a la parte inferior posterior de la unidad. Las tazas plásticas están empacadas en el interior de la secadora. 5. Levante la secadora a su lugar. Levantando - Asko T701 | User manual Use & Care Guide Asko T701,721,761,781 - Page 56
BISAGRAS DE LA PUERTA Las bisagras de la puerta de las secadoras ASKO son reversibles. Las secadoras se embarcan con las bisagras a la de comenzar este procedimiento. 1. Quite los dos tornillos de 20 torx de la parte inferior del panel delantero, después sujete los lados del panel y tire hacia - Asko T701 | User manual Use & Care Guide Asko T701,721,761,781 - Page 57
longitud de la manguera de desahogo también puede afectar los tiempos de secado. (Vea la sección "Cómo conectar un ducto de ventilación (T701/ T761)" en la página 5 donde hallará las instrucciones recomendadas para la instalación.) CONSEJOS GENERALES PARA SECAR LA ROPA ♦ Lea cuidadosamente todas las - Asko T701 | User manual Use & Care Guide Asko T701,721,761,781 - Page 58
INSTRUCCIONES EN LAS ETIQUETAS DE CUIDADOS La mayoría de las ropas y otros artículos lavables tienen etiquetas de cuidado con instrucciones sobre el lavado. ¡Lea cuidadosamente estas etiquetas! Las instrucciones y las advertencias de las etiquetas de cuidado deben seguirse atentamente para lograr - Asko T701 | User manual Use & Care Guide Asko T701,721,761,781 - Page 59
T701 INSTRUCCIONES DE OPERACIÓN EL TABLERO DE CONTROL Botón de Energía Apaga y enciende intermitentemente la máquina Luz de indicación de suministro eléctrico Se ilumina cuando se enciende el equipo Botón de la Opción del Señal Oprima este botón para encender y apagar el señal Control del - Asko T701 | User manual Use & Care Guide Asko T701,721,761,781 - Page 60
T721 INSTRUCCIONES DE OPERACIÓN EL TABLERO DE CONTROL Botón de la Opción del Señal Oprima este botón para encender y apagar el señal Botón de Energía Apaga y enciende intermitentemente la máquina Luz de indicación de suministro eléctrico Se ilumina cuando se enciende el equipo Control del - Asko T701 | User manual Use & Care Guide Asko T701,721,761,781 - Page 61
T761 AND T781 INSTRUCCIONES DE OPERACIÓN EL TABLERO DE CONTROL Botón de Energía Apaga y enciende intermitentemente la máquina Luz de indicación de suministro eléctrico Se ilumina cuando - Asko T701 | User manual Use & Care Guide Asko T701,721,761,781 - Page 62
BOTONES DE PROGRAMAS PREAJUSTADOS El panel de EasyControl™ de ASKO simplifica la personalización de los programas preajustados para min.); Señal (on/off), Antiarruga 0 a 3 horas; Temperatura alta o bajo (T761 only), Arranque demorad 1 a 24 horas Aireado Tiempo del ciclo, 5 a 90 min.; Timbre - Asko T701 | User manual Use & Care Guide Asko T701,721,761,781 - Page 63
Opciones Enfriamiento Señal Antiarrugas Temperatura Inicio diferido Secado temporizado Definiciones Para reducir las arrugas, esta opción hace girar la ropa sin calor durante algunos minutos después que termina el programa. La opción Normal hace girar la ropa durante 15 minutos; la opción de secado - Asko T701 | User manual Use & Care Guide Asko T701,721,761,781 - Page 64
CÓMO NAVEGAR EN LOS MENÚS Los siguientes párrafos explican cómo navegar a través de los menús y cambiar los programas de fábrica. Si no desea hacer cambios en todos los menús, continúe oprimiendo MENU hasta que aparezca el que desee cambiar. Para restaurar un programa de fábrica a su ajuste original - Asko T701 | User manual Use & Care Guide Asko T701,721,761,781 - Page 65
pantalla LCD para que aparezca en el idioma que seleccionó. ARRANQUE A PRUEBA DE NIÑOS Como medida de precaución, usted puede programar los modelos T761 y T781 para que no arranquen a menos que el botón START se mantenga oprimido durante tres segundos. Para hacer esto, siga los pasos a continuaci - Asko T701 | User manual Use & Care Guide Asko T701,721,761,781 - Page 66
LOS MENSAJES DE ERROR - T761/T781 Los mensajes de error aparecerán en la pantalla LCD si estén intactos. Limpie el filtro de pelusa. Verifique que la manguera de escape esté destapada (T761). Borre el mensaje apagando y encendiendo la energía. Verifique que el recipiente de agua condensada esté vac - Asko T701 | User manual Use & Care Guide Asko T701,721,761,781 - Page 67
. 3. Desatornille el tornillo de seguridad de 10 torx de la parte inferior de la cubierta del ventilador y doble hacia afuera las cuatro lengüetas. 4. R e t i r e l a c u b i e r t a d e l ventilador. T721 Y T781 - LIMPIEZA DEL CONDENSADOR El condensador debe limpiarse regularmente, cuando menos - Asko T701 | User manual Use & Care Guide Asko T701,721,761,781 - Page 68
AL SERVICIO TÉCNICO Antes de llamar al servicio técnico o comunicarse con ASKO respecto a cualquier reclamación relacionada con la garantía, anote el nombre del el número de serie. El nombre del modelo está escrito en la parte frontal izquierda del panel de control. La placa con el nombre del tipo y - Asko T701 | User manual Use & Care Guide Asko T701,721,761,781 - Page 69
NOTAS Página 21 ESPAÑOL - Asko T701 | User manual Use & Care Guide Asko T701,721,761,781 - Page 70
NOTAS Página 22 - Asko T701 | User manual Use & Care Guide Asko T701,721,761,781 - Page 71
GARANTÍA DE PRODUCTOS ASKO MODELOS T701, T721, T761, T781 Asegúrese de llenar la tarjeta de registro de la garantía que recibió con el aparato y de enviarla por correo a AM Appliance Group para validar la garantía de su aparato. Los daños cosméticos deben informarse al concesionario antes de cinco - Asko T701 | User manual Use & Care Guide Asko T701,721,761,781 - Page 72
magnética de la puerta 2 Manguera de expulsión, limpieza 18 Arranque a prueba de niños (T761/T781) 2, 17 Materiales peligrosos 2 Arranque diferido, programación (T761/T781) 17 Mensajes de error - T761/T781 18 B Menú de opciones 16 Menú de programas 16 Bisagras de la puerta, inversi
-
 1
1 -
 2
2 -
 3
3 -
 4
4 -
 5
5 -
 6
6 -
 7
7 -
8
-
9
-
10
-
11
-
12
-
13
-
14
-
15
-
16
-
17
-
18
-
19
-
20
-
21
-
22
-
23
-
24
-
25
-
26
-
27
-
28
-
29
-
30
-
31
-
32
-
33
-
34
-
35
-
36
-
37
-
38
-
39
-
40
-
41
-
42
-
43
-
44
-
45
-
46
-
47
-
48
-
49
-
50
-
51
-
52
-
53
-
54
-
55
-
56
-
57
-
58
-
59
-
60
-
61
-
62
-
63
-
64
-
65
-
66
-
67
-
68
-
69
-
70
-
71
-
72
 |
 |
Page 1
ENGLISH
ENGLISH
DRYER
USE AND CARE GUIDE
IMPORTANT!
To get the best performance from
your dryer, read all operating
instructions before using it for the
first time.
ASKO
CONTENTS
IMPORTANT SAFETY INSTRUCTIONS
2
SAFETY FEATURES
2
ASKO DRYER FEATURES
3
ENERGY SAVING TIPS
3
INSTALLATION INSTRUCTIONS
4
PREPARING THE LAUNDRY
9
T701 OPERATING INSTRUCTIONS
11
T721 OPERATING INSTRUCTIONS
12
T761 AND T781 OPERATING INSTRUCTIONS
13
CARE AND MAINTENANCE INSTRUCTIONS
18
TROUBLESHOOTING
20
PRODUCT WARRANTY
23
INDEX
24
Save these instructions for future reference
FRANÇAIS
ESPAÑOL