Asus P1-PH1 User Guide - Page 24
Reinstalling the CPU fan and, heatsink assembly
 |
View all Asus P1-PH1 manuals
Add to My Manuals
Save this manual to your list of manuals |
Page 24 highlights
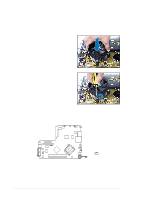
2.6.3 Reinstalling the CPU fan and heatsink assembly To reinstall the CPU fan and heatsink assembly: 1. Position the CPU fan and heatsink assembly on top of the installed CPU. 2. Hold down the heatsink lightly and twist each of the four screws with a Philips (cross) screwdriver just enough to attach the heatsink to the motherboard. When the four screws are attached, tighten them one by one to completely secure the heatsink. 3. Connect the CPU fan cable to the CPU fan connector on the motherboard. ® Fan power connector CPU_FAN Rotation +12V GND 2-8 Chapter 2: Basic installation
-
 1
1 -
2
-
3
-
4
-
5
-
6
-
7
-
8
-
9
-
10
-
11
-
12
-
13
-
14
-
15
-
16
-
17
-
18
-
 19
19 -
 20
20 -
 21
21 -
 22
22 -
 23
23 -
 24
24 -
 25
25 -
 26
26 -
 27
27 -
 28
28 -
 29
29 -
30
-
31
-
32
-
33
-
34
-
35
-
36
-
37
-
38
-
39
-
40
-
41
-
42
-
43
-
44
-
45
-
46
-
47
-
48
-
49
-
50
-
51
-
52
-
53
-
54
-
55
-
56
-
57
-
58
-
59
-
60
-
61
-
62
-
63
-
64
-
65
-
66
-
67
-
68
-
69
-
70
-
71
-
72
-
73
-
74
-
75
-
76
-
77
-
78
-
79
-
80
-
81
-
82
-
83
-
84
-
85
-
86
-
87
-
88
 |
 |

2-8
Chapter 2: Basic installation
2.6.3
Reinstalling the CPU fan and
heatsink assembly
To reinstall the CPU fan and heatsink assembly:
1.
Position the CPU fan and heatsink
assembly on top of the installed
CPU.
3.
Connect the CPU fan cable to the CPU fan connector on the
motherboard.
2.
Hold down the heatsink lightly and
twist each of the four screws with
a Philips (cross) screwdriver just
enough to attach the heatsink to
the motherboard. When the four
screws are attached, tighten them
one by one to completely secure
the heatsink.
Fan power connector
CPU_FAN
GND
Rotation
+12V