Asus P1-PH1 User Guide - Page 28
Removing a DIMM
 |
View all Asus P1-PH1 manuals
Add to My Manuals
Save this manual to your list of manuals |
Page 28 highlights
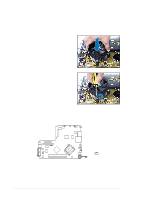
2.7.5 Removing a DIMM To remove a DIMM: 1. Simultaneously press the retaining clips outward to unlock the DIMM. Support the DIMM lightly with your fingers when pressing the retaining clips. The DIMM might get damaged when it flips out with extra force. 2. Remove the DIMM from the socket. Remove the CPU fan and heatsink assembly before removing the memory module(s). Incorrect removal sequence may damage the DIMM socket retaining clips. 2-12 Chapter 2: Basic installation
-
 1
1 -
2
-
3
-
4
-
5
-
6
-
7
-
8
-
9
-
10
-
11
-
12
-
13
-
14
-
15
-
16
-
17
-
18
-
19
-
20
-
21
-
22
-
 23
23 -
 24
24 -
 25
25 -
 26
26 -
 27
27 -
 28
28 -
 29
29 -
 30
30 -
 31
31 -
 32
32 -
 33
33 -
34
-
35
-
36
-
37
-
38
-
39
-
40
-
41
-
42
-
43
-
44
-
45
-
46
-
47
-
48
-
49
-
50
-
51
-
52
-
53
-
54
-
55
-
56
-
57
-
58
-
59
-
60
-
61
-
62
-
63
-
64
-
65
-
66
-
67
-
68
-
69
-
70
-
71
-
72
-
73
-
74
-
75
-
76
-
77
-
78
-
79
-
80
-
81
-
82
-
83
-
84
-
85
-
86
-
87
-
88
 |
 |

2-12
Chapter 2: Basic installation
2.7.5
Removing a DIMM
To remove a DIMM:
1.
Simultaneously press the
retaining clips outward to unlock
the DIMM.
2.
Remove the DIMM from the
socket.
Support the DIMM lightly with
your fingers when pressing the
retaining clips. The DIMM might
get damaged when it flips out
with extra force.
Remove the CPU fan and heatsink assembly
before
removing the
memory module(s). Incorrect removal sequence may damage the
DIMM socket retaining clips.