Asus P1-PH1 User Guide - Page 30
Basic installation
 |
View all Asus P1-PH1 manuals
Add to My Manuals
Save this manual to your list of manuals |
Page 30 highlights
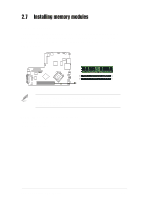
2. Place the PCI riser asembly on a flat surface. 3. Remove the bracket opposite the PCI slot you wish to use. Keep the screw for later use. PCI riser card PCI slot bracket 3 4. Align the PCI card connector with the slot and press firmly until the card is completely seated on the slot. Secure the PCI card to the PCI riser assembly with the screw you removed earlier. 5. Reinstall the PCI riser assembly to the system chassis. 4 5 2-14 Chapter 2: Basic installation
-
 1
1 -
2
-
3
-
4
-
5
-
6
-
7
-
8
-
9
-
10
-
11
-
12
-
13
-
14
-
15
-
16
-
17
-
18
-
19
-
20
-
21
-
22
-
23
-
24
-
 25
25 -
 26
26 -
 27
27 -
 28
28 -
 29
29 -
 30
30 -
 31
31 -
 32
32 -
 33
33 -
 34
34 -
 35
35 -
36
-
37
-
38
-
39
-
40
-
41
-
42
-
43
-
44
-
45
-
46
-
47
-
48
-
49
-
50
-
51
-
52
-
53
-
54
-
55
-
56
-
57
-
58
-
59
-
60
-
61
-
62
-
63
-
64
-
65
-
66
-
67
-
68
-
69
-
70
-
71
-
72
-
73
-
74
-
75
-
76
-
77
-
78
-
79
-
80
-
81
-
82
-
83
-
84
-
85
-
86
-
87
-
88
 |
 |

2-14
Chapter 2: Basic installation
2.
Place the PCI riser asembly on
a flat surface.
3.
Remove the bracket opposite
the PCI slot you wish to use.
Keep the screw for later use.
4.
Align the PCI card connector
with the slot and press firmly
until the card is completely
seated on the slot. Secure the
PCI card to the PCI riser
assembly with the screw you
removed earlier.
5.
Reinstall the PCI riser assembly
to the system chassis.
5
4
PCI slot bracket
PCI riser card
3