Asus P5B SE User Manual - Page 122
A selected HDD shows
 |
UPC - 610839154968
View all Asus P5B SE manuals
Add to My Manuals
Save this manual to your list of manuals |
Page 122 highlights
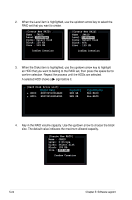
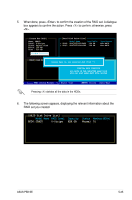
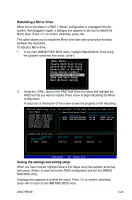
2. When the Level item is highlighted, use the up/down arrow key to select the RAID set that you want to create. [Create New RAID] Name : JRAID Level: 0-Stripe Disks: Select Disk Block: 128 KB Size : 319 GB Confirm Creation [Create New RAID] Name : JRAID Level: 1-Mirror Disks: Select Disk Block: N/A Size : 159 GB Confirm Creation 3. When the Disks item is highlighted, use the up/down arrow key to highlight an HDD that you want to belong to the RAID set, then press the space bar to confirm selection. Repeat the process until the HDDs are selected. A selected HDD shows a sign before it. [Hard Disk Drive List] Model Name HDD0: HDS722516VLSA80 HDD1: HDS722516DLA380 Capacity XXX GB XXX GB Type/Status Non-RAID Non-RAID 4. Key in the RAID volume capacity. Use the up/down arrow to choose the block size. The default value indicates the maximum allowed capacity. [Create New RAID] Name : JRAID Level: 0-Stripe Disks: Select Disk Block: 128 KB Size : 319 GB Confirm Creation 5-24 Chapter 5: Software support
-
 1
1 -
2
-
3
-
4
-
5
-
6
-
7
-
8
-
9
-
10
-
11
-
12
-
13
-
14
-
15
-
16
-
17
-
18
-
19
-
20
-
21
-
22
-
23
-
24
-
25
-
26
-
27
-
28
-
29
-
30
-
31
-
32
-
33
-
34
-
35
-
36
-
37
-
38
-
39
-
40
-
41
-
42
-
43
-
44
-
45
-
46
-
47
-
48
-
49
-
50
-
51
-
52
-
53
-
54
-
55
-
56
-
57
-
58
-
59
-
60
-
61
-
62
-
63
-
64
-
65
-
66
-
67
-
68
-
69
-
70
-
71
-
72
-
73
-
74
-
75
-
76
-
77
-
78
-
79
-
80
-
81
-
82
-
83
-
84
-
85
-
86
-
87
-
88
-
89
-
90
-
91
-
92
-
93
-
94
-
95
-
96
-
97
-
98
-
99
-
100
-
101
-
102
-
103
-
104
-
105
-
106
-
107
-
108
-
109
-
110
-
111
-
112
-
113
-
114
-
115
-
116
-
 117
117 -
 118
118 -
 119
119 -
 120
120 -
 121
121 -
 122
122 -
 123
123 -
 124
124 -
 125
125 -
 126
126 -
 127
127 -
128
-
129
-
130
-
131
-
132
-
133
-
134
-
135
-
136
 |
 |
